
Appearance
HEA47 User Manual

Alinx Electronic Limited
Company Website: www.en.alinx.com
Service Hotline: +86 21 67676997
Technical Support : technical@alinx.com
Document Information
| Item | Content |
| Document Name | User Manual |
| Product Model | HEA47 |
| Document Version | V1.0 |
| Prepared by | Alinx Electronic Limited |
| Release Date | 2026.10.20 |
Document Revision History
| Version | Date | Section | Revision Summary |
| V1.0 | 2026.10.20 | All | Initial Release |
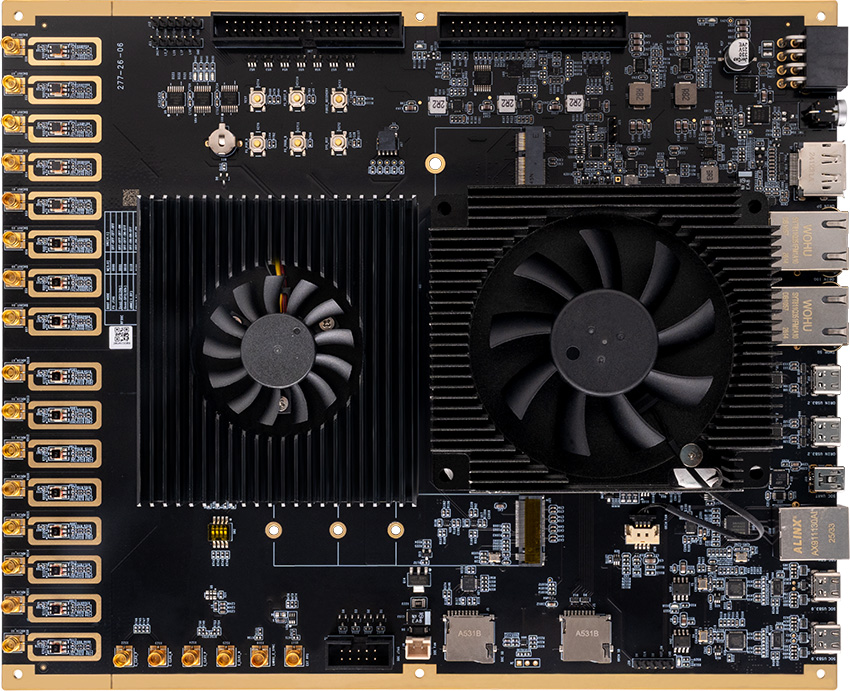
Alinx Electronic Limited has officially released the 2026 development platform (model: HEA47), which is based on the XILINX RFSOC and integrates the NVIDIA Jetson AGX/THOR module. This user manual has been prepared to help you quickly get familiar with this development platform.
The development board consists of a Zynq UltraScale+ RFSOC SoM, an NVIDIA Jetson AGX/THOR module, and a carrier board. The RFSOC SoM and the NVIDIA Jetson AGX/THOR module are interconnected via PCIe Gen3 x8 signals.
The RFSOC SoM adopts the Xilinx Zynq UltraScale+ RFSOC series ZU47DR FPGA as the main chip. It supports 8-channel 14-bit RF-ADC with a maximum sampling rate of up to 5 GSPS, and 8-channel 14-bit RF-DAC with a maximum sampling rate of up to 9.85 GSPS. This architecture reduces the complexity of the RF signal processing chain, maximizes input/output channel density without sacrificing bandwidth, leverages heterogeneous processing capability, and delivers lower power consumption (by eliminating external ADC/DAC components and the associated FPGA-to-analog interface power). The Zynq UltraScale+ device integrates an ARM Cortex-A53 processing subsystem, UltraScale+ programmable logic, and the highest signal processing bandwidth, providing a complete RF signal chain to meet the requirements of wireless, cable access, test and measurement, radar, and other high-performance RF applications.
The NVIDIA Jetson AGX/THOR series modules are high-performance, low-power embedded AI computing platforms designed for autonomous machines, robotics, and edge AI applications. They integrate a GPU, CPU, high-speed memory, and a rich set of peripheral interfaces into a compact module, enabling complex AI and vision algorithms to run directly on the device in real time.
In the design of the development board, a rich set of peripheral interfaces has been expanded for the user: on the RFSOC side, there are 8-channel high-speed AD inputs and 8-channel high-speed DA outputs, 2 USB3.0 Type-C ports, 1 Gigabit Ethernet port, 1 PS_UART port, and 1 SD card slot; on the NVIDIA AGX side, there is 1 10GbE Ethernet port, 2 USB3.2 Type-C ports, 1 M.2 SSD slot, 1 M.2 WIFI/BT slot, and 1 TF card slot.
The RFSOC and the NVIDIA AGX/THOR are interconnected through 8 sets of high-speed GT links with a throughput of 80 Gbps, enhancing the data interaction and processing capability of the RFSOC.
Chapter 1: Introduction to the Development Board
This chapter provides a brief functional introduction to the HEA47 development platform.
The development board mainly consists of the RFSOC ZU47DR system and the NVIDIA ORIN AGX/THOR module. Data transmission and communication between the RFSOC and the ORIN AGX/THOR module are carried out via PCIe 3.0 x8. The following figure shows the structural diagram of the entire development system:
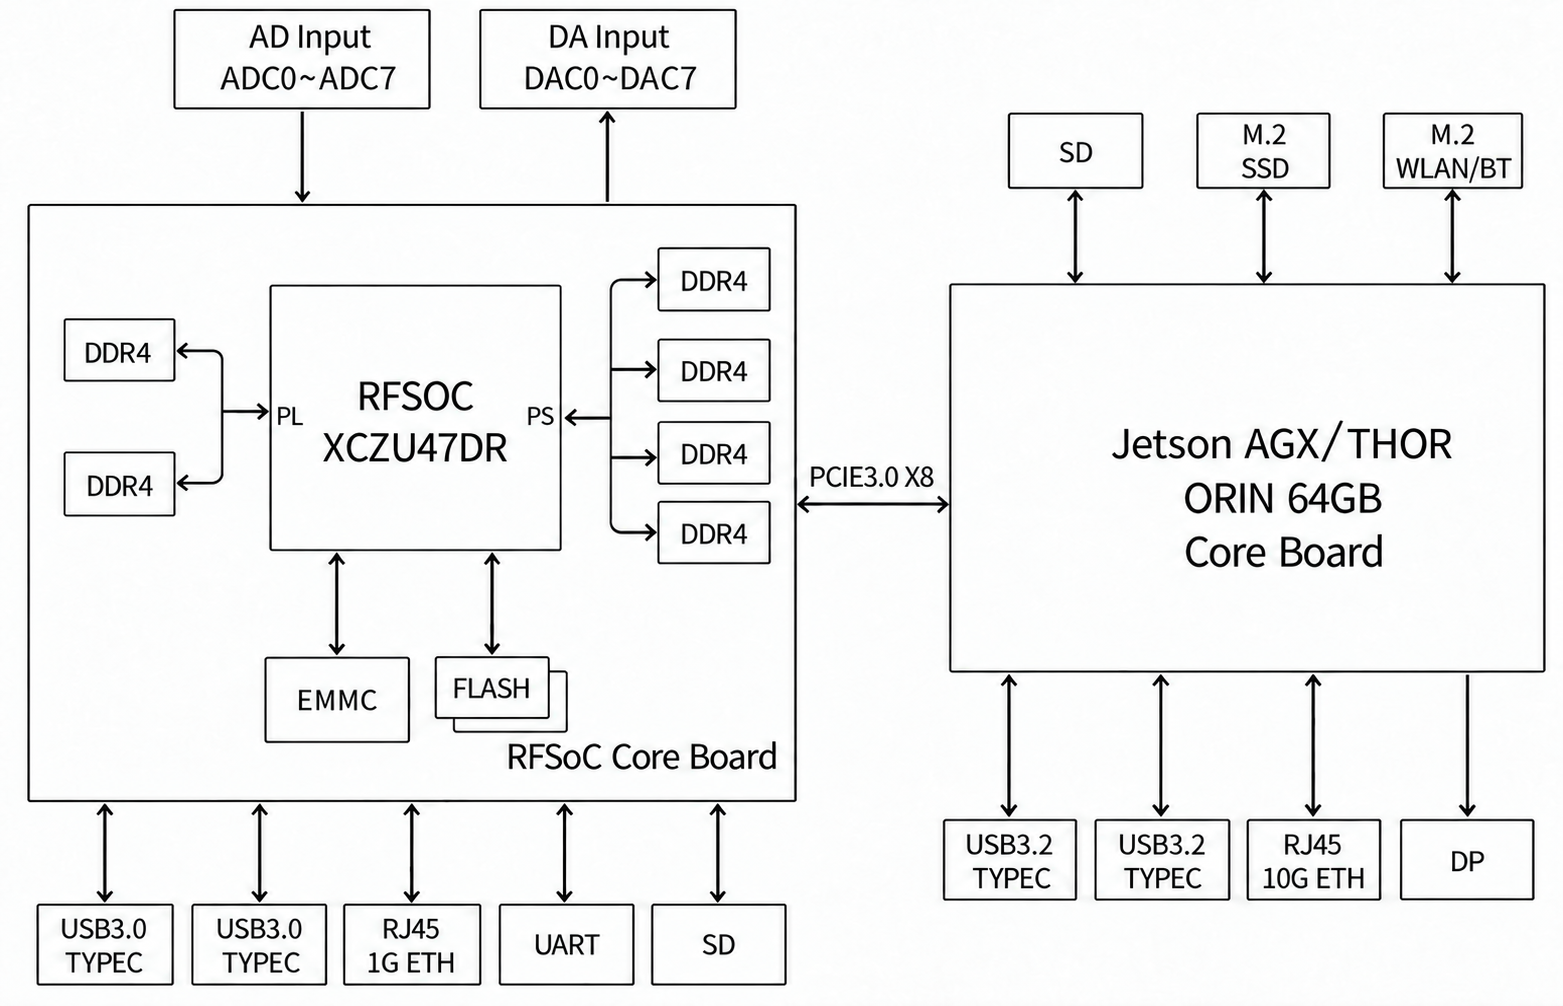
From this diagram, the interfaces and functions available on this development platform can be observed.
RFSOC SoM: Consists of ZU47DR + 4GB DDR4 (PS) + 2GB DDR4 (PL) + 256MB QSPI Flash + 32 GB eMMC. The SoM also provides dual oscillator clock sources: a single-ended 33.3333 MHz active oscillator for the PS system, and a 32.768 kHz crystal driving the internal RTC circuit of the RFSOC.
NVIDIA ORIN AGX/THOR Module: The NVIDIA Jetson AGX/THOR series modules are high-performance embedded AI and edge-computing System-on-Modules (SoM). They integrate a GPU, CPU, memory, storage controller, and high-speed I/O on a compact PCB, with peripherals expanded through a carrier board. The AGX module supports up to 275 TOPS of compute, while the THOR module supports up to 2070 TOPS. It uses a 100mm x 87mm x 16mm module package and connects to the carrier board via a 699-pin board-to-board connector.
RFSOC Peripheral Interfaces
RF-ADC: 8-channel 14-bit RF-ADC, maximum sampling rate up to 5 GSPS.
RF-DAC: 8-channel 14-bit RF-DAC, maximum sampling rate up to 9.85 GSPS.
USB3.0 Interface: 2 USB3.0 Type-C ports, supporting both HOST and SLAVE modes.
Gigabit Ethernet Interface: 1 10M/100M/1000M Ethernet RJ45 port, used for Ethernet data exchange with a computer or other network devices.
Micro SD Card Slot: 1 Micro SD card slot, used for storing the operating system image and file system.
UART Interface: 1 UART debug interface in the form of a Mini USB port, used for debugging the FPGA program.
JTAG Interface: 1 standard 10-pin 2.54mm JTAG port, through which the user can debug and download the RFSOC system using a XILINX download cable.
LED: 4 user LED indicators expanded on the RFSOC side.
Buttons: 4 buttons expanded on the RFSOC side, namely PS_POR_B, PS_SRST_B, PS_PROG_B, and one user button TEST.
ORIN AGX/THOR Peripheral Interfaces
USB3.2 Interface: 2 USB3.2 Type-C ports, supporting HOST, OTG, and SLAVE modes.
10GbE Ethernet Interface (AGX module only): 1 10G Ethernet RJ45 port, used for Ethernet data exchange between the ORIN AGX and a computer or other network devices.
5G Ethernet Interface (THOR module only): 1 5G Ethernet RJ45 port, used for Ethernet data exchange between the ORIN THOR module and a computer or other network devices.
DP Output Interface: 1 standard DisplayPort output interface for video display, supporting up to 4K@30Hz or 1080P@60Hz output.
M.2 SSD Interface: 1 M.2 KEY-M slot for connecting an NVMe SSD solid-state drive, with a single-lane communication speed of up to 5 Gbps.
M.2 WIFI/BT Interface: 1 M.2 KEY-E slot for connecting a WIFI/BT module, with a single-lane communication speed of up to 5 Gbps.
UART Interface: 1 UART signal brought out through a 2.54mm 3-pin connector, used for debugging the ORIN AGX program.
Buttons: 2 buttons expanded on the ORIN AGX side, namely the system reset button SYS_RESET and the recovery button FORCE_RECOVERY.
LED: 1 user LED indicator expanded on the ORIN AGX/THOR side.
Module PCIe Communication: The RFSOC connects to the Jetson Orin AGX/THOR module via PCIe x8 to achieve PCIe data communication. It supports the PCI Express 3.0 standard, with a per-lane communication rate of up to 8 Gbps.
Chapter 2: RFSOC System
2.1 RFSOC SoM
The 47DR SoC introduces the AMD RFSoC in a highly versatile design, making it suitable for a wide range of applications. The SoM draws 12V power from the carrier board through board-to-board connectors. The 47DR SoM uses 6 Micron DDR4 chips (MT40A512M16LY-062E IT:E), of which 4 are mounted on the PS side forming a 64-bit data bus, and 2 are mounted on the PL side forming a 32-bit data bus. Each DDR4 chip has a capacity of 1 GB. The DDR4 SDRAM supports data rates up to 3200 MT/s. The SoM also features 32 GB eMMC. In addition, two 1 Gbit NOR Flash chips are integrated on the module for boot configuration storage and system files.
To connect to the carrier board, the module uses three 240-pin board-to-board connectors, expanding 2 HD banks, 2 PS MIO banks, 8x PL GTY transceivers (up to 28.21 Gb/s), 4x PS GTR transceivers (up to 6 Gb/s), 13 I/Os (HP bank), 8 high-speed RF ADCs, 8 high-speed DACs, and JTAG.
The appearance of the 47DR SoM is shown in Figures 2.1.1
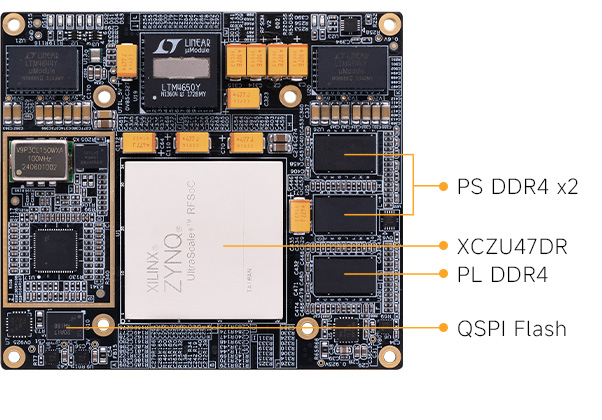
Figure 2.1.1 - 47DR SoM Top View
2.1.1 Hardware Introduction
The hardware block diagram of the 47DR SoM is shown in Figure 2.1.3:
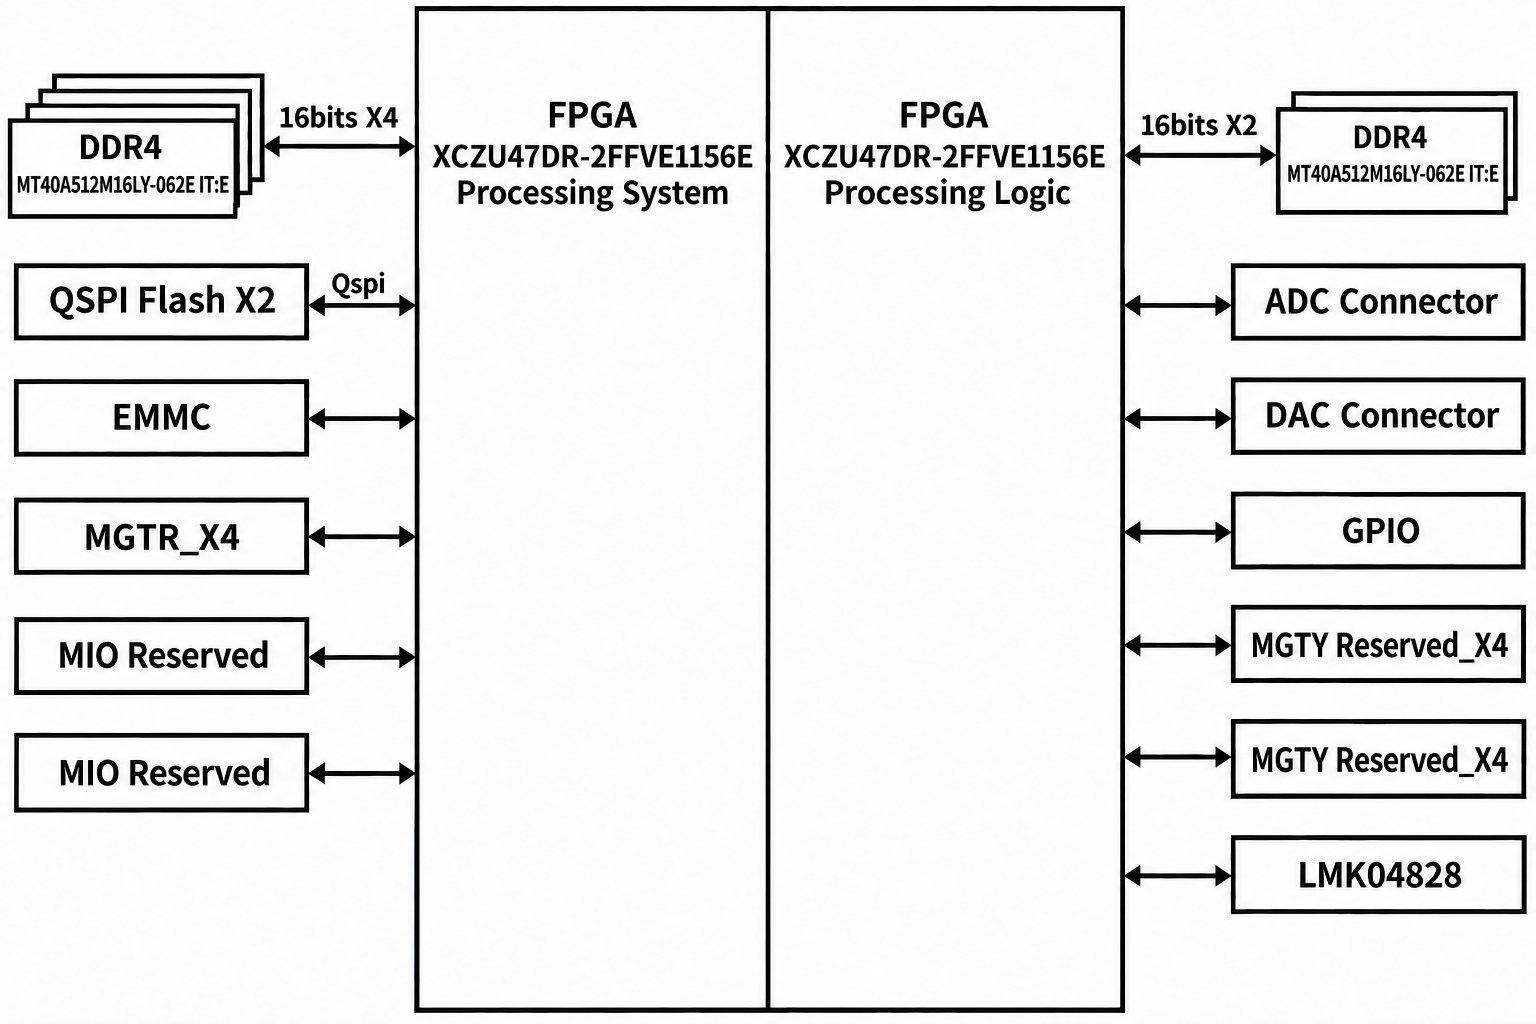
Figure 2.1.3 - 47DR SoM Hardware Block Diagram
The main chip of the SoM is the XCZU47DR. The key parameters of the board are shown in Table 2.1.1.
| Main Chip | - XCZU47DR |
| Dimensions | - 90mm * 80.5mm |
| Extended Memory | - PS DDR4 64-bit- PL DDR4 32-bit |
| Storage | - Nor Flash 1Gbit *2 |
| eMMC | - PS eMMC 32 GB |
| Indicators | - INIT_B, DONE: 2 working status LEDs- PS_ERR_OUT, PS_ERR_STATUS: 2 working status LEDs |
| Board Power Supply | 12V supplied by the carrier board (via connector J4) |
| Power Consumption | 60W (actual value depends on usage) |
| Operating Temperature | -40°C to 110°C during operation |
Table 2.1.1 - Key Parameters of the 47DR SoM
2.1.2 RFSOC
The SoM uses the Xilinx Zynq UltraScale+ RFSoCs GEN3 series chip, model XCZU47DR-2FFVE1156E. The ZU47DR supports 8-channel 14-bit RF-ADC with a maximum sampling rate of up to 5 GSPS, and 8-channel 14-bit RF-DAC with a maximum sampling rate of up to 9.85 GSPS. The PS system integrates 4 ARM Cortex™-A53 processors running at up to 1.3 GHz. In addition, the ZU47DR includes 2 Cortex-R5 processors running at up to 533 MHz.
The ZU47DR supports 32-bit or 64-bit DDR4, LPDDR4, DDR3, DDR3L, and LPDDR3 memory devices. The PS side provides a rich set of high-speed interfaces such as PCIe Gen2, USB3.0, SATA 3.1, and DisplayPort, as well as USB2.0, Gigabit Ethernet, SD/SDIO, I2C, CAN, UART, and GPIO. The PL side contains abundant programmable logic cells, DSP slices, and internal RAM. The overall block diagram of the ZU47DR is shown in Figure 2.1.4.
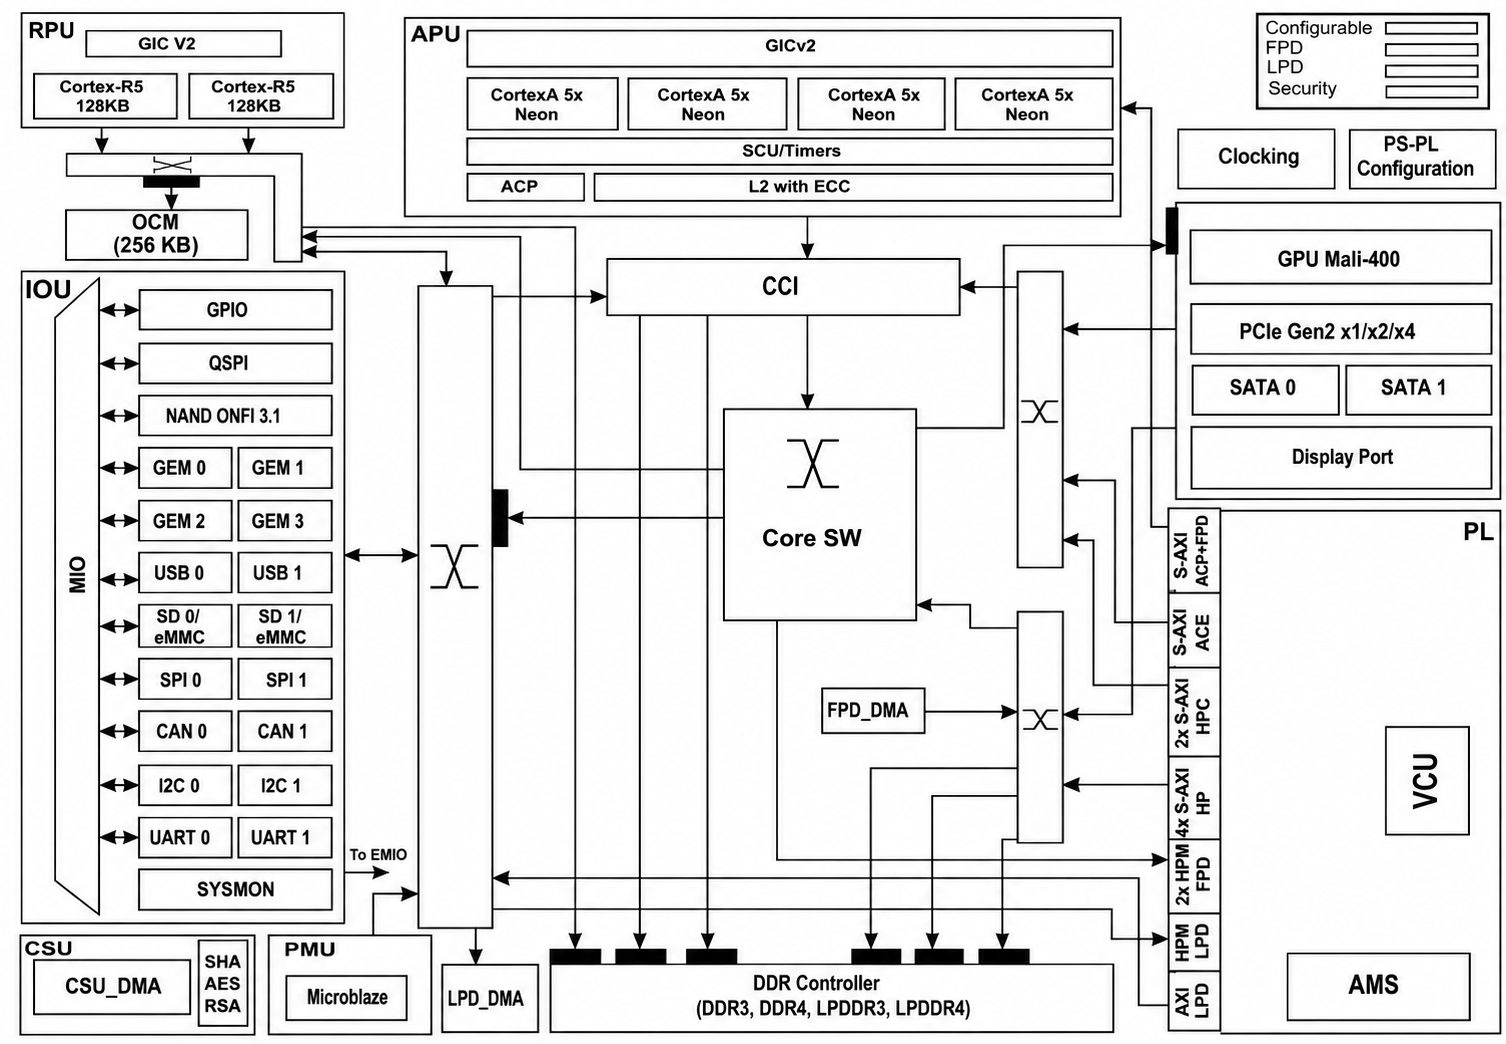
Figure 2.1.4 - Overall Block Diagram of the RFSOC ZU47DR Chip
The main parameters of the PS system are as follows:
Quad-core ARM Cortex™-A53 processors up to 1.3 GHz; dual-core ARM Cortex-R5 processors up to 533 MHz.
Mali-400 GPU up to 677 MHz, with 64 KB L2 cache.
External memory interface supporting 32/64-bit DDR4/DDR3/DDR3L, LPDDR4/LPDDR3.
Static memory interface supporting NAND and 2x Quad-SPI Flash.
High-speed connectivity: PCIe Gen2 x4, 2x USB3.0, SATA 3.1, DisplayPort, and 4x tri-mode Gigabit Ethernet.
Standard connectivity: 2x USB2.0, 2x SD/SDIO, 2x UART, 2x CAN 2.0B, 2x I2C, 2x SPI, and 4x 32-bit GPIO.
Power management: supports power partitioning for FPD/LPD/PL/Security domains.
Encryption: supports RSA, AES, and SHA.
System monitoring: 10-bit, 1 MSPS SYSMON for temperature and voltage detection.
The main parameters of the PL logic are as follows:
RF-ADC: 8-channel 12-bit RF-ADC, maximum sampling rate up to 5 GSPS.
RF-DAC: 8-channel 14-bit RF-DAC, maximum sampling rate up to 9.85 GSPS.
System Logic Cells: 930K.
CLB LUTs: 425K.
Block RAM: 38Mb.
DSP Slices: 4272.
GTY 32.75 Gb/s transceivers: 16.
PCIe Gen3 controllers: 2.
Hardware video codec VCU supporting H.264 and H.265 encoding/decoding.
2.1.3 DDR4 Memory
As shown in the 47DR SoM hardware block diagram, the main chip XCZU47DR is configured with 2 groups of DDR4 extended memory: 4 DDR4 chips on the PS side forming a 64-bit data bus, and 2 DDR4 chips on the PL side forming a 32-bit data bus. All six are Micron MT40A512M16LY-062E IT:E chips. A 300 MHz differential oscillator is used as the reference clock. The detailed DDR4 configuration for the PS and PL sides is shown in the following table:
| Location | Designator | Chip Model | Capacity | Manufacturer |
| PS | U24、U25、U26、U27 | MT40A512M16LY-062E IT:E | 512x16bit | Micron |
| PL | U28、U29 | MT40A512M16LY-062E IT:E | 512x16bit | Micron |
Table 2.1.2 - DDR4 Configuration
The hardware connection of the DDR4 on the PS side is shown in the following figure:
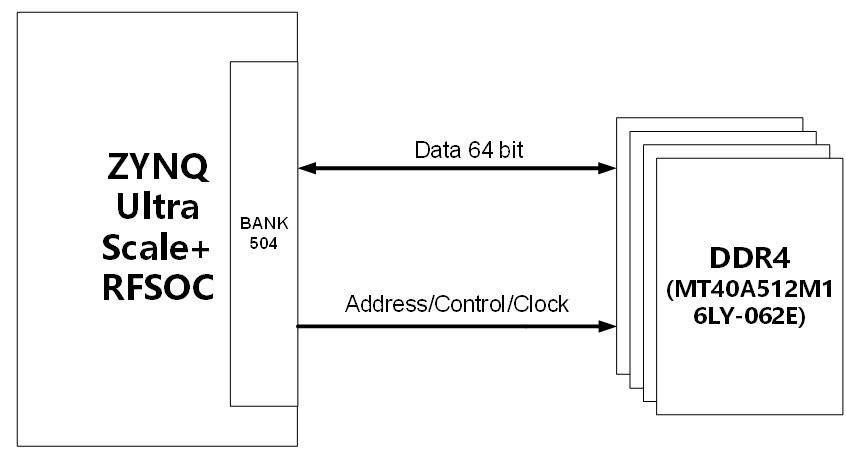
Figure 2.1.5 - DDR4 Connection on the PS Side
The hardware connection of the DDR4 on the PL side is as follows:
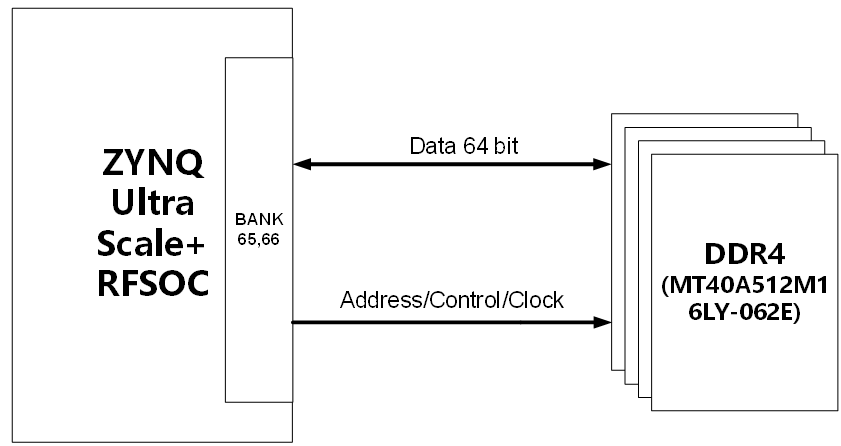
Figure 2.1.6 - DDR4 Connection on the PL Side
Note:
Although the memory devices support data rates up to 3200 MT/s, the FPGA chip only supports up to 2400 Mb/s. Please refer to the chip datasheet for details.
The parameters shown here represent the maximum performance configuration between the memory and the main chip (which also means the highest power consumption). Users may adjust the configuration according to their application to balance power consumption and performance.
2.1.4 QSPI FLASH
The board is configured with two MT25QU01GBBB8E12-0SIT serial NOR Flash chips on the PS side, which can be used to store executable code and data, such as the boot program, operating system, and bitstream. The two QSPI chips are connected in parallel.
To achieve higher performance, the two Quad-SPI devices are connected in parallel, providing a combined 8-bit data bus for boot and configuration. The XCZU47DR is connected to two QSPI NOR Flash chips as shown below:
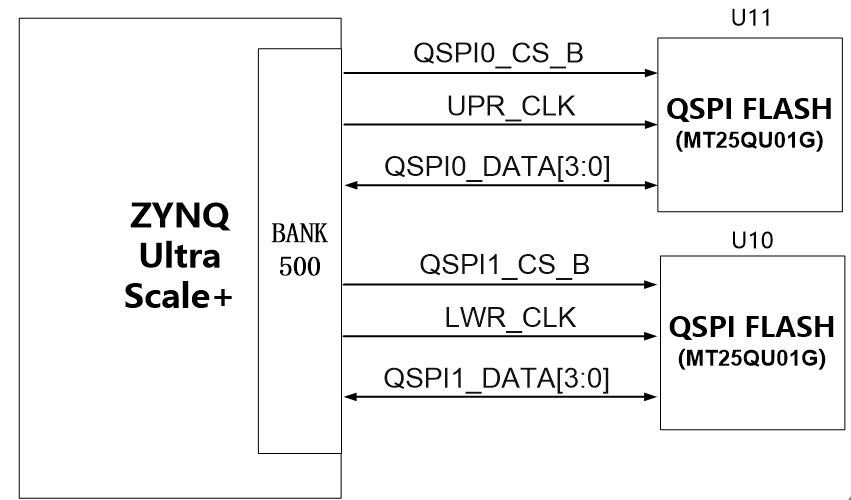
Figure 2.1.7 - Interconnection Between Two QSPI NOR Flash Chips and the XCZU47DR
The pin definitions for the interconnection between the two QSPI NOR Flash chips are as follows:
| FPGA Pin Number | FPGA Pin Name | Signal Name | QSPI Pin Number | QSPI Pin Name |
| U1.MIO12_B15 | PS_MIO12_B15 | MIO12_QSPI_UPR_CLK | U11.B2 | C |
| U1.MIO10_C15 | PS_MIO10_C15 | MIO10_QSPI_UPR_DQ2 | U11.C4 | DQ2_W_B |
| U1.MIO9_F15 | PS_MIO9_F15 | MIO9_QSPI_UPR_DQ1 | U11.D2 | DQ1 |
| U1.MIO8_E15 | PS_MIO8_E15 | MIO8_QSPI_UPR_DQ0 | U11.D3 | DQ0 |
| U1. MIO11_G16 | PS_MIO11_G16 | MIO11_QSPI_UPR_DQ3 | U11.D4 | DQ3_RST_HLD_B |
| U1.MIO7_K17 | PS_MIO7_K17 | MIO7_QSPI_UPR_CS_B | U11.C2 | S_B |
| U1.MIO5_H18 | PS_MIO5_H18 | MIO5_QSPI_LWR_CS_B | U10.C2 | S_B |
| U1.MIO4_G15 | PS_MIO4_G15 | MIO4_QSPI_LWR_DQ0 | U10.D3 | DQ0 |
| U1.MIO3_K16 | PS_MIO3_K16 | MIO3_QSPI_LWR_DQ3 | U10.D4 | DQ3_RST_HLD_B |
| U1.MIO2_J16 | PS_MIO2_J16 | MIO2_QSPI_LWR_DQ2 | U10.C4 | DQ2_W_B |
| U1.MIO1_J18 | PS_MIO1_J18 | MIO1_QSPI_LWR_DQ1 | U10.D2 | DQ1 |
| U1.MIO0_J17 | PS_MIO0_J17 | MIO0_QSPI_LWR_CLK | U10.B2 | C |
Table 2.1.3 - Pin Definitions for the 2 QSPI NOR Flash Interconnection
2.1.5 eMMC
The SoM provides eMMC storage, connected to the PS side of the main chip for direct data exchange. The overall eMMC connection diagram is shown in the following figure:
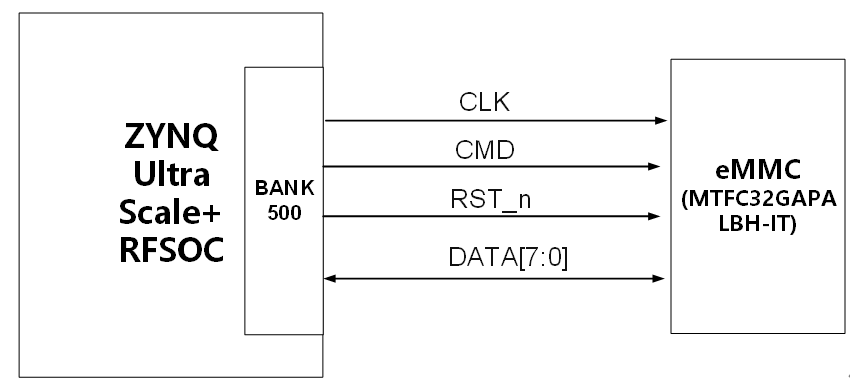
Figure 2.1.8 - Overall eMMC Connection Diagram
eMMC pin assignment table:
| Signal Name | Pin Name | Pin Number |
| eMMC_DS | PS_MIO25_B17 | B17 |
| MIO23_eMMC_RST | PS_MIO23_D17 | D17 |
| MIO22_eMMC_CLK | PS_MIO22_E17 | E17 |
| MIO21_eMMC_CMD | PS_MIO21_F17 | F17 |
| MIO20_eMMC_DAT7 | PS_MIO20_B16 | B16 |
| MIO20_eMMC_DAT6 | PS_MIO19_C16 | C16 |
| MIO18_eMMC_DAT5 | PS_MIO18_F18 | F18 |
| MIO17_eMMC_DAT4 | PS_MIO17_E16 | E16 |
| MIO16_eMMC_DAT3 | PS_MIO16_G17 | G17 |
| MIO15_eMMC_DAT2 | PS_MIO15_D16 | D16 |
| MIO14_eMMC_DAT1 | PS_MIO14_A15 | A15 |
| MIO13_eMMC_DAT0 | PS_MIO13_G18 | G18 |
Table 2.1.4 - eMMC Pin Assignment
2.1.6 EEPROM
The SoM is equipped with an on-board EEPROM, model M24C08-RDW6TP, with a capacity of 8 Kbit, connected to the PL side via the I2C bus for communication.
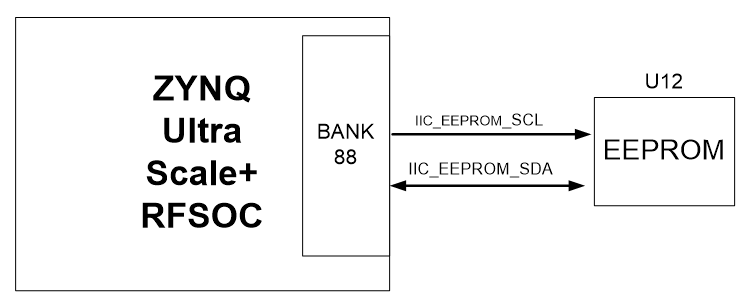
Figure 2.1.9 - EEPROM Hardware Schematic
EEPROM pin assignment table:
| Signal Name | Pin Name | Pin Number | Remarks |
| IIC_EEPROM_SCL | IO_L12N_AD8N_88_A12 | A12 | I2C data signal |
| IIC_EEPROM_SDA | IO_L12P_AD8P_88_B12 | B12 | I2C clock signal |
Table 2.1.5 - EEPROM Pin Definitions
2.1.7 SoM Indicators
The main chip XCZU47DR (designator U1) has 8 status indicators. The locations of the FPGA status LEDs are shown in the following figure:
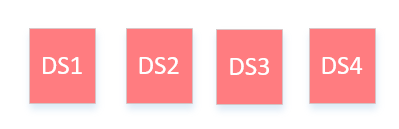
Figure 2.1.10 - Location of the XCZU47DR Status Indicators
The function of each LED is described in the following table:
| LED No. | Indication | LED Color | Function |
| DS1 | PS_INIT_B | Red | FPGA initialization error |
| DS2 | PS_DONE | Red | FPGA download error |
| DS3 | PS_ERR_OUT | Red | PS_ERR_OUT indicator |
| DS4 | PS_ERR_STATUS | Red | PS_ERR_STATUS indicator |
Table 2.1.6 - Functions of the XCZU47DR Status Indicators
Board input power indicator:
The board input power is 12V, supplied by the carrier board and brought into the SoM through connector J4. When the input power is normal, the power indicator DS6 (bright green) lights up.
2.1.8 Clock Configuration
The SoM provides dual oscillator clocks. The system clock defaults to a 33.3333 MHz active oscillator. A 32.768 kHz crystal drives the internal RTC circuit of the SoM. In addition, an LMK04828 clock chip is used to distribute the clocks required by each module. The main oscillator is a 100 MHz crystal, and CLK0 and CLK1 provided by the carrier board can also be selected. The design supports GTY recovered clock, external reference clock input, and SYSREF input, enabling multiple modules to be paralleled to form larger-scale coherent RF channels.
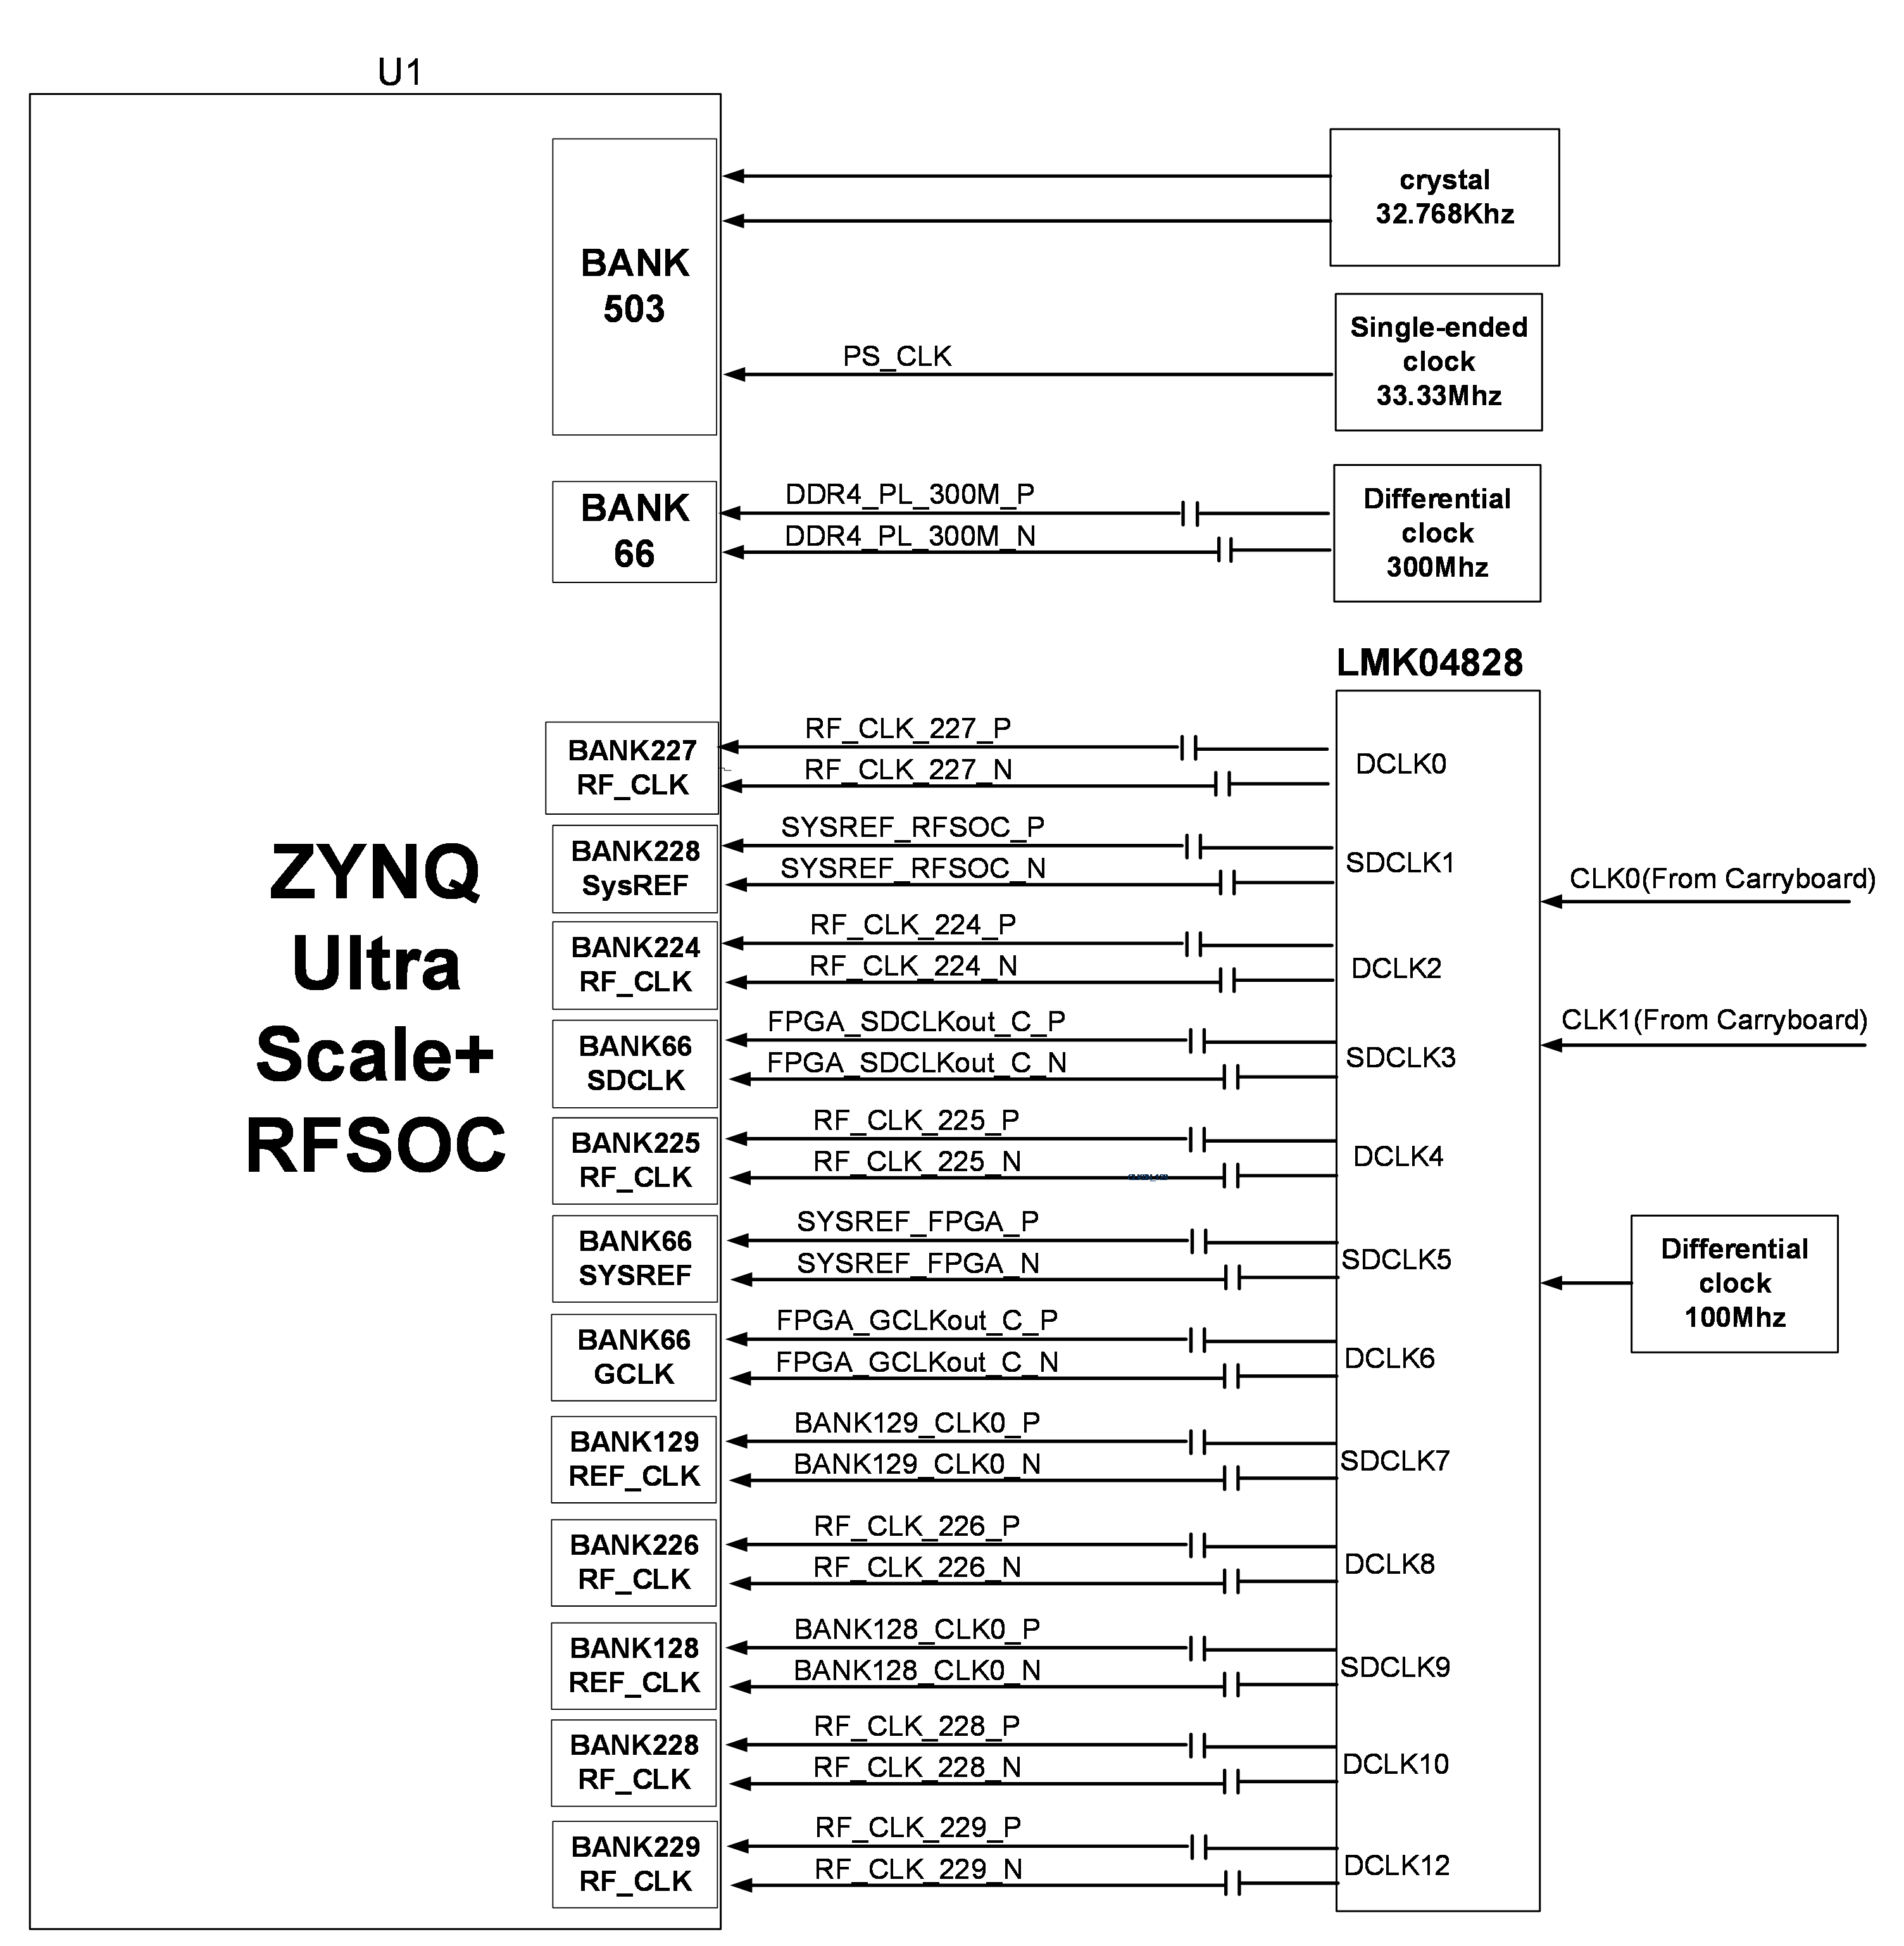
Figure 2.1.11 - Board Clock Topology Diagram
2.1.9 Power Supply
The SoM is powered by a DC 12V supply from the carrier board through the connector. The typical power consumption of the SoM is 60W. The 12V system power is converted to various voltages by step-down regulators to drive the FPGA and other circuits on the board. The ADC and DAC supplies are provided by low-dropout linear regulators (LDOs) with good power supply rejection ratio (PSRR).
The I/O bank interface levels of the SoM are as follows:
| BANK | Voltage Level | Remarks |
| BANK65 | 1.2V | Not defined; remaining I/Os are routed to the connector |
| BANK88 | 3.3V | HD_BANK supports 1.2 to 3.3V (HD I/O only) at ±5% |
| BANK89 | 1.8V or 3.3V | SoM defaults to 1.8V; this bank level can be adjusted via ferrite beads |
| BANK128 | MGTY(1.2V) | PCIe Gen4 signals |
| BANK129 | MGTY(1.2V) | PCIe Gen4 signals |
| BANK501 | 1.8V or 3.3V | SoM defaults to 1.8V; this bank level can be adjusted via ferrite beads |
| BANK502 | 1.8V or 3.3V | SoM defaults to 1.8V; this bank level can be adjusted via ferrite beads |
| BANK503 | Fixed at 1.8V | Configuration pin output, mode select, system reset signal |
| BANK505 | PS_MGTR | Not defined; all high-speed signal pins and clock signals are routed to the connector |
Table 2.1.7 - I/O Bank Voltage Levels
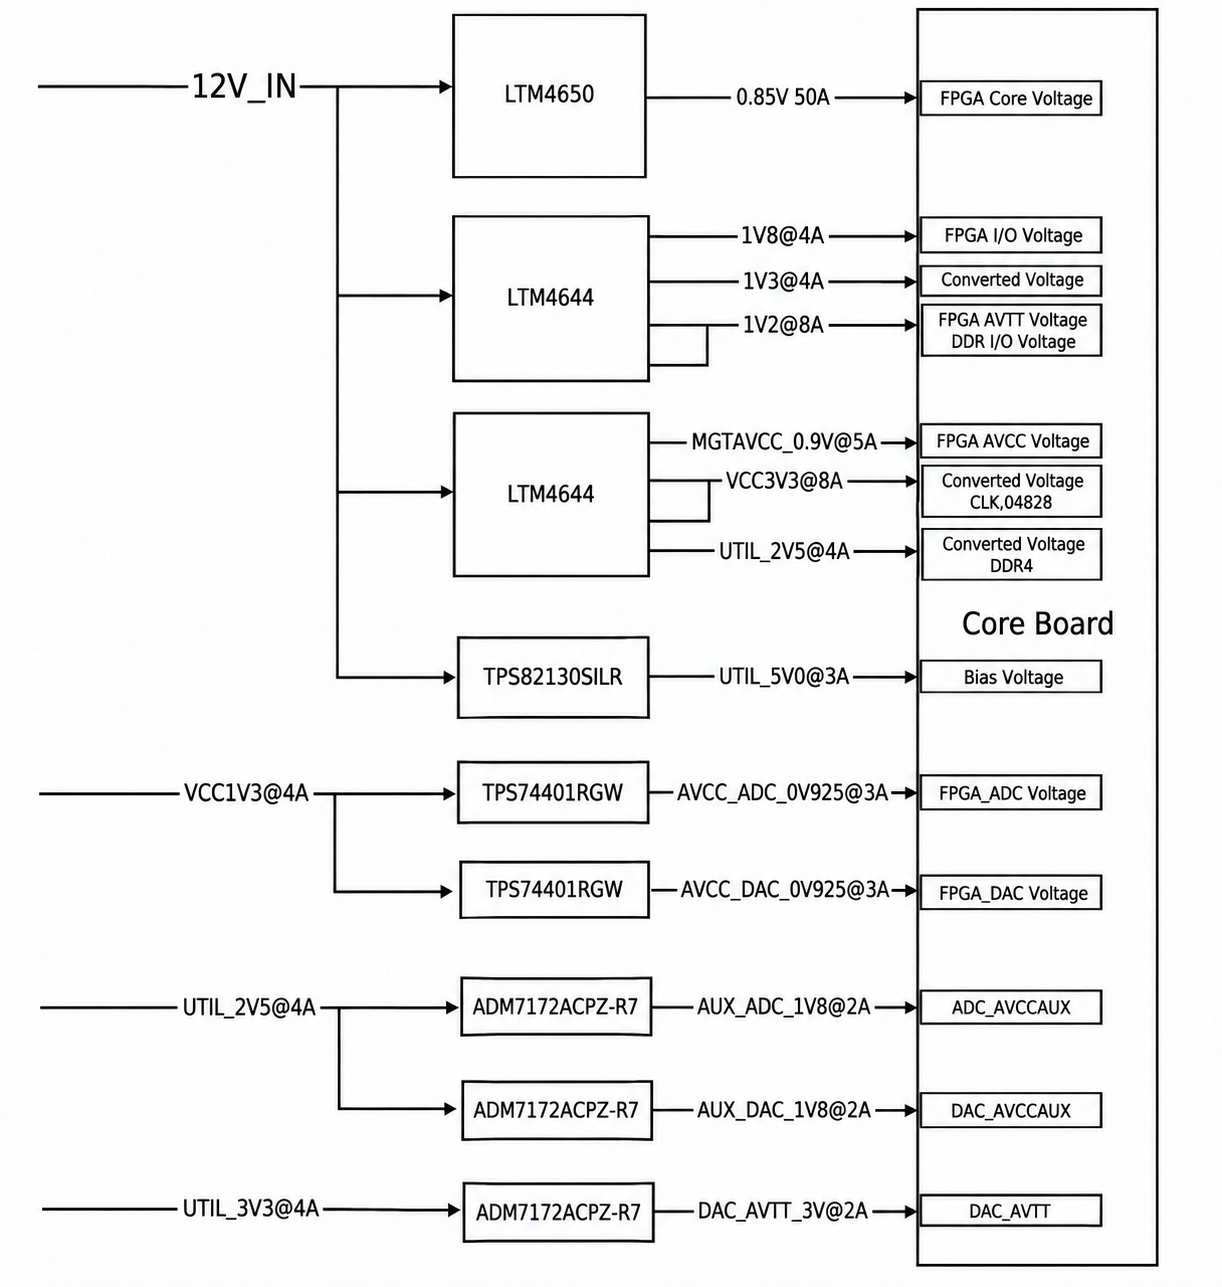
Figure 2.1.12 - Board Power Supply Tree
2.1.10 Structure Diagram
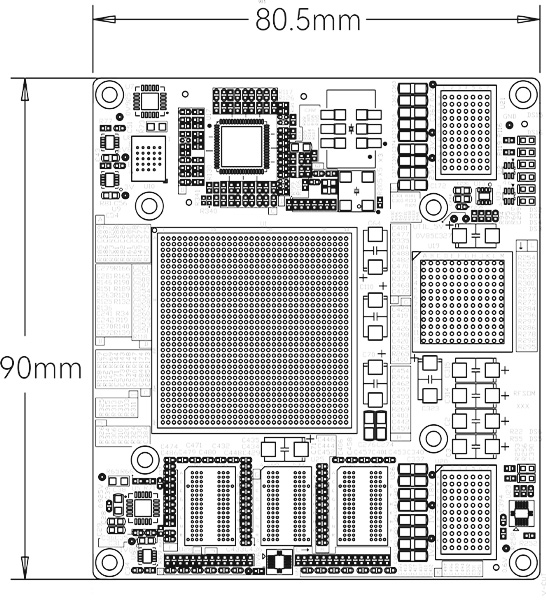
Figure 2.1.13 - SoM Top-side Structure Diagram
2.1.11 User Expansion Interface Definitions
The SoM provides 3 high-speed expansion ports, using 240-pin board-to-board connectors (J1, J3, J4) to connect to the carrier board. The connectors are Samtec ADM6-60-01.5-L-4-2-TR. The signal definitions for connector J1 are as follows:
| Pin No. | Signal Net | Pin No. | Signal Net | Pin No. | Signal Net | Pin No. | Signal Net |
| A01 | GND | B01 | GND | C01 | GND | D01 | GND |
| A02 | GND | B02 | GND | C02 | GND | D02 | GND |
| A03 | GND | B03 | GND | C03 | GND | D03 | GND |
| A04 | GND | B04 | GND | C04 | GND | D04 | GND |
| A05 | GND | B05 | GND | C05 | GND | D05 | GND |
| A06 | VCM01_224 | B06 | VCM01_225 | C06 | VCM01_226 | D06 | VCM01_227 |
| A07 | GND | B07 | GND | C07 | GND | D07 | GND |
| A08 | GND | B08 | GND | C08 | GND | D08 | GND |
| A09 | GND | B09 | GND | C09 | GND | D09 | GND |
| A10 | GND | B10 | GND | C10 | GND | D10 | GND |
| A11 | VCM23_224 | B11 | VCM23_225 | C11 | VCM23_226 | D11 | VCM23_227 |
| A12 | GND | B12 | GND | C12 | GND | D12 | GND |
| A13 | GND | B13 | GND | C13 | GND | D13 | GND |
| A14 | GND | B14 | GND | C14 | GND | D14 | GND |
| A15 | GND | B15 | GND | C15 | GND | D15 | GND |
| A16 | RFMC_ADC_01_N | B16 | RFMC_ADC_01_P | C16 | RFMC_ADC_00_N | D16 | RFMC_ADC_00_P |
| A17 | GND | B17 | GND | C17 | GND | D17 | GND |
| A18 | GND | B18 | GND | C18 | GND | D18 | GND |
| A19 | GND | B19 | GND | C19 | GND | D19 | GND |
| A20 | GND | B20 | GND | C20 | GND | D20 | GND |
| A21 | RFMC_ADC_03_N | B21 | RFMC_ADC_03_P | C21 | RFMC_ADC_02_N | D21 | RFMC_ADC_02_P |
| A22 | GND | B22 | GND | C22 | GND | D22 | GND |
| A23 | GND | B23 | GND | C23 | GND | D23 | GND |
| A24 | GND | B24 | GND | C24 | GND | D24 | GND |
| A25 | GND | B25 | GND | C25 | GND | D25 | GND |
| A26 | RFMC_ADC_05_N | B26 | RFMC_ADC_05_P | C26 | RFMC_ADC_04_N | D26 | RFMC_ADC_04_P |
| A27 | GND | B27 | GND | C27 | GND | D27 | GND |
| A28 | GND | B28 | GND | C28 | GND | D28 | GND |
| A29 | GND | B29 | GND | C29 | GND | D29 | GND |
| A30 | GND | B30 | GND | C30 | GND | D30 | GND |
| A31 | RFMC_ADC_05_N | B31 | RFMC_ADC_05_P | C31 | RFMC_ADC_06_N | D31 | RFMC_ADC_06_P |
| A32 | GND | B32 | GND | C32 | GND | D32 | GND |
| A33 | GND | B33 | GND | C33 | GND | D33 | GND |
| A34 | GND | B34 | GND | C34 | GND | D34 | GND |
| A35 | GND | B35 | GND | C35 | GND | D35 | GND |
| A36 | RFMC_DAC_04_N | B36 | RFMC_DAC_04_P | C36 | RFMC_DAC_00_N | D36 | RFMC_DAC_00_P |
| A37 | GND | B37 | GND | C37 | GND | D37 | GND |
| A38 | GND | B38 | GND | C38 | GND | D38 | GND |
| A39 | GND | B39 | GND | C39 | GND | D39 | GND |
| A40 | GND | B40 | GND | C40 | GND | D40 | GND |
| A41 | RFMC_DAC_05_N | B41 | RFMC_DAC_05_P | C41 | RFMC_DAC_01_N | D41 | RFMC_DAC_01_P |
| A42 | GND | B42 | GND | C42 | GND | D42 | GND |
| A43 | GND | B43 | GND | C43 | GND | D43 | GND |
| A44 | GND | B44 | GND | C44 | GND | D44 | GND |
| A45 | GND | B45 | GND | C45 | GND | D45 | GND |
| A46 | RFMC_DAC_06_N | B46 | RFMC_DAC_06_P | C46 | RFMC_DAC_02_N | D46 | RFMC_DAC_02_P |
| A47 | GND | B47 | GND | C47 | GND | D47 | GND |
| A48 | GND | B48 | GND | C48 | GND | D48 | GND |
| A49 | GND | B49 | GND | C49 | GND | D49 | GND |
| A50 | GND | B50 | GND | C50 | GND | D50 | GND |
| A51 | RFMC_DAC_07_N | B51 | RFMC_DAC_07_P | C51 | RFMC_DAC_03_N | D51 | RFMC_DAC_03_P |
| A52 | GND | B52 | GND | C52 | GND | D52 | GND |
| A53 | GND | B53 | GND | C53 | GND | D53 | GND |
| A54 | GND | B54 | GND | C54 | GND | D54 | GND |
| A55 | GND | B55 | GND | C55 | GND | D55 | GND |
| A56 | GND | B56 | GND | C56 | GND | D56 | GND |
| A57 | GND | B57 | GND | C57 | GND | D57 | GND |
| A58 | GND | B58 | GND | C58 | GND | D58 | GND |
| A59 | GND | B59 | GND | C59 | GND | D59 | GND |
| A60 | GND | B60 | GND | C60 | GND | D60 | GND |
Table 2.1.8 - Signal Interconnection Between Expansion Connector J1 and the Main Chip
Connector J3 definitions:
| Pin No. | Signal Net | Pin No. | Signal Net | Pin No. | Signal Net | Pin No. | Signal Net |
| A01 | GND | B01 | GND | C01 | GND | D01 | GND |
| A02 | GND | B02 | GND | C02 | GND | D02 | GND |
| A03 | GND | B03 | GND | C03 | GND | D03 | GND |
| A04 | GND | B04 | GND | C04 | GND | D04 | GND |
| A05 | CLKIN0_P | B05 | CLKIN0_N | C05 | CLKIN1_P | D05 | CLKIN1_N |
| A06 | GND | B06 | GND | C06 | GND | D06 | GND |
| A07 | GND | B07 | GND | C07 | GND | D07 | GND |
| A08 | GND | B08 | GND | C08 | IO_L2P_T0L_N2_66_AP6_1V2 | D08 | IO_L2N_T0L_N3_66_AP5_1V2 |
| A09 | GND | B09 | IO_T3U_N12_66_AH12_1V2 | C09 | GND | D09 | GND |
| A10 | GND | B10 | GND | C10 | IO_L3P_T0L_N4_AD15P_66_AM6_1V2 | D10 | IO_L3N_T0L_N5_AD15N_66_AM5_1V2 |
| A11 | VCC_PSBATT_C | B11 | PS_DONE | C11 | GND | D11 | GND |
| A12 | GND | B12 | GND | C12 | GND | D12 | PS_ERR_OUT |
| A13 | GND | B13 | GND | C13 | GND | D13 | GND |
| A14 | JTAG_TDO | B14 | GND | C14 | IO_L5P_T0U_N8_AD14P_66_AP3_1V2 | D14 | IO_L5N_T0U_N9_AD14N_66_AP2_1V2 |
| A15 | GND | B15 | PS_INIT_B | C15 | GND | D15 | GND |
| A16 | GND | B16 | GND | C16 | PS_ERR_STATUS | D16 | PS_PROG_B |
| A17 | GND | B17 | GND | C17 | GND | D17 | GND |
| A18 | PS_POR_B | B18 | PS_SRST_B | C18 | GND | D18 | GND |
| A19 | GND | B19 | GND | C19 | IO_L1P_T0L_N0_DBC_66_AP8_1V2 | D19 | IO_L1N_T0L_N1_DBC_66_AP7_1V2 |
| A20 | JTAG_TCK | B20 | JTAG_TMS | C20 | GND | D20 | GND |
| A21 | GND | B21 | GND | C21 | IO_L6P_T0U_N10_AD6P_66_AN2_1V2 | D21 | IO_L6N_T0U_N11_AD6N_66_AN1_1V2 |
| A22 | IO_L4P_T0U_N6_DBC_AD7P_66_AN5_1V2 | B22 | IO_L4N_T0U_N7_DBC_AD7N_66_AN4_1V2 | C22 | GND | D22 | GND |
| A23 | GND | B23 | GND | C23 | GND | D23 | GND |
| A24 | PS_MODE3 | B24 | JTAG_TDI | C24 | GND | D24 | GND |
| A25 | GND | B25 | GND | C25 | PS_MODE2 | D25 | LMK_SYNC_C |
| A26 | PS_MODE1 | B26 | PS_MODE0 | C26 | GND | D26 | GND |
| A27 | GND | B27 | GND | C27 | GND | D27 | GND |
| A28 | GND | B28 | GND | C28 | BANK505_MGT_RX0_P | D28 | BANK505_MGT_RX0_N |
| A29 | BANK505_MGT_CLK0_P | B29 | BANK505_MGT_CLK0_N | C29 | GND | D29 | GND |
| A30 | GND | B30 | GND | C30 | BANK505_MGT_RX1_P | D30 | BANK505_MGT_RX1_N |
| A31 | BANK505_MGT_TX0_P | B31 | BANK505_MGT_TX0_N | C31 | GND | D31 | GND |
| A32 | GND | B32 | GND | C32 | BANK505_MGT_RX2_P | D32 | BANK505_MGT_RX2_N |
| A33 | BANK505_MGT_TX1_P | B33 | BANK505_MGT_TX1_N | C33 | GND | D33 | GND |
| A34 | GND | B34 | GND | C34 | BANK505_MGT_RX3_P | D34 | BANK505_MGT_RX3_N |
| A35 | BANK505_MGT_TX2_P | B35 | BANK505_MGT_TX2_N | C35 | GND | D35 | GND |
| A36 | GND | B36 | GND | C36 | BANK505_MGT_CLK1_P | D36 | BANK505_MGT_CLK1_N |
| A37 | BANK505_MGT_CLK2_P | B37 | BANK505_MGT_CLK2_N | C37 | GND | D37 | GND |
| A38 | GND | B38 | GND | C38 | BANK505_MGT_CLK3_P | D38 | BANK505_MGT_CLK3_N |
| A39 | BANK505_MGT_TX3_P | B39 | BANK505_MGT_TX3_N | C39 | GND | D39 | GND |
| A40 | GND | B40 | GND | C40 | BANK128_MGT_RX0_P | D40 | BANK128_MGT_RX0_N |
| A41 | BANK128_MGT_TX0_P | B41 | BANK128_MGT_TX0_N | C41 | GND | D41 | GND |
| A42 | GND | B42 | GND | C42 | BANK128_MGT_CLK1_P | D42 | BANK128_MGT_CLK1_N |
| A43 | BANK128_MGT_TX1_P | B43 | BANK128_MGT_TX1_N | C43 | GND | D43 | GND |
| A44 | GND | B44 | GND | C44 | BANK128_MGT_RX1_P | D44 | BANK128_MGT_RX1_N |
| A45 | BANK129_MGT_CLK1_P | B45 | BANK129_MGT_CLK1_N | C45 | GND | D45 | GND |
| A46 | GND | B46 | GND | C46 | BANK128_MGT_RX2_P | D46 | BANK128_MGT_RX2_N |
| A47 | BANK128_MGT_TX2_P | B47 | BANK128_MGT_TX2_N | C47 | GND | D47 | GND |
| A48 | GND | B48 | GND | C48 | BANK128_MGT_RX3_P | D48 | BANK128_MGT_RX3_N |
| A49 | BANK128_MGT_TX3_P | B49 | BANK128_MGT_TX3_N | C49 | GND | D49 | GND |
| A50 | GND | B50 | GND | C50 | BANK129_MGT_RX0_P | D50 | BANK129_MGT_RX0_N |
| A51 | BANK129_MGT_TX0_P | B51 | BANK129_MGT_TX0_N | C51 | GND | D51 | GND |
| A52 | GND | B52 | GND | C52 | BANK129_MGT_RX1_P | D52 | BANK129_MGT_RX1_N |
| A53 | BANK129_MGT_TX1_P | B53 | BANK129_MGT_TX1_N | C53 | GND | D53 | GND |
| A54 | GND | B54 | GND | C54 | BANK129_MGT_RX2_P | D54 | BANK129_MGT_RX2_N |
| A55 | BANK129_MGT_TX2_P | B55 | BANK129_MGT_TX2_N | C55 | GND | D55 | GND |
| A56 | GND | B56 | GND | C56 | BANK129_MGT_RX3_P | D56 | BANK129_MGT_RX3_N |
| A57 | BANK129_MGT_TX3_P | B57 | BANK129_MGT_TX3_N | C57 | GND | D57 | GND |
| A58 | GND | B58 | GND | C58 | GND | D58 | GND |
| A59 | GND | B59 | GND | C59 | GND | D59 | GND |
| A60 | GND | B60 | GND | C60 | GND | D60 | GND |
Table 2.1.9 - Signal Interconnection Between Expansion Connector J3 and the Main Chip
Connector J4 definitions:
| Pin No. | Signal Net | Pin No. | Signal Net | Pin No. | Signal Net | Pin No. | Signal Net |
| A01 | VCC12V_SW | B01 | VCC12V_SW | C01 | VCC12V_SW | D01 | VCC12V_SW |
| A02 | VCC12V_SW | B02 | VCC12V_SW | C02 | VCC12V_SW | D02 | VCC12V_SW |
| A03 | VCC12V_SW | B03 | VCC12V_SW | C03 | VCC12V_SW | D03 | VCC12V_SW |
| A04 | VCC12V_SW | B04 | VCC12V_SW | C04 | VCC12V_SW | D04 | VCC12V_SW |
| A05 | GND | B05 | GND | C05 | GND | D05 | GND |
| A06 | GND | B06 | GND | C06 | GND | D06 | GND |
| A07 | GND | B07 | GND | C07 | GND | D07 | GND |
| A08 | GND | B08 | GND | C08 | DXP | D08 | DXN |
| A09 | BANK501_PS_MIO28 | B09 | GND | C09 | GND | D09 | GND |
| A10 | GND | B10 | GND | C10 | BANK502_PS_MIO66 | D10 | BANK502_PS_MIO67 |
| A11 | BANK501_PS_MIO29 | B11 | BANK501_PS_MIO30 | C11 | GND | D11 | GND |
| A12 | GND | B12 | GND | C12 | BANK502_PS_MIO68 | D12 | BANK502_PS_MIO76 |
| A13 | BANK501_PS_MIO33 | B13 | BANK501_PS_MIO31 | C13 | GND | D13 | GND |
| A14 | GND | B14 | GND | C14 | BANK502_PS_MIO69 | D14 | BANK502_PS_MIO77 |
| A15 | BANK501_PS_MIO35 | B15 | BANK501_PS_MIO32 | C15 | GND | D15 | GND |
| A16 | GND | B16 | GND | C16 | BANK502_PS_MIO72 | D16 | BANK502_PS_MIO74 |
| A17 | BANK501_PS_MIO49 | B17 | BANK501_PS_MIO42 | C17 | GND | D17 | GND |
| A18 | GND | B18 | GND | C18 | BANK502_PS_MIO70 | D18 | BANK502_PS_MIO75 |
| A19 | BANK501_PS_MIO47 | B19 | BANK501_PS_MIO50 | C19 | GND | D19 | GND |
| A20 | GND | B20 | GND | C20 | BANK502_PS_MIO73 | D20 | BANK502_PS_MIO64 |
| A21 | BANK501_PS_MIO48 | B21 | BANK501_PS_MIO51 | C21 | GND | D21 | GND |
| A22 | GND | B22 | GND | C22 | BANK502_PS_MIO65 | D22 | BANK502_PS_MIO71 |
| A23 | BANK501_PS_MIO44 | B23 | BANK501_PS_MIO45 | C23 | GND | D23 | GND |
| A24 | GND | B24 | GND | C24 | BANK502_PS_MIO54 | D24 | BANK502_PS_MIO56 |
| A25 | BANK501_PS_MIO46 | B25 | BANK501_PS_MIO39 | C25 | GND | D25 | GND |
| A26 | GND | B26 | GND | C26 | BANK502_PS_MIO60 | D26 | BANK502_PS_MIO62 |
| A27 | BANK501_PS_MIO41 | B27 | BANK501_PS_MIO43 | C27 | GND | D27 | GND |
| A28 | GND | B28 | GND | C28 | BANK502_PS_MIO63 | D28 | BANK502_PS_MIO58 |
| A29 | BANK501_PS_MIO27 | B29 | BANK501_PS_MIO26 | C29 | GND | D29 | GND |
| A30 | GND | B30 | GND | C30 | BANK502_PS_MIO59 | D30 | BANK502_PS_MIO55 |
| A31 | BANK501_PS_MIO40 | B31 | BANK501_PS_MIO38 | C31 | GND | D31 | GND |
| A32 | GND | B32 | GND | C32 | BANK502_PS_MIO61 | D32 | BANK501_PS_MIO37 |
| A33 | BANK501_PS_MIO36 | B33 | BANK500_PS_MIO24 | C33 | GND | D33 | GND |
| A34 | GND | B34 | GND | C34 | BANK502_PS_MIO57 | D34 | BANK502_PS_MIO52 |
| A35 | BANK501_PS_MIO34 | B35 | BANK500_PS_MIO6 | C35 | GND | D35 | GND |
| A36 | GND | B36 | GND | C36 | BANK502_PS_MIO53 | D36 | GND |
| A37 | GND | B37 | GND | C37 | GND | D37 | GND |
| A38 | GND | B38 | GND | C38 | GND | D38 | BANK88_IO_GC_L5N |
| A39 | BANK89_IO_L10P | B39 | BANK89_IO_L10N | C39 | GND | D39 | GND |
| A40 | GND | B40 | GND | C40 | BANK89_IO_L12P | D40 | BANK89_IO_L12N |
| A41 | BANK89_IO_L9P | B41 | BANK89_IO_L9N | C41 | GND | D41 | GND |
| A42 | GND | B42 | GND | C42 | BANK89_IO_L11P | D42 | BANK89_IO_L11N |
| A43 | BANK89_IO_GC_L8P | B43 | BANK89_IO_GC_L8N | C43 | GND | D43 | GND |
| A44 | GND | B44 | GND | C44 | BANK88_IO_GC_L6P | D44 | BANK88_IO_GC_L6N |
| A45 | GND | B45 | GND | C45 | GND | D45 | GND |
| A46 | GND | B46 | GND | C46 | BANK88_IO_GC_L7P | D46 | BANK88_IO_GC_L7N |
| A47 | BANK89_IO_GC_L7P | B47 | BANK89_IO_GC_L7N | C47 | GND | D47 | GND |
| A48 | GND | B48 | GND | C48 | BANK88_IO_L9P | D48 | BANK88_IO_L9N |
| A49 | BANK89_IO_GC_L5P | B49 | BANK89_IO_GC_L5N | C49 | GND | D49 | GND |
| A50 | GND | B50 | GND | C50 | BANK88_IO_L10P | D50 | BANK88_IO_L10N |
| A51 | BANK89_IO_L4P | B51 | BANK89_IO_L4N | C51 | GND | D51 | GND |
| A52 | GND | B52 | GND | C52 | BANK88_IO_L11P | D52 | BANK88_IO_L11N |
| A53 | BANK89_IO_L2P | B53 | BANK89_IO_L2N | C53 | GND | D53 | GND |
| A54 | GND | B54 | GND | C54 | BANK88_IO_GC_L8P | D54 | BANK88_IO_GC_L8N |
| A55 | BANK89_IO_L3P | B55 | BANK89_IO_L3N | C55 | GND | D55 | GND |
| A56 | GND | B56 | GND | C56 | BANK89_IO_L1P | D56 | BANK89_IO_L1N |
| A57 | BANK89_IO_GC_L6P | B57 | BANK89_IO_GC_L6N | C57 | GND | D57 | GND |
| A58 | GND | B58 | GND | C58 | GND | D58 | GND |
| A59 | GND | B59 | GND | C59 | GND | D59 | GND |
| A60 | GND | B60 | GND | C60 | GND | D60 | GND |
Table 2.1.10 - Signal Interconnection Between Expansion Connector J4 and the Main Chip
2.2 USB3.0 Interface
The carrier board provides 2 USB3.0 ports on the RFSOC side, supporting HOST and SLAVE modes with a data transfer rate of up to 5.0 Gb/s. USB3.0 is connected through the HD3SS3220IRNHT to the Type-C connector, while USB2.0 is connected through the ULPI interface to an external USB3320C chip, enabling high-speed USB3.0 and USB2.0 data communication. The USB3.0 connection diagram is as follows:
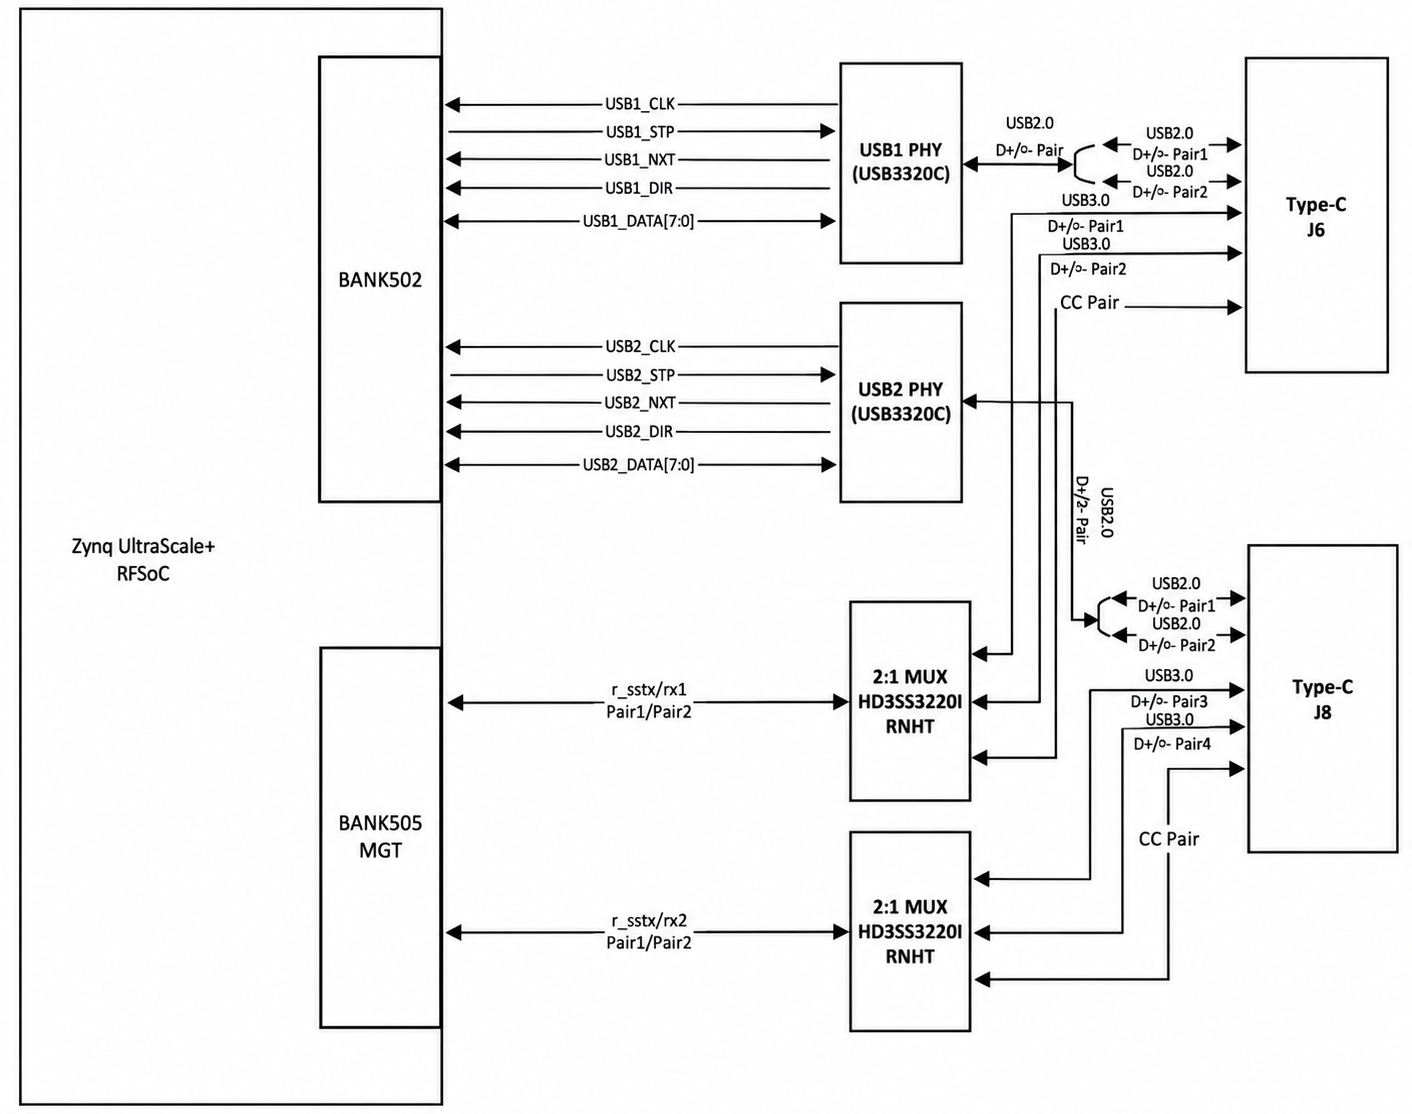
Figure 2.2.1 - USB3.0 Connection Diagram
| Signal Name | Pin Name | ZYNQ Pin Number | Remarks |
| r_sstxp1 | PS_MGTRTXP3_505_R30 | R30 | USB3.0 data transmit positive |
| r_sstxn1 | PS_MGTRTXN3_505_R31 | R31 | USB3.0 data transmit negative |
| r_ssrxp1 | PS_MGTRRXP3_505_T33 | T33 | USB3.0 data receive positive |
| r_ssrxn1 | PS_MGTRRXN3_505_T34 | T34 | USB3.0 data receive negative |
| USB1_DATA0 | PS_MIO68_E25 | E25 | USB2.0 data Bit0 |
| USB1_DATA1 | PS_MIO69_E24 | E24 | USB2.0 data Bit1 |
| USB1_DATA2 | PS_MIO66_F24 | F24 | USB2.0 data Bit2 |
| USB1_DATA3 | PS_MIO71_A24 | A24 | USB2.0 data Bit3 |
| USB1_DATA4 | PS_MIO72_C25 | C25 | USB2.0 data Bit4 |
| USB1_DATA5 | PS_MIO73_A25 | A25 | USB2.0 data Bit5 |
| USB1_DATA6 | PS_MIO74_C26 | C26 | USB2.0 data Bit6 |
| USB1_DATA7 | PS_MIO75_B26 | B26 | USB2.0 data Bit7 |
| USB1_STP | PS_MIO70_B25 | B25 | USB2.0 stop signal |
| USB1_DIR | PS_MIO65_C24 | C24 | USB2.0 data direction signal |
| USB1_CLK | PS_MIO64_D24 | D24 | USB2.0 clock signal |
| USB1_NXT | PS_MIO67_F25 | F25 | USB2.0 next data signal |
| r_sstxp2 | PS_MGTRTXP0_505_AA31 | AA31 | USB3.0 data transmit positive |
| r_sstxn2 | PS_MGTRTXN0_505_AA32 | AA32 | USB3.0 data transmit negative |
| r_ssrxp2 | PS_MGTRRXP0_505_AB33 | AB33 | USB3.0 data receive positive |
| r_ssrxn2 | PS_MGTRRXN0_505_AB34 | AB34 | USB3.0 data receive negative |
| USB2_DATA0 | PS_MIO56_G23 | G23 | USB2.0 data Bit0 |
| USB2_DATA1 | PS_MIO57_F23 | F23 | USB2.0 data Bit1 |
| USB2_DATA2 | PS_MIO54_H23 | H23 | USB2.0 data Bit2 |
| USB2_DATA3 | PS_MIO59_D23 | D23 | USB2.0 data Bit3 |
| USB2_DATA4 | PS_MIO60_A23 | A23 | USB2.0 data Bit4 |
| USB2_DATA5 | PS_MIO61_E22 | E22 | USB2.0 data Bit5 |
| USB2_DATA6 | PS_MIO62_B23 | B23 | USB2.0 data Bit6 |
| USB2_DATA7 | PS_MIO63_C23 | C23 | USB2.0 data Bit7 |
| USB2_STP | PS_MIO58_B22 | B22 | USB2.0 stop signal |
| USB2_DIR | PS_MIO53_F22 | F22 | USB2.0 data direction signal |
| USB2_CLK | PS_MIO52_G22 | G22 | USB2.0 clock signal |
| USB2_NXT | PS_MIO55_D22 | D22 | USB2.0 next data signal |
Table 2.2.1 - USB Interface Pin Assignment
2.3 Gigabit Ethernet Interface
The RFSOC system has 1 Gigabit Ethernet port connected to the PS side via RGMII. The GPHY chip is the Micrel KSZ9031RNX Ethernet PHY, providing network communication for the user. The KSZ9031RNX supports 10/100/1000 Mbps network rates and communicates with the MAC layer of the ZU47DR system through the RGMII interface. It supports MDI/MDI-X auto-crossover, speed auto-negotiation, Master/Slave auto-negotiation, and MDIO bus for PHY register management.
On power-up, the KSZ9031RNX detects the level states of certain I/Os to determine its operating mode. Table 2.3.1 describes the default settings of the GPHY chip after power-up.
| Configuration Pin | Description | Configuration Value |
| PHYAD[2:0] | PHY address in MDIO/MDC mode | PHY Address is 001 |
| CLK125_EN | Enable 125 MHz clock output selection | Enabled |
| LED_MODE | LED mode configuration | Single LED mode |
| MODE0~MODE3 | Link auto-negotiation and full-duplex configuration | 10/100/1000 auto-negotiation, compatible with full-duplex and half-duplex |
Table 2.3.1 - Default PHY Chip Configuration
When connected to a Gigabit Ethernet network, data transfer between the ZYNQ and the KSZ9031RNX PHY occurs via the RGMII bus with a 125 MHz clock, and data is sampled on both the rising and falling edges of the clock.
When connected to a Fast Ethernet network, data transfer between the ZYNQ and the KSZ9031RNX PHY occurs via the RMII bus with a 25 MHz clock, and data is sampled on both clock edges. Figure 2.3.1 shows the ZYNQ Ethernet PHY chip connection diagram:
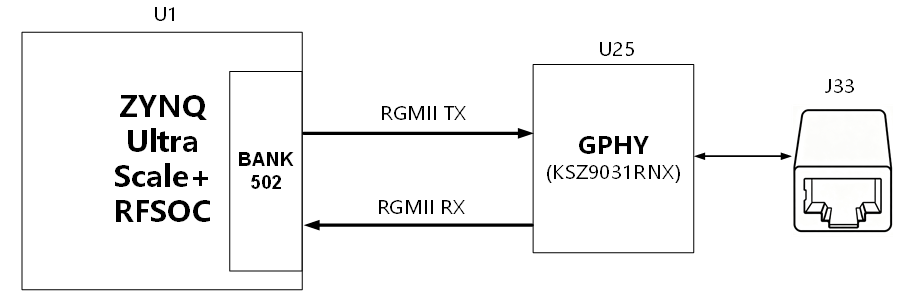
Figure 2.3.1 - Ethernet Connection Diagram
The PS Gigabit Ethernet pin assignment is as follows:
| Signal Name | Pin Name | Pin Number | PHY Chip | |
| Pin Number | Pin Name | |||
| ENET_TX_CLK | PS_MIO26_K19 | K19 | 29 | TX_CLK |
| ENET_TX_D0 | PS_MIO27_H19 | H19 | 28 | TXD0 |
| ENET_TX_D1 | PS_MIO28_J19 | J19 | 27 | TXD1 |
| ENET_TX_D2 | PS_MIO29_H21 | H21 | 26 | TXD2 |
| ENET_TX_D3 | PS_MIO30_H20 | H20 | 25 | TXD3 |
| ENET_TX_CTRL | PS_MIO31_G20 | G20 | 37 | TX_CTRL |
| ENET_RX_CLK | PS_MIO32_F19 | F19 | 32 | RXCLK |
| ENET_RX_D0 | PS_MIO33_G21 | G21 | 33 | RXD0 |
| ENET_RX_D1 | PS_MIO34_D18 | D18 | 34 | RXD1 |
| ENET_RX_D2 | PS_MIO35_F20 | F20 | 35 | RXD2 |
| ENET_RX_D3 | PS_MIO36_C18 | C18 | 36 | RXD3 |
| ENET_RX_CTRL | PS_MIO37_E19 | E19 | 38 | RX_CTRL |
| ENET_MDC | PS_MIO76_E26 | E26 | 16 | MDC |
| ENET_MDIO | PS_MIO77_D26 | D26 | 17 | MDIO |
| ENET_RESET_B(MIO41_ETH_RESET#) | PS_MIO41_C19 | C19 | 43 | RESET_B |
| PS_POR_B | PS_POR_B_N24 | N24 | ||
Table 2.3.2 - PS Gigabit Ethernet Pin Assignment
2.4 UART Interface
The RFSOC system connects 2 UART interfaces. One of them is brought out through a UART-to-USB chip to a Mini USB port connected to the PS side. The conversion chip is the Silicon Labs CP2102GM. It can be connected to a PC USB port via a USB cable for serial data communication.
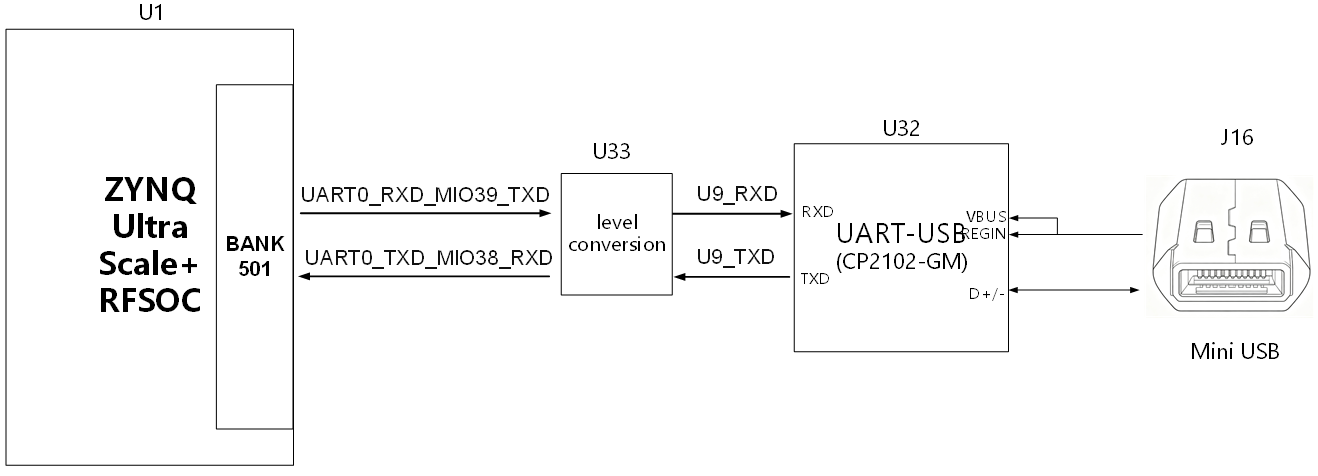
Figure 2.4.1 - USB-to-Serial Diagram
ZYNQ pin assignment for the USB-to-serial port:
| Signal Name | Pin Name | Pin Number | Remarks |
| UART0_RXD_MIO39_TXD | PS_MIO39_D19 | D19 | PS UART data output |
| UART0_TXD_MIO38_RXD | PS_MIO38_B18 | B18 | PS UART data input |
Table 2.4.1 - ZYNQ Pin Assignment for the USB-to-Serial Port
2.5 SD Card Slot
The carrier board includes a Micro SD card interface brought out from the RFSOC, providing user access to SD card storage for storing the BOOT program, Linux kernel, file system, and other user data files. The SD card I/O signals are connected to the MIO signals of PS BANK501. The connection diagram between the PS and the SD card connector is shown below:
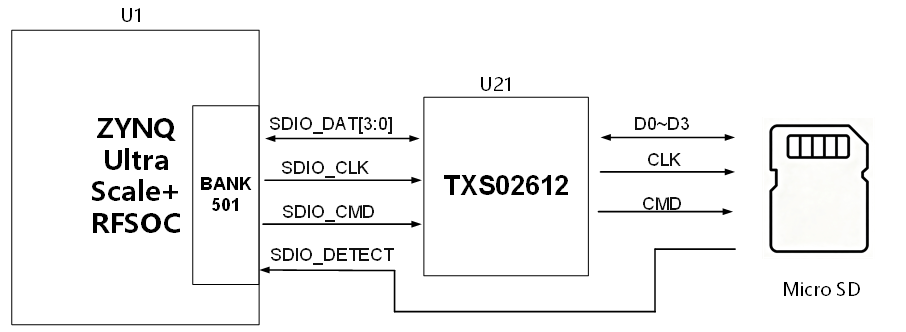
Figure 2.5.1 - SD Card Connection Diagram
SD Card Slot Pin Assignment
| Signal Name | Pin Name | Pin Number | Remarks |
| SDIO_CLK | PS_MIO51_B21 | B21 | SD clock signal |
| SDIO_CMD | PS_MIO50_A22 | A22 | SD command signal |
| SDIO_DAT0 | PS_MIO46_A20 | A20 | SD data Bit0 |
| SDIO_DAT1 | PS_MIO47_D21 | D21 | SD data Bit1 |
| SDIO_DAT2 | PS_MIO48_C21 | C21 | SD data Bit2 |
| SDIO_DAT3 | PS_MIO49_E21 | E21 | SD data Bit3 |
| SDIO_DETECT | PS_MIO45_B20 | B20 | SD card detect signal |
Table 2.5.1 - SD Card Slot Pin Assignment
2.6 RF Interface
The FPGA chip used on the SoM is the Zynq™ UltraScale+™ RFSoC Gen3 series, the industry's only single-chip adaptive radio platform. The chip integrates 14-bit RF-ADCs with a maximum sampling rate of up to 5 GSPS. On the carrier board, 8 RF-ADC channels and 8 RF-DAC channels are exposed. The RF connector is the SMP-JHT3W-B, with single-ended signal input/output. A balun device performs differential-to-single-ended conversion for data transmission and reception. The VCM signal is also brought out to a TP test point for the user to adjust the common-mode voltage.
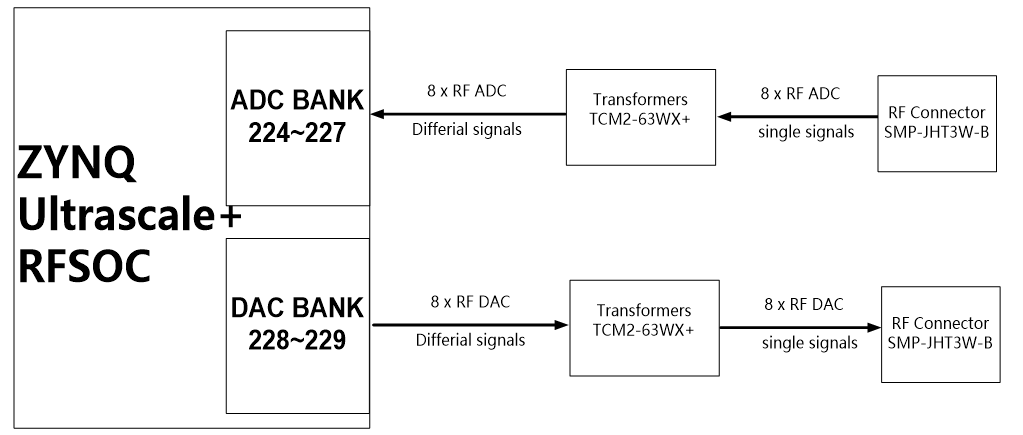
Figure 2.6.1 - RF Interface Design Diagram
| Signal Name | ZYNQ Pin Name | ZYNQ Pin Number |
| RFMC_ADC_00_N | ADC_VIN_I01_N_224 | AK1 |
| RFMC_ADC_00_P | ADC_VIN_I01_P_224 | AK2 |
| RFMC_ADC_01_N | ADC_VIN_I23_N_224 | AH1 |
| RFMC_ADC_01_P | ADC_VIN_I23_P_224 | AH2 |
| RFMC_ADC_02_N | ADC_VIN_I01_N_225 | AF1 |
| RFMC_ADC_02_P | ADC_VIN_I01_P_225 | AF2 |
| RFMC_ADC_03_N | ADC_VIN_I23_N_225 | AD1 |
| RFMC_ADC_03_P | ADC_VIN_I23_P_225 | AD2 |
| RFMC_ADC_04_N | ADC_VIN_I01_N_226 | AB1 |
| RFMC_ADC_04_P | ADC_VIN_I01_P_226 | AB2 |
| RFMC_ADC_05_N | ADC_VIN_I23_N_226 | Y1 |
| RFMC_ADC_05_P | ADC_VIN_I23_P_226 | Y2 |
| RFMC_ADC_06_N | ADC_VIN_I01_N_227 | V1 |
| RFMC_ADC_06_P | ADC_VIN_I01_P_227 | V2 |
| RFMC_ADC_07_N | ADC_VIN_I23_N_227 | T1 |
| RFMC_ADC_07_P | ADC_VIN_I23_P_227 | T2 |
| RFMC_DAC_00_N | DAC_VOUT0_N_228 | N1 |
| RFMC_DAC_00_P | DAC_VOUT0_P_228 | N2 |
| RFMC_DAC_01_N | DAC_VOUT2_N_228 | J1 |
| RFMC_DAC_01_P | DAC_VOUT2_P_228 | J2 |
| RFMC_DAC_02_N | DAC_VOUT0_N_229 | E1 |
| RFMC_DAC_02_P | DAC_VOUT0_P_229 | E2 |
| RFMC_DAC_03_N | DAC_VOUT2_N_229 | A4 |
| RFMC_DAC_03_P | DAC_VOUT2_P_229 | B4 |
| RFMC_DAC_04_N | DAC_VOUT1_N_228 | L1 |
| RFMC_DAC_04_P | DAC_VOUT1_P_228 | L2 |
| RFMC_DAC_05_N | DAC_VOUT3_N_228 | G1 |
| RFMC_DAC_05_P | DAC_VOUT3_P_228 | G2 |
| RFMC_DAC_06_N | DAC_VOUT1_N_229 | C1 |
| RFMC_DAC_06_P | DAC_VOUT1_P_229 | C2 |
| RFMC_DAC_07_N | DAC_VOUT3_N_229 | A6 |
| RFMC_DAC_07_P | DAC_VOUT3_P_229 | B6 |
Table 2.6.1 - ADC and DAC Pin Assignment
2.7 External Connectors
The HEA47 development board features a 40-pin expansion header, a 6-pin pin header, and an external PPS clock input interface. Various Alinx modules (such as HDMI output modules, binocular camera modules, and high-speed AD modules) or external devices can be connected. The 40-pin expansion header includes one 5V power pin, two 3.3V power pins, 28 I/O signals, and 3 ground pins. The 6-pin header includes one 3.3V power pin, 4 output I/O signals, and 1 GND.
The 28 signals of the 40-pin expansion header are connected to the I/Os of BANK88 and BANK89 on the ZYNQ UltraScale+ RFSOC chip, with a 3.3V voltage standard. The 4 I/Os of the 6-pin header are connected to the I/Os of BANK66, outputting at 3.3V through level translation. The connector schematic for the ZYNQ UltraScale+ RFSOC is shown in Figure 2.7.1.
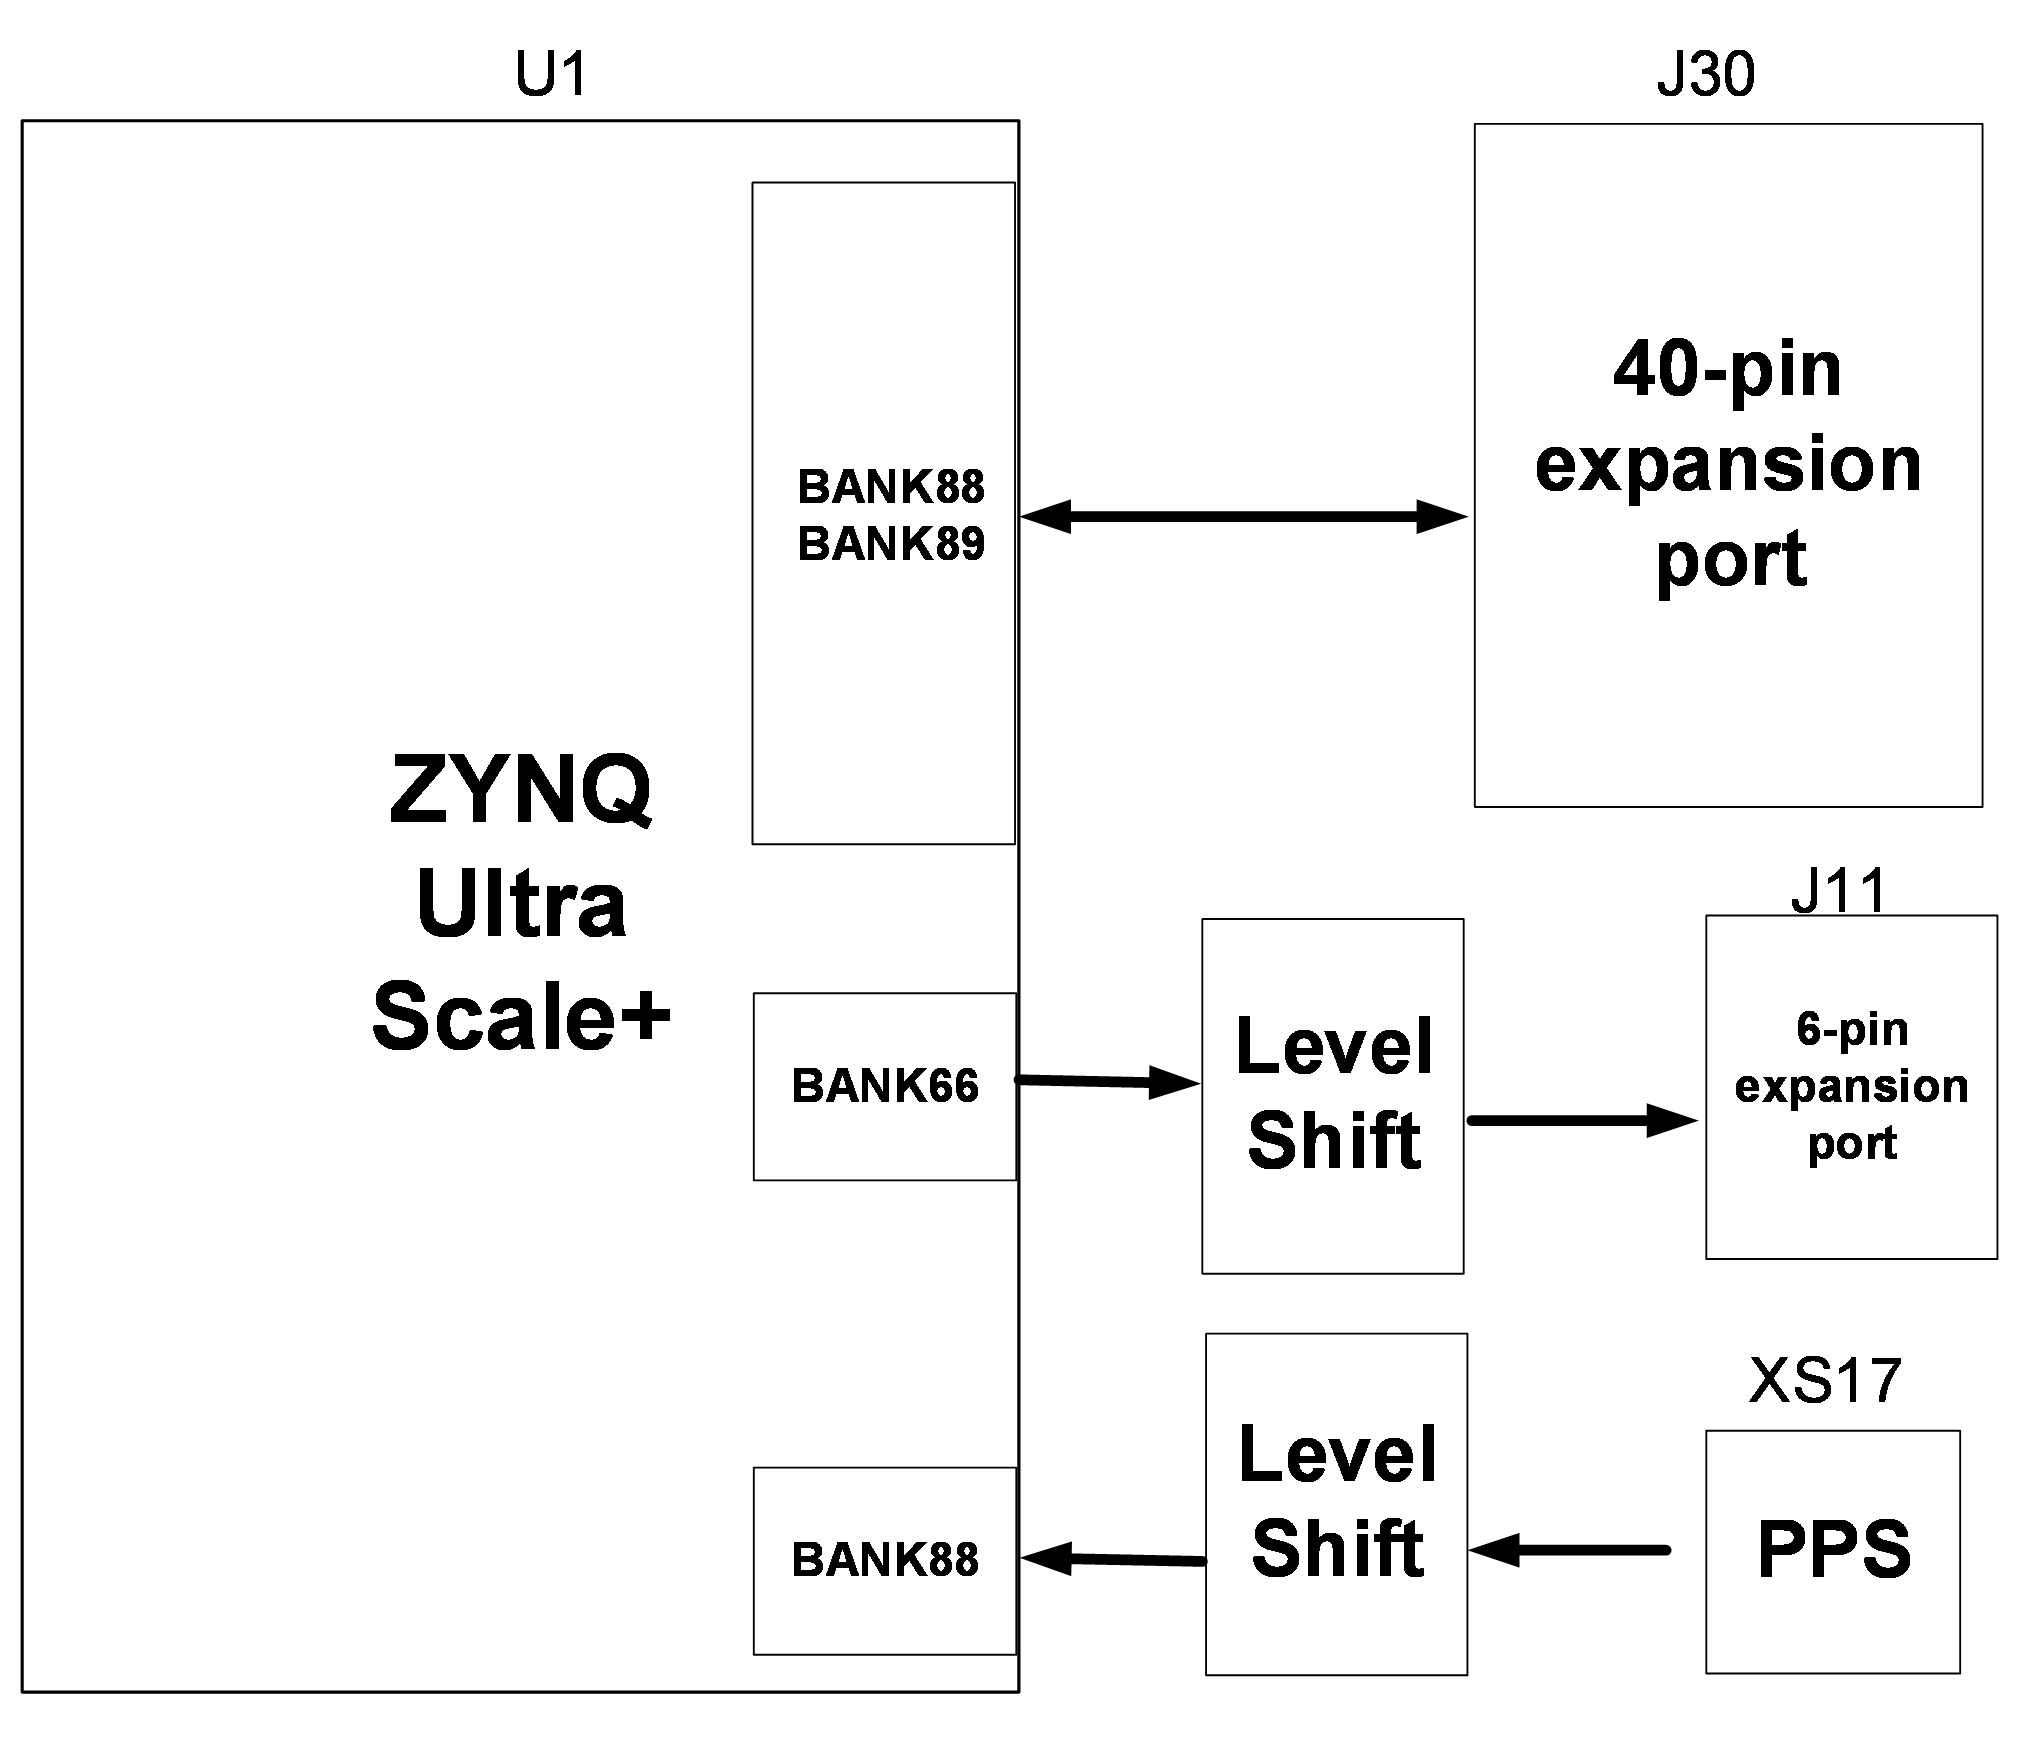
Figure 2.7.1 - 40-pin Connector Connection Diagram
40-pin Connector Pin Assignment
| Pin No. | Signal Name | ZYNQPin Number | Pin No. | Signal Name | ZYNQ Pin Number |
| 1 | GND | - | 2 | +5V | - |
| 3 | BANK89_IO_L10P | K11 | 4 | BANK89_IO_L10N | K10 |
| 5 | BANK89_IO_L9P | H10 | 6 | BANK89_IO_L9N | H9 |
| 7 | BANK89_IO_GC_L8P | G11 | 8 | BANK89_IO_GC_L8N | G10 |
| 9 | BANK89_IO_GC_L5P | E11 | 10 | BANK89_IO_GC_L5N | D11 |
| 11 | BANK89_IO_L4P | D9 | 12 | BANK89_IO_L4N | C9 |
| 13 | BANK89_IO_L2P | C10 | 14 | BANK89_IO_L2N | B10 |
| 15 | BANK89_IO_L3P | A10 | 16 | BANK89_IO_L3N | A9 |
| 17 | BANK89_IO_GC_L6P | E10 | 18 | BANK89_IO_GC_L6N | E9 |
| 19 | BANK89_IO_L12P | K12 | 20 | BANK89_IO_L12N | J12 |
| 21 | BANK89_IO_L11P | J11 | 22 | BANK89_IO_L11N | H11 |
| 23 | BANK88_IO_GC_L6P | G12 | 24 | BANK88_IO_GC_L6N | F12 |
| 25 | BANK88_IO_GC_L7P | E14 | 26 | BANK88_IO_GC_L7N | D14 |
| 27 | BANK88_IO_L10P | C14 | 28 | BANK88_IO_L10N | B13 |
| 29 | BANK88_IO_L11P | A14 | 30 | BANK88_IO_L11N | A13 |
| 31 | NC | - | 32 | NC | - |
| 33 | NC | - | 34 | NC | - |
| 35 | NC | - | 36 | NC | - |
| 37 | GND | - | 38 | GND | - |
| 39 | VCC3V3 | - | 40 | VCC3V3 | - |
Table 2.7.1 - 40-pin Connector Pin Assignment
6-pin Connector Pin Assignment
| Connector Pin | Signal Name | FPGA Pin Name | FPGA Pin Number |
| 1 | VCC3V3 | - | - |
| 2 | IO_L2P | IO_L2P_T0L_N2_66_AP6 | AP6 |
| 3 | IO_L1N | IO_L1N_T0L_N1_DBC_66_AP7 | AP7 |
| 4 | IO_L1P | IO_L1P_T0L_N0_DBC_66_AP8 | AP8 |
| 5 | IO_L4P | IO_L4P_T0U_N6_DBC_AD7P_66_AN5 | AN5 |
| 6 | GND | - | - |
Table 2.7.2 - 6-pin Connector Pin Assignment
PPS Connector Pin Assignment
| Signal Name | FPGA Pin Name | FPGA Pin Number |
| EXT_PPS | BANK88_IO_GC_L5N | F13 |
Table 2.7.3 - PPS Connector Pin Assignment
2.8 AGX/THOR PCIe Interface
The RFSOC chip connects to the NVIDIA AGX/THOR module through one PCIe 3.0 x8 interface. By default, the NVIDIA AGX/THOR acts as the RC (Root Complex) master and the RFSOC acts as the EP (Endpoint) slave. Figure 2.8.1 shows the hardware connection diagram between the RFSOC and the AGX/THOR module.
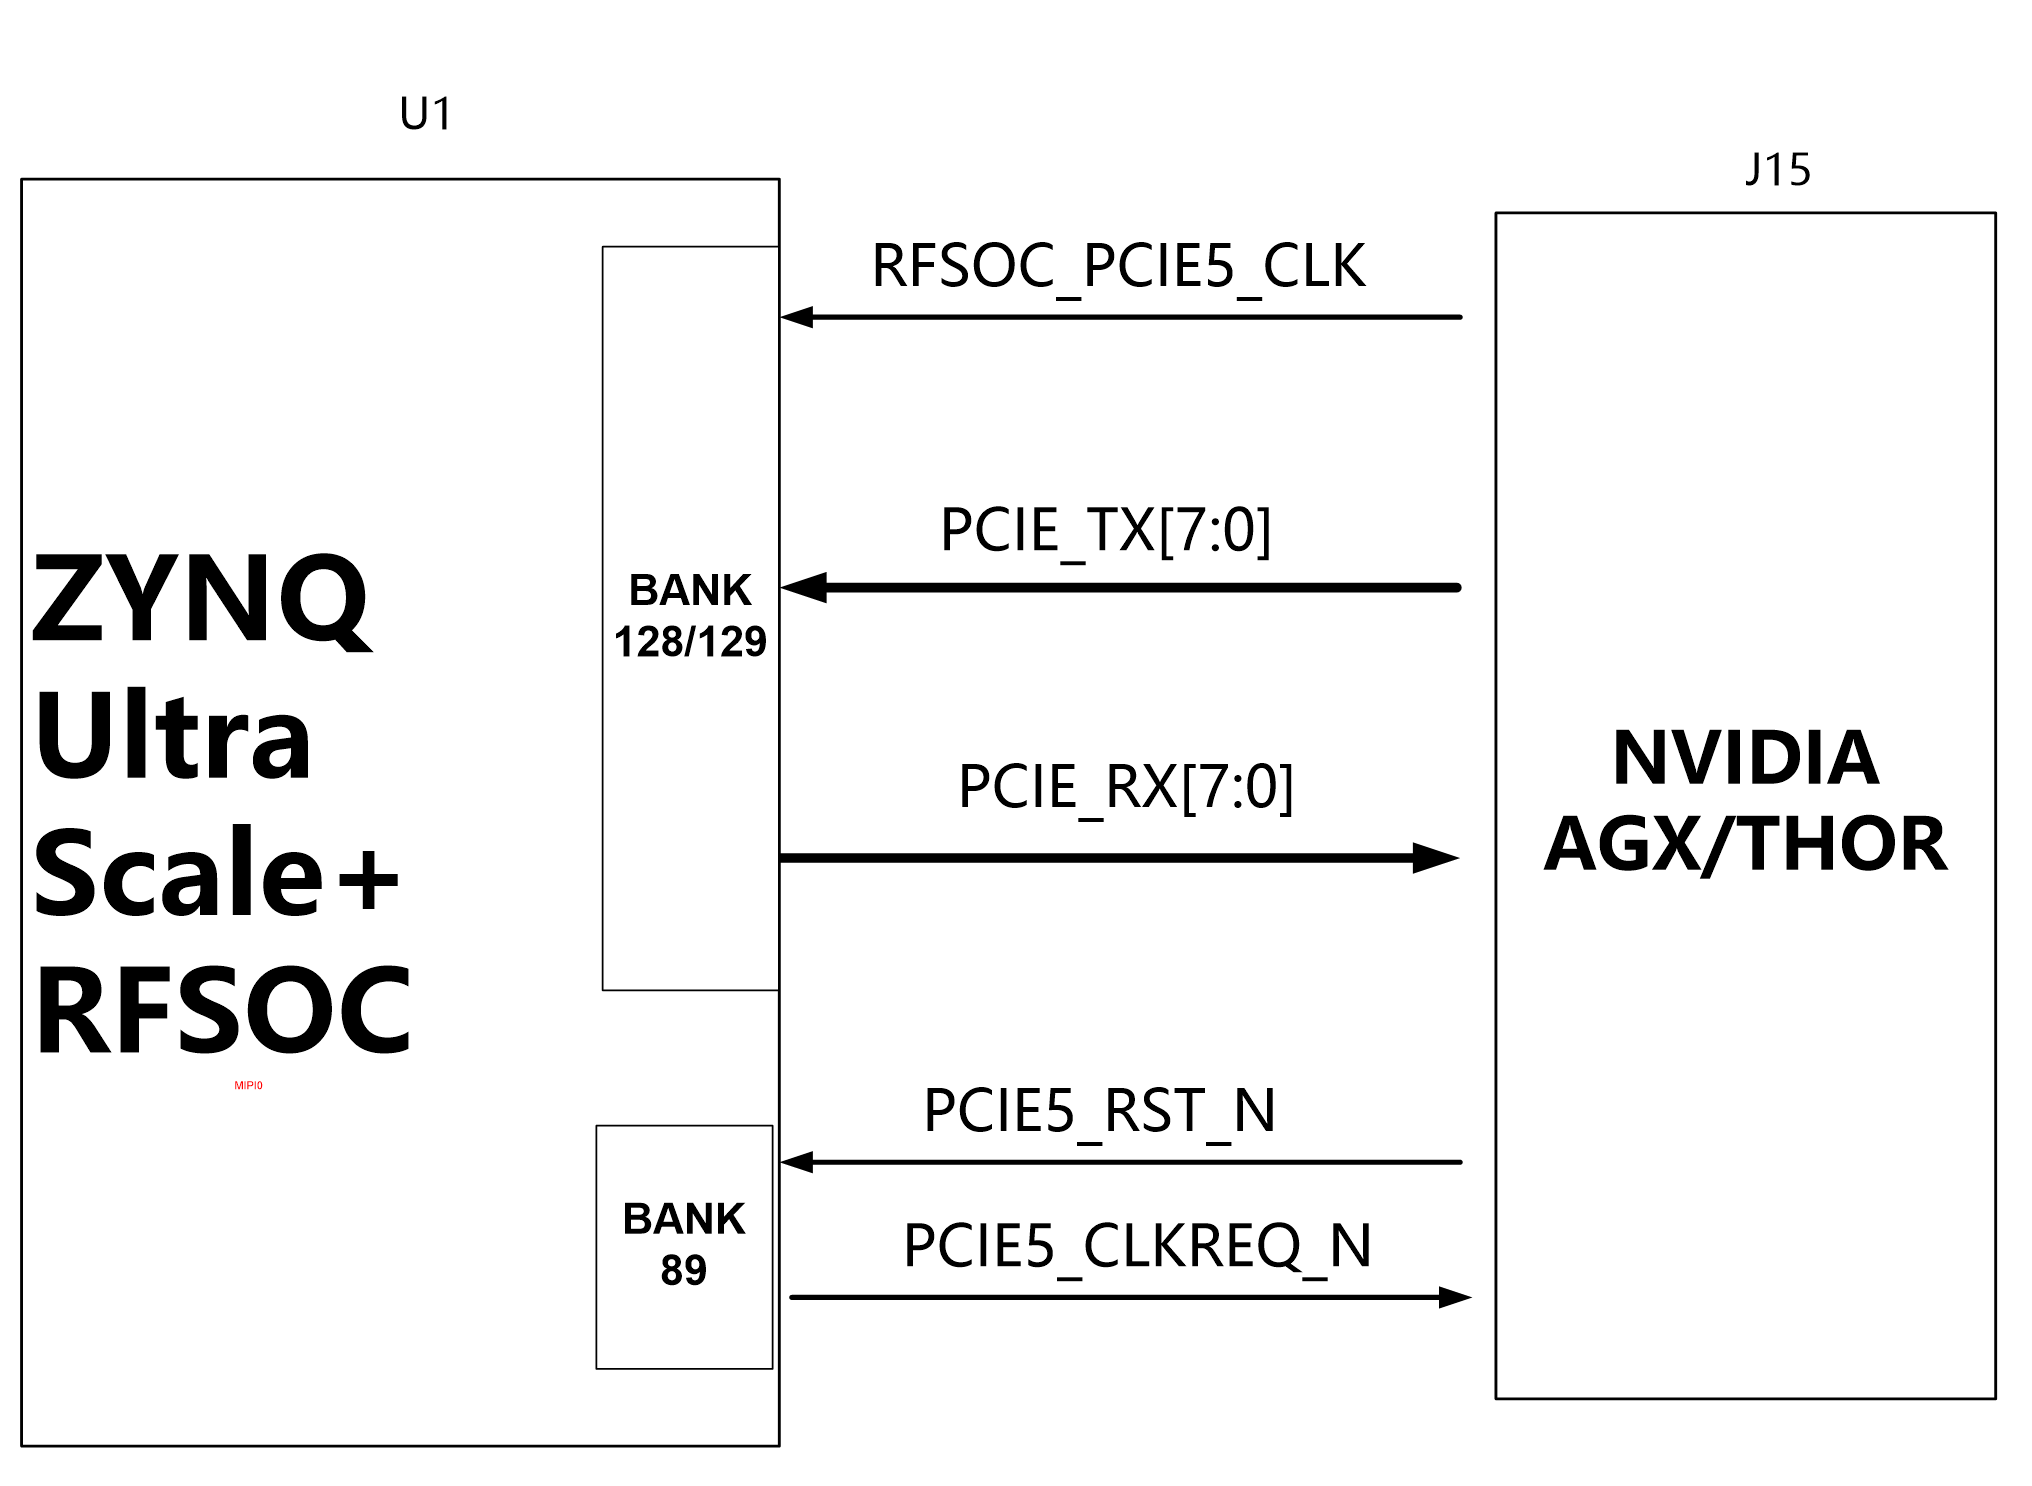
Figure 2.8.1 - Hardware Connection Diagram Between the RFSOC and the ORIN Module
The PCIe Gen3 x8 and MIPI communication pin assignment is as follows:
| Signal Name | Pin Name | Pin Number | Remarks |
| RFSOC_PCIE5_CLK_N | BANK129_MGT_CLK1_N | F29 | PCIe lane reference clock negative |
| RFSOC_PCIE5_CLK_P | BANK129_MGT_CLK1_P | F28 | PCIe lane reference clock positive |
| PCIE_RX0_N | BANK128_MGT_TX0_N | N31 | PCIe lane 0 receive data negative |
| PCIE_RX0_P | BANK128_MGT_TX0_P | N30 | PCIe lane 0 receive data positive |
| PCIE_RX1_N | BANK128_MGT_TX1_N | L31 | PCIe lane 1 receive data negative |
| PCIE_RX1_P | BANK128_MGT_TX1_P | L30 | PCIe lane 1 receive data positive |
| PCIE_RX2_N | BANK128_MGT_TX2_N | J31 | PCIe lane 2 receive data negative |
| PCIE_RX2_P | BANK128_MGT_TX2_P | J30 | PCIe lane 2 receive data positive |
| PCIE_RX3_N | BANK128_MGT_TX3_N | G31 | PCIe lane 3 receive data negative |
| PCIE_RX3_P | BANK128_MGT_TX3_P | G30 | PCIe lane 3 receive data positive |
| PCIE_RX4_N | BANK129_MGT_TX0_N | E31 | PCIe lane 4 receive data negative |
| PCIE_RX4_P | BANK129_MGT_TX0_P | E30 | PCIe lane 4 receive data positive |
| PCIE_RX5_N | BANK129_MGT_TX1_N | D29 | PCIe lane 5 receive data negative |
| PCIE_RX5_P | BANK129_MGT_TX1_P | D28 | PCIe lane 5 receive data positive |
| PCIE_RX6_N | BANK129_MGT_TX2_N | C31 | PCIe lane 6 receive data negative |
| PCIE_RX6_P | BANK129_MGT_TX2_P | C30 | PCIe lane 6 receive data positive |
| PCIE_RX7_N | BANK129_MGT_TX3_N | B29 | PCIe lane 7 receive data negative |
| PCIE_RX7_P | BANK129_MGT_TX3_P | B28 | PCIe lane 7 receive data positive |
| PCIE_TX0_N | BANK128_MGT_RX0_N | P34 | PCIe lane 0 transmit data negative |
| PCIE_TX0_P | BANK128_MGT_RX0_P | P33 | PCIe lane 0 transmit data positive |
| PCIE_TX1_N | BANK128_MGT_RX1_N | M34 | PCIe lane 1 transmit data negative |
| PCIE_TX1_P | BANK128_MGT_RX1_P | M33 | PCIe lane 1 transmit data positive |
| PCIE_TX2_N | BANK128_MGT_RX2_N | K34 | PCIe lane 2 transmit data negative |
| PCIE_TX2_P | BANK128_MGT_RX2_P | K33 | PCIe lane 2 transmit data positive |
| PCIE_TX3_N | BANK128_MGT_RX3_N | H34 | PCIe lane 3 transmit data negative |
| PCIE_TX3_P | BANK128_MGT_RX3_P | H33 | PCIe lane 3 transmit data positive |
| PCIE_TX4_N | BANK129_MGT_RX0_N | F34 | PCIe lane 4 transmit data negative |
| PCIE_TX4_P | BANK129_MGT_RX0_P | F33 | PCIe lane 4 transmit data positive |
| PCIE_TX5_N | BANK129_MGT_RX1_N | D34 | PCIe lane 5 transmit data negative |
| PCIE_TX5_P | BANK129_MGT_RX1_P | D33 | PCIe lane 5 transmit data positive |
| PCIE_TX6_N | BANK129_MGT_RX2_N | B34 | PCIe lane 6 transmit data negative |
| PCIE_TX6_P | BANK129_MGT_RX2_P | B33 | PCIe lane 6 transmit data positive |
| PCIE_TX7_N | BANK129_MGT_RX3_N | A32 | PCIe lane 7 transmit data negative |
| PCIE_TX7_P | BANK129_MGT_RX3_P | A31 | PCIe lane 7 transmit data positive |
| PCIE5_CLKREQ_N | BANK89_IO_L1N | B11 | PCIe reference clock shutdown signal |
| PCIE5_RST_N | BANK89_IO_L1P | C11 | PCIe global reset signal |
Table 2.8.1 - PCIe Gen3 x8 Communication Pin Assignment
2.9 LEDs and Buttons
The HEA47 development board has 4 user LED indicators and 4 function buttons on the RFSOC side. The user can control the on/off state of the 4 LEDs through software. The 4 function buttons are PS_POR_B, PS_SRST_B, PS_PROG_B, and one user button. The hardware connection diagram for the LEDs and buttons is shown in Figure 2.9.1:
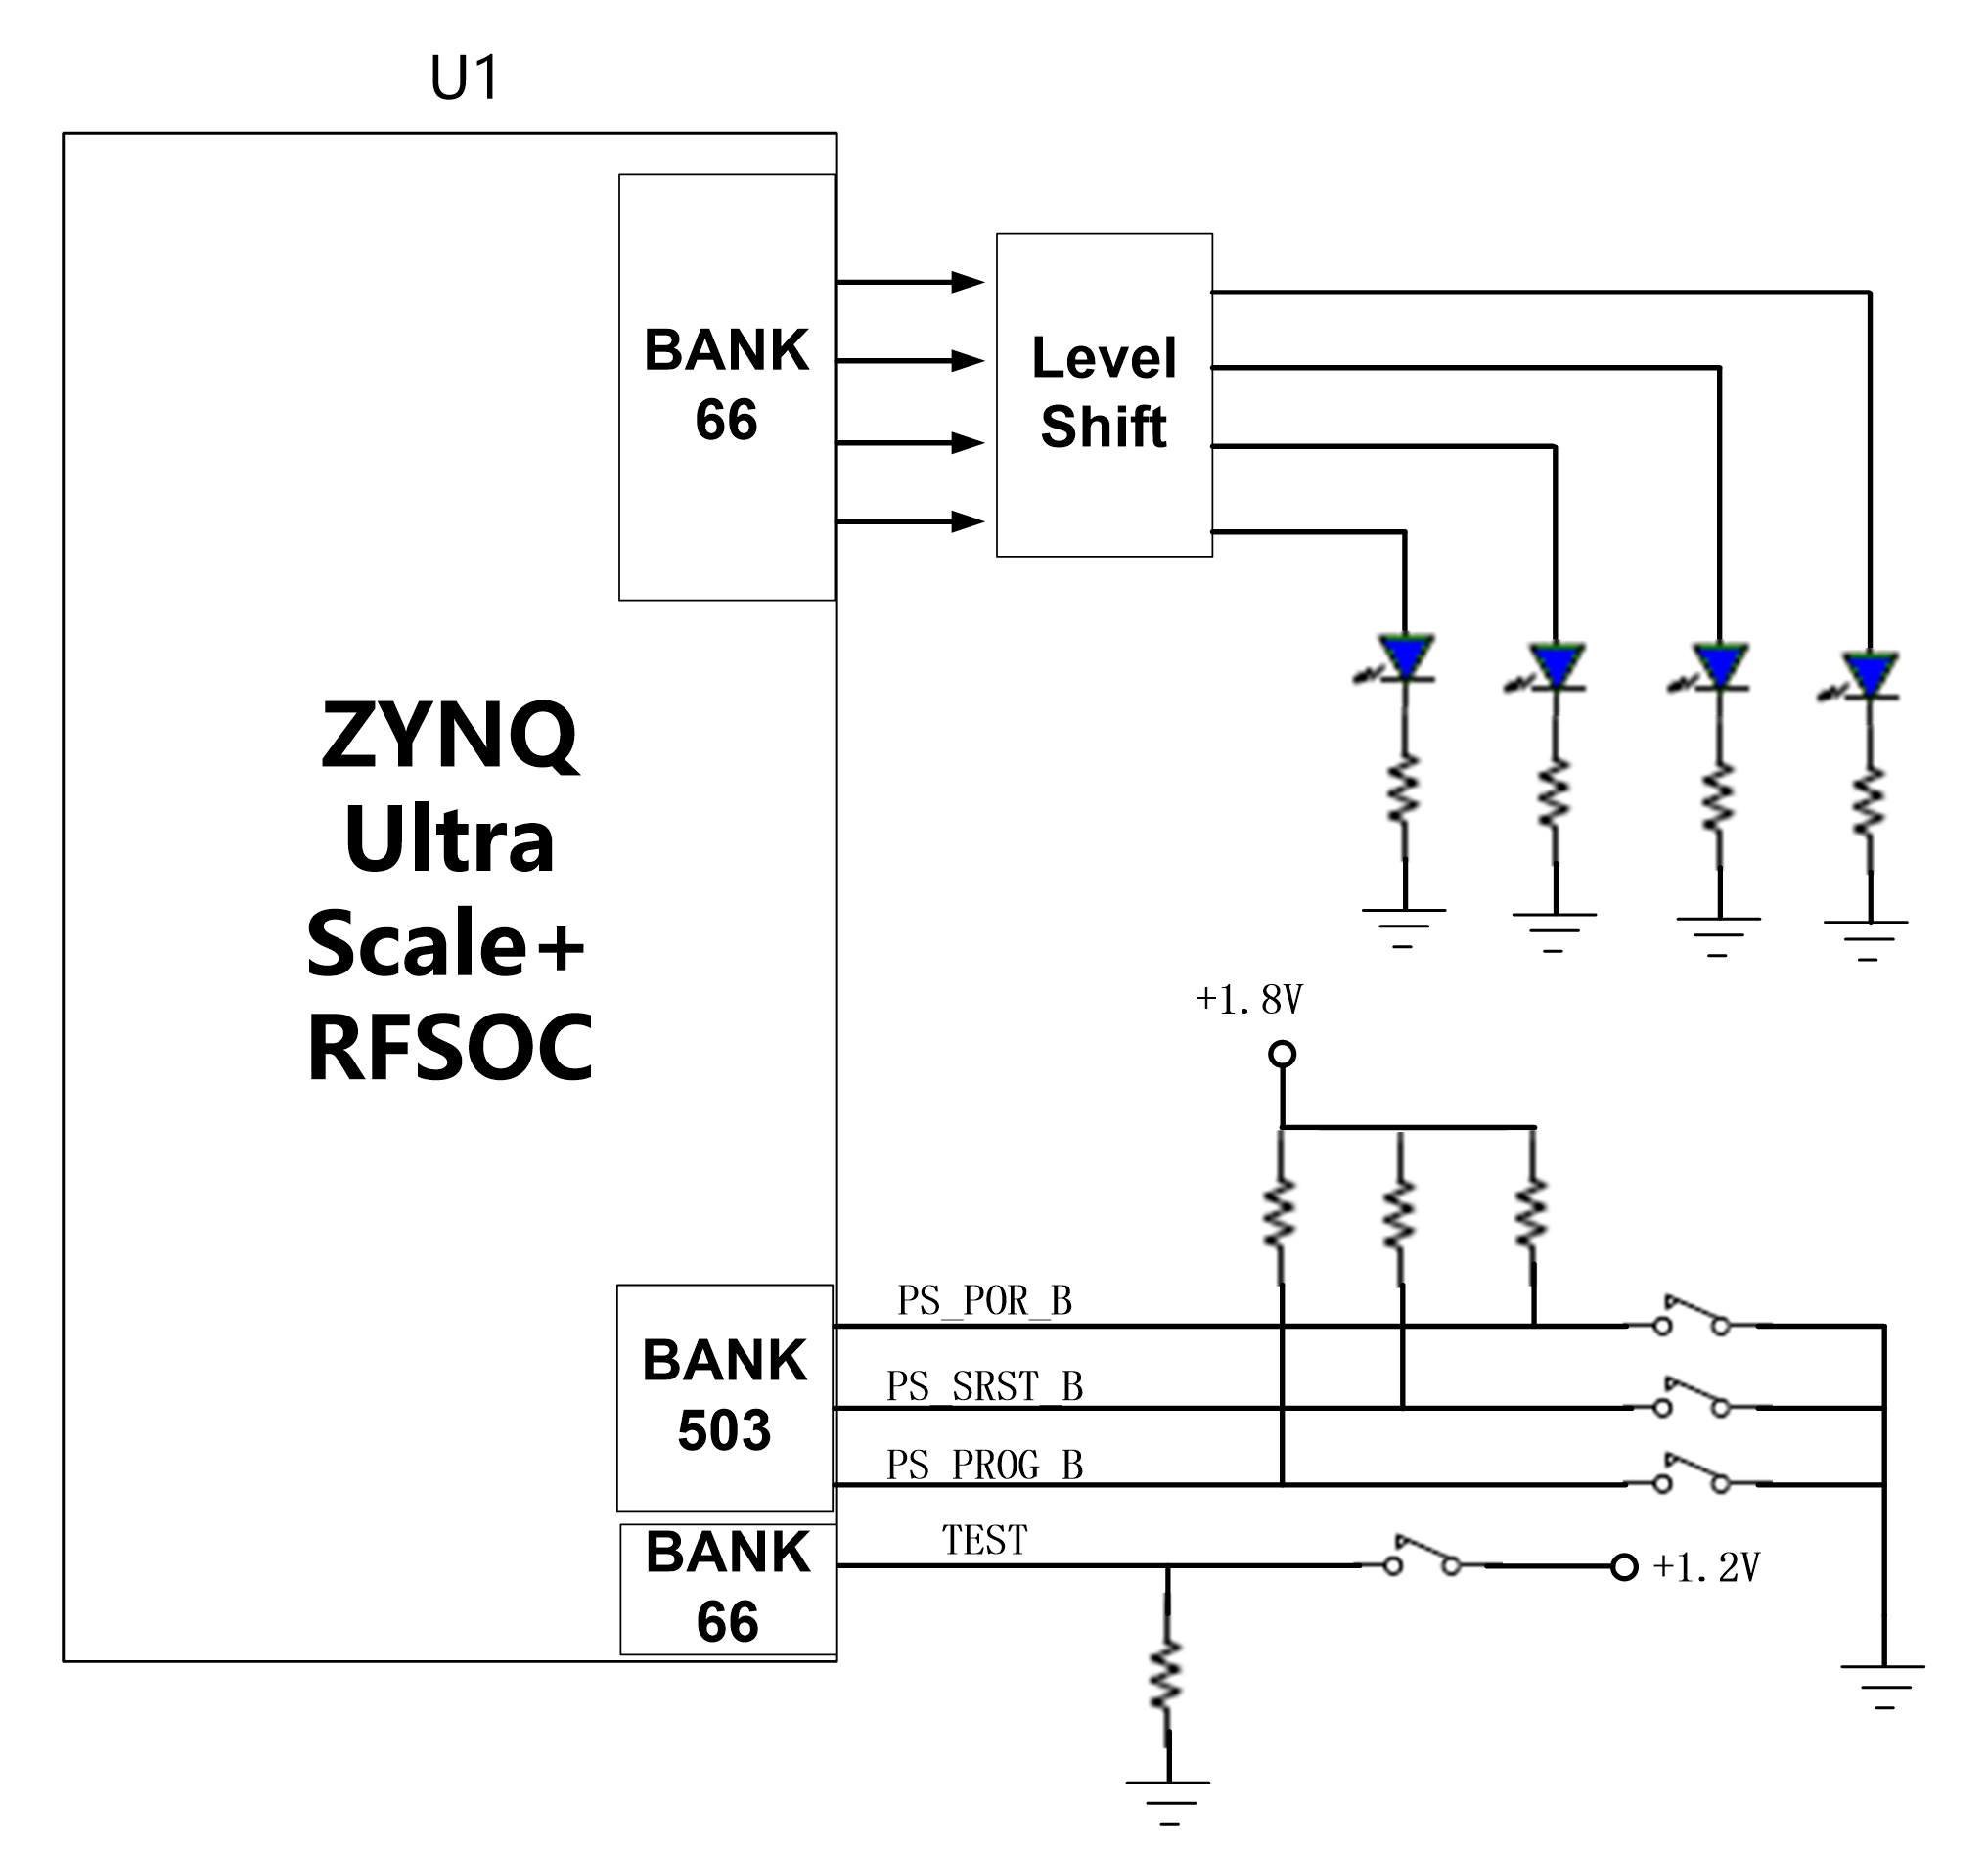
Figure 2.9.1 - User LED Hardware Connection Diagram
The pin assignment for the user LEDs and buttons is shown in the following table:
| Signal Name | Pin Name | Pin Number | Remarks |
| LED0 | IO_T3U_N12_66_AH12 | AH12 | User LED1 |
| LED1 | IO_L6N_T0U_N11_AD6N_66_AN1 | AN1 | User LED2 |
| LED2 | IO_L6P_T0U_N10_AD6P_66_AN2 | AN2 | User LED3 |
| LED3 | IO_L2N_T0L_N3_66_AP5 | AP5 | User LED4 |
| TEST | IO_L4N_T0U_N7 | N7 | User test button |
Table 2.9.1 - Pin Assignment for User LEDs and Buttons
2.10 JTAG Debug Port
The HEA47 development board provides a JTAG interface for downloading the ZYNQ UltraScale+ RFSOC program or flashing the program to the Flash. To prevent damage to the ZYNQ UltraScale+ RFSOC chip caused by hot-plugging, protection diodes have been added on the JTAG signals to ensure that the signal voltages stay within the FPGA's acceptable range.
2.11 DIP Switch Configuration
The development board has a 4-bit DIP switch SW2 used to configure the boot mode of the RFSOC system. The HEA47 platform supports 4 boot modes: JTAG debug mode, QSPI Flash boot, eMMC boot, and SD 2.0 card boot. After power-up, the RFSOC chip detects the levels of PS_MODE0 to PS_MODE3 to determine the boot mode. The user can select different boot modes through the DIP switch SW2 on the expansion board. The SW2 boot mode configuration is shown in Table 2.11.1.
| SW2 | DIP Switch Position (4, 3, 2, 1) | MODE[3:0] | Boot Mode |
| ON, ON, ON, ON | 0000 | PS JTAG |
| ON, ON, OFF ,ON | 0010 | QSPI FLASH | |
| ON, OFF, ON, OFF | 0101 | SD Card | |
| ON, OFF, OFF, ON | 0110 | EMMC |
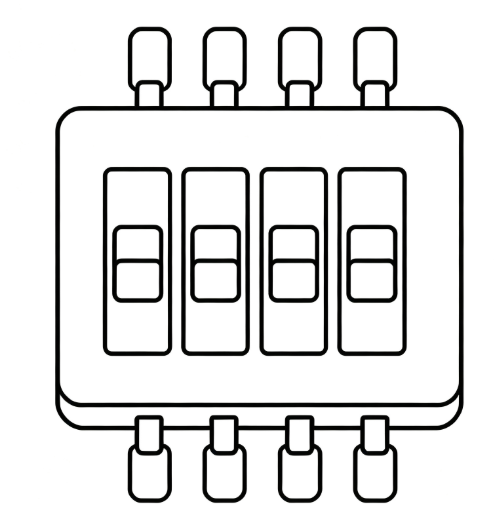
Table 2.11.1 - SW2 Boot Mode Configuration
2.12 Fan
Because the RFSOC generates a significant amount of heat during normal operation, a heatsink and fan have been added on the board to prevent the chip from overheating. The fan is controlled by the RFSOC chip, with the control pin connected to an I/O of BANK66 (FPGA pin AM5). When the I/O outputs a low level, the MOSFET turns on and the fan runs; when the I/O outputs a high level, the fan stops. The fan is pre-installed on the development board with screws. The fan power is connected to the J8 connector, with the red wire as positive and the black wire as negative.
Chapter 3: Jetson System
3.1 NVIDIA Jetson Module
The development board features a 699-pin Molex Mirror Mezz connector for connecting either the NVIDIA AGX ORIN module or the AGX THOR module, which the user can select according to their needs.
The AGX ORIN module is based on an Ampere GPU with AI compute of up to 275 TOPS, a 12-core ARM Cortex-A78AE CPU, and up to 64GB LPDDR5 memory, making it suitable for demanding edge AI applications. The AGX THOR module adopts a more advanced CPU+GPU+DPU heterogeneous computing architecture, delivering AI compute of over 2000 INT8 TOPS—more than 7 times that of the AGX Orin (275 TOPS), and even exceeding some current data center GPU accelerator cards. It is based on NVIDIA's new-generation GPU architecture and dedicated AI acceleration units, deeply optimized for multimodal large models and Physical AI (enabling machines to understand and simulate the physical world).
The detailed parameter comparison between the AGX Orin and the THOR T5000 is as follows:
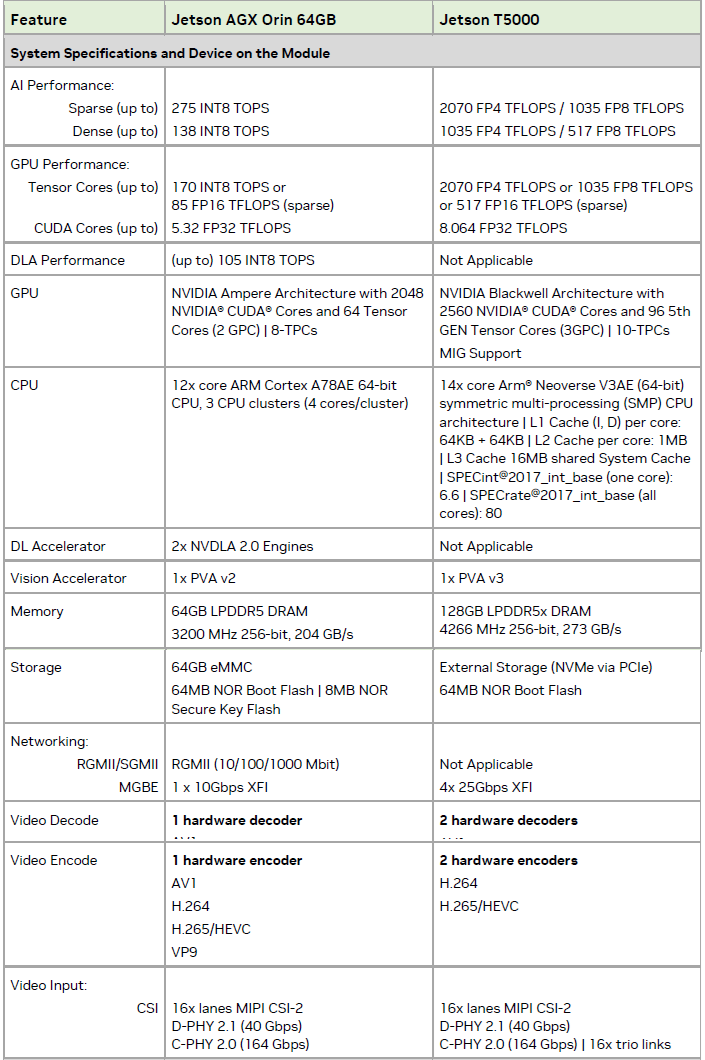
Table 3.1.1 - Parameter Comparison Between AGX Orin and THOR T5000
For detailed information, please refer to the module datasheets "Jetson_AGX_Modules_DS-10662-001_v1.0" and "Jetson_T5000_Modules_DS_DS11945001_v1.1".
3.2 M.2 SSD Interface
The ORIN system provides a PCIe (x4) Gen4 M.2 interface for connecting an NVMe SSD solid-state drive, where ORIN data and system files are stored. The ORIN AGX module connects to the M.2 interface via PCIe x4 (C4), while the ORIN THOR module uses PCIe x2 (C3). The M.2 interface uses an M-key slot and supports only PCIe, not SATA. When selecting an SSD, the user must choose a PCIe-type NVMe SSD. The M.2 interface design diagram is as follows:
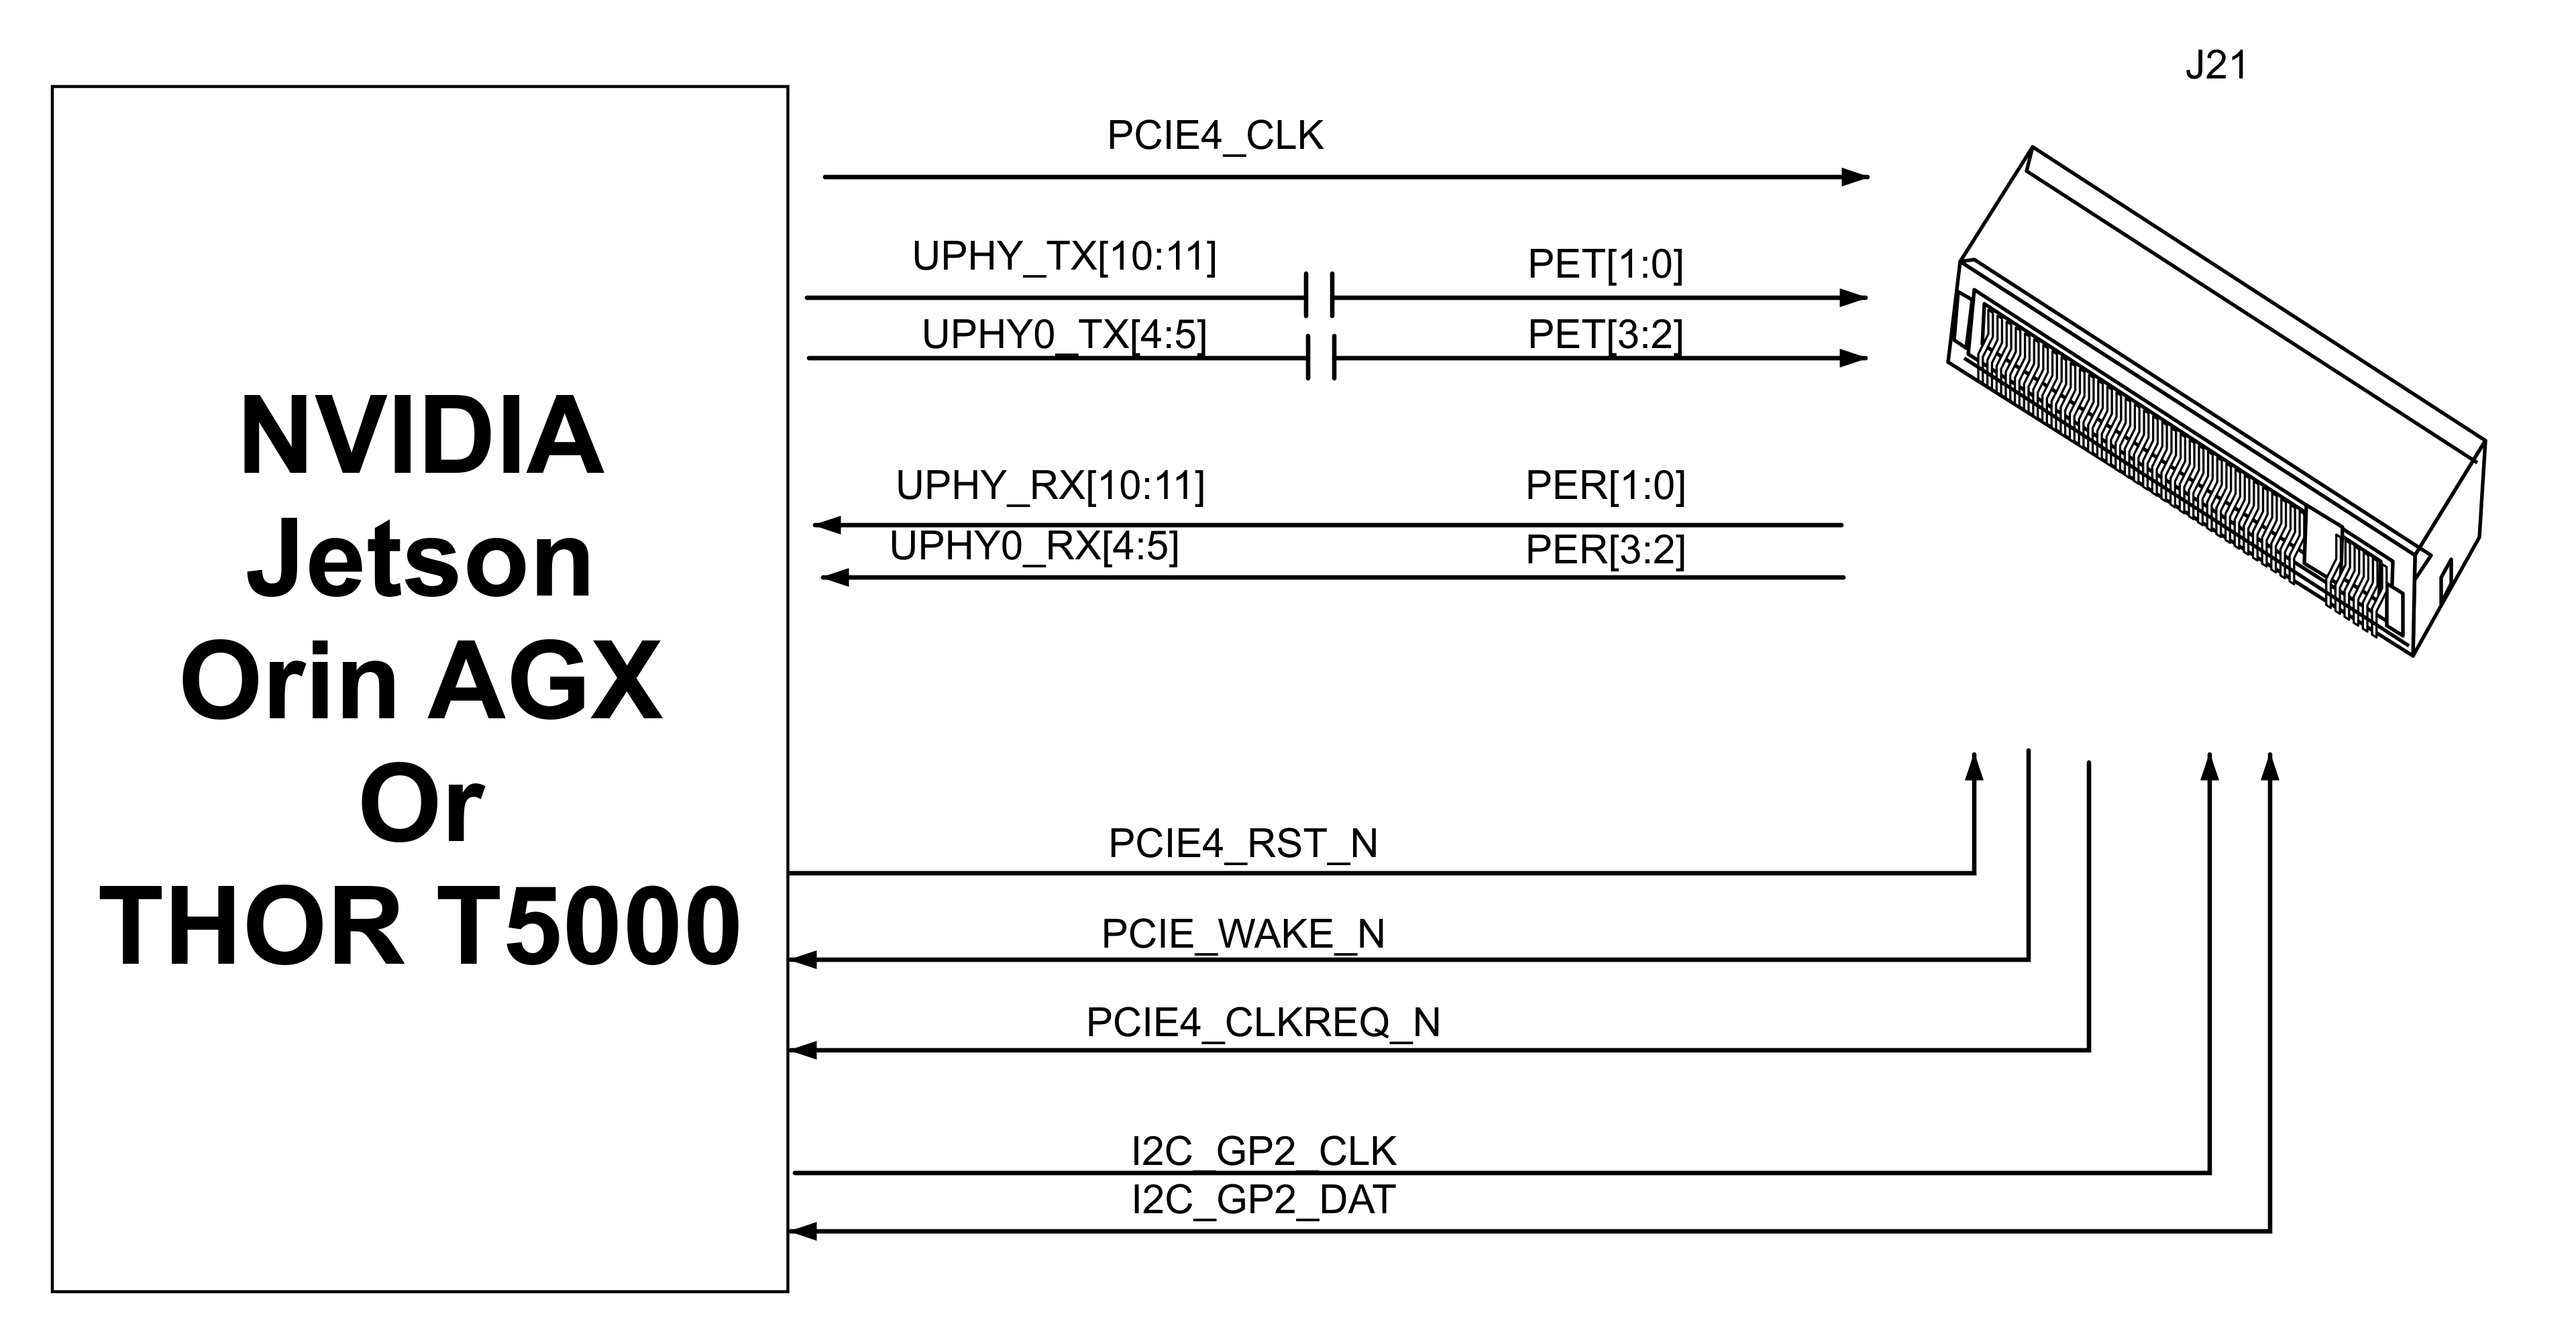
Figure 3.2.1 - M.2 Interface Design Diagram
M.2 SSD interface pin assignment:
| Pin # | Signal Name | Pin Name | Description | Direction |
| D32 | PER3_N | UPHY_RX22_N | UPHY block 0, Receive Lane 4 (Not use for THOR T5000) | Input |
| D33 | PER3_P | UPHY_RX22_P | Input | |
| J34 | PET3_N | UPHY_TX22_N | UPHY block 0, Transmit Lane 4 (Not use for THOR T5000) | Output |
| J35 | PET3_P | UPHY_TX22_P | Output | |
| A35 | PER2_N | UPHY_RX23_N | UPHY block 0, Receive Lane 5 (Not use for THOR T5000) | Input |
| A34 | PER2_P | UPHY_RX23_P | Input | |
| H33 | PET2_N | UPHY_TX23_N | UPHY block 0, Transmit Lane 5 (Not use for THOR T5000) | Output |
| H32 | PET2_P | UPHY_TX23_P | Output | |
| B13 | PER1_N | UPHY_RX10_N | UPHY block 0, Receive Lane 6 | Input |
| B12 | PER1_P | UPHY_RX10_P | Input | |
| K12 | PET1_N | UPHY_TX10_N | UPHY block 0, Transmit Lane 6 | Output |
| K13 | PET1_P | UPHY_TX10_P | Output | |
| D13 | PER0_N | UPHY_RX11_N | UPHY block 0, Receive Lane 7 | Input |
| D12 | PER0_P | UPHY_RX11_P | Input | |
| H13 | PET0_N | UPHY_TX11_N | UPHY block 0, Transmit Lane 7 | Output |
| H12 | PET0_P | UPHY_TX11_P | Output | |
| E22 | PCIE4_CLK_N | PEX_CLK4_N | AGX:PCIe output Reference Clock for controller #4. THOR:PCIe output Reference Clock for controller #3. | Output |
| E23 | PCIE4_CLK_P | PEX_CLK4_P | Output | |
| G8 | PEX_C4_CLKREQ_N | GP183_PCIE4_ CLKREQ_N | AGX:PCIe Clock Request for controller #4. THOR:PCIe Clock Request for controller #3. | Input |
| J9 | PEX_C4_RST_N | GP184_PCIE4_RST_N | AGX:PCIe Reset for controller #4. THOR:PCIe Reset for controller #3. | Output |
| A8 | PCIE_WAKE_N | PEX_WAKE_N | PCIe Wake. | Input |
Table 3.2.1 - M.2 SSD Interface Pin Assignment
3.3 M.2 WIFI/BT Interface
The HEA47 development board has an M.2 KEY-E connector reserved for connecting a WIFI/BT module. The interface includes PCIe x1, USB2.0, UART, I2S, and I2C signals.
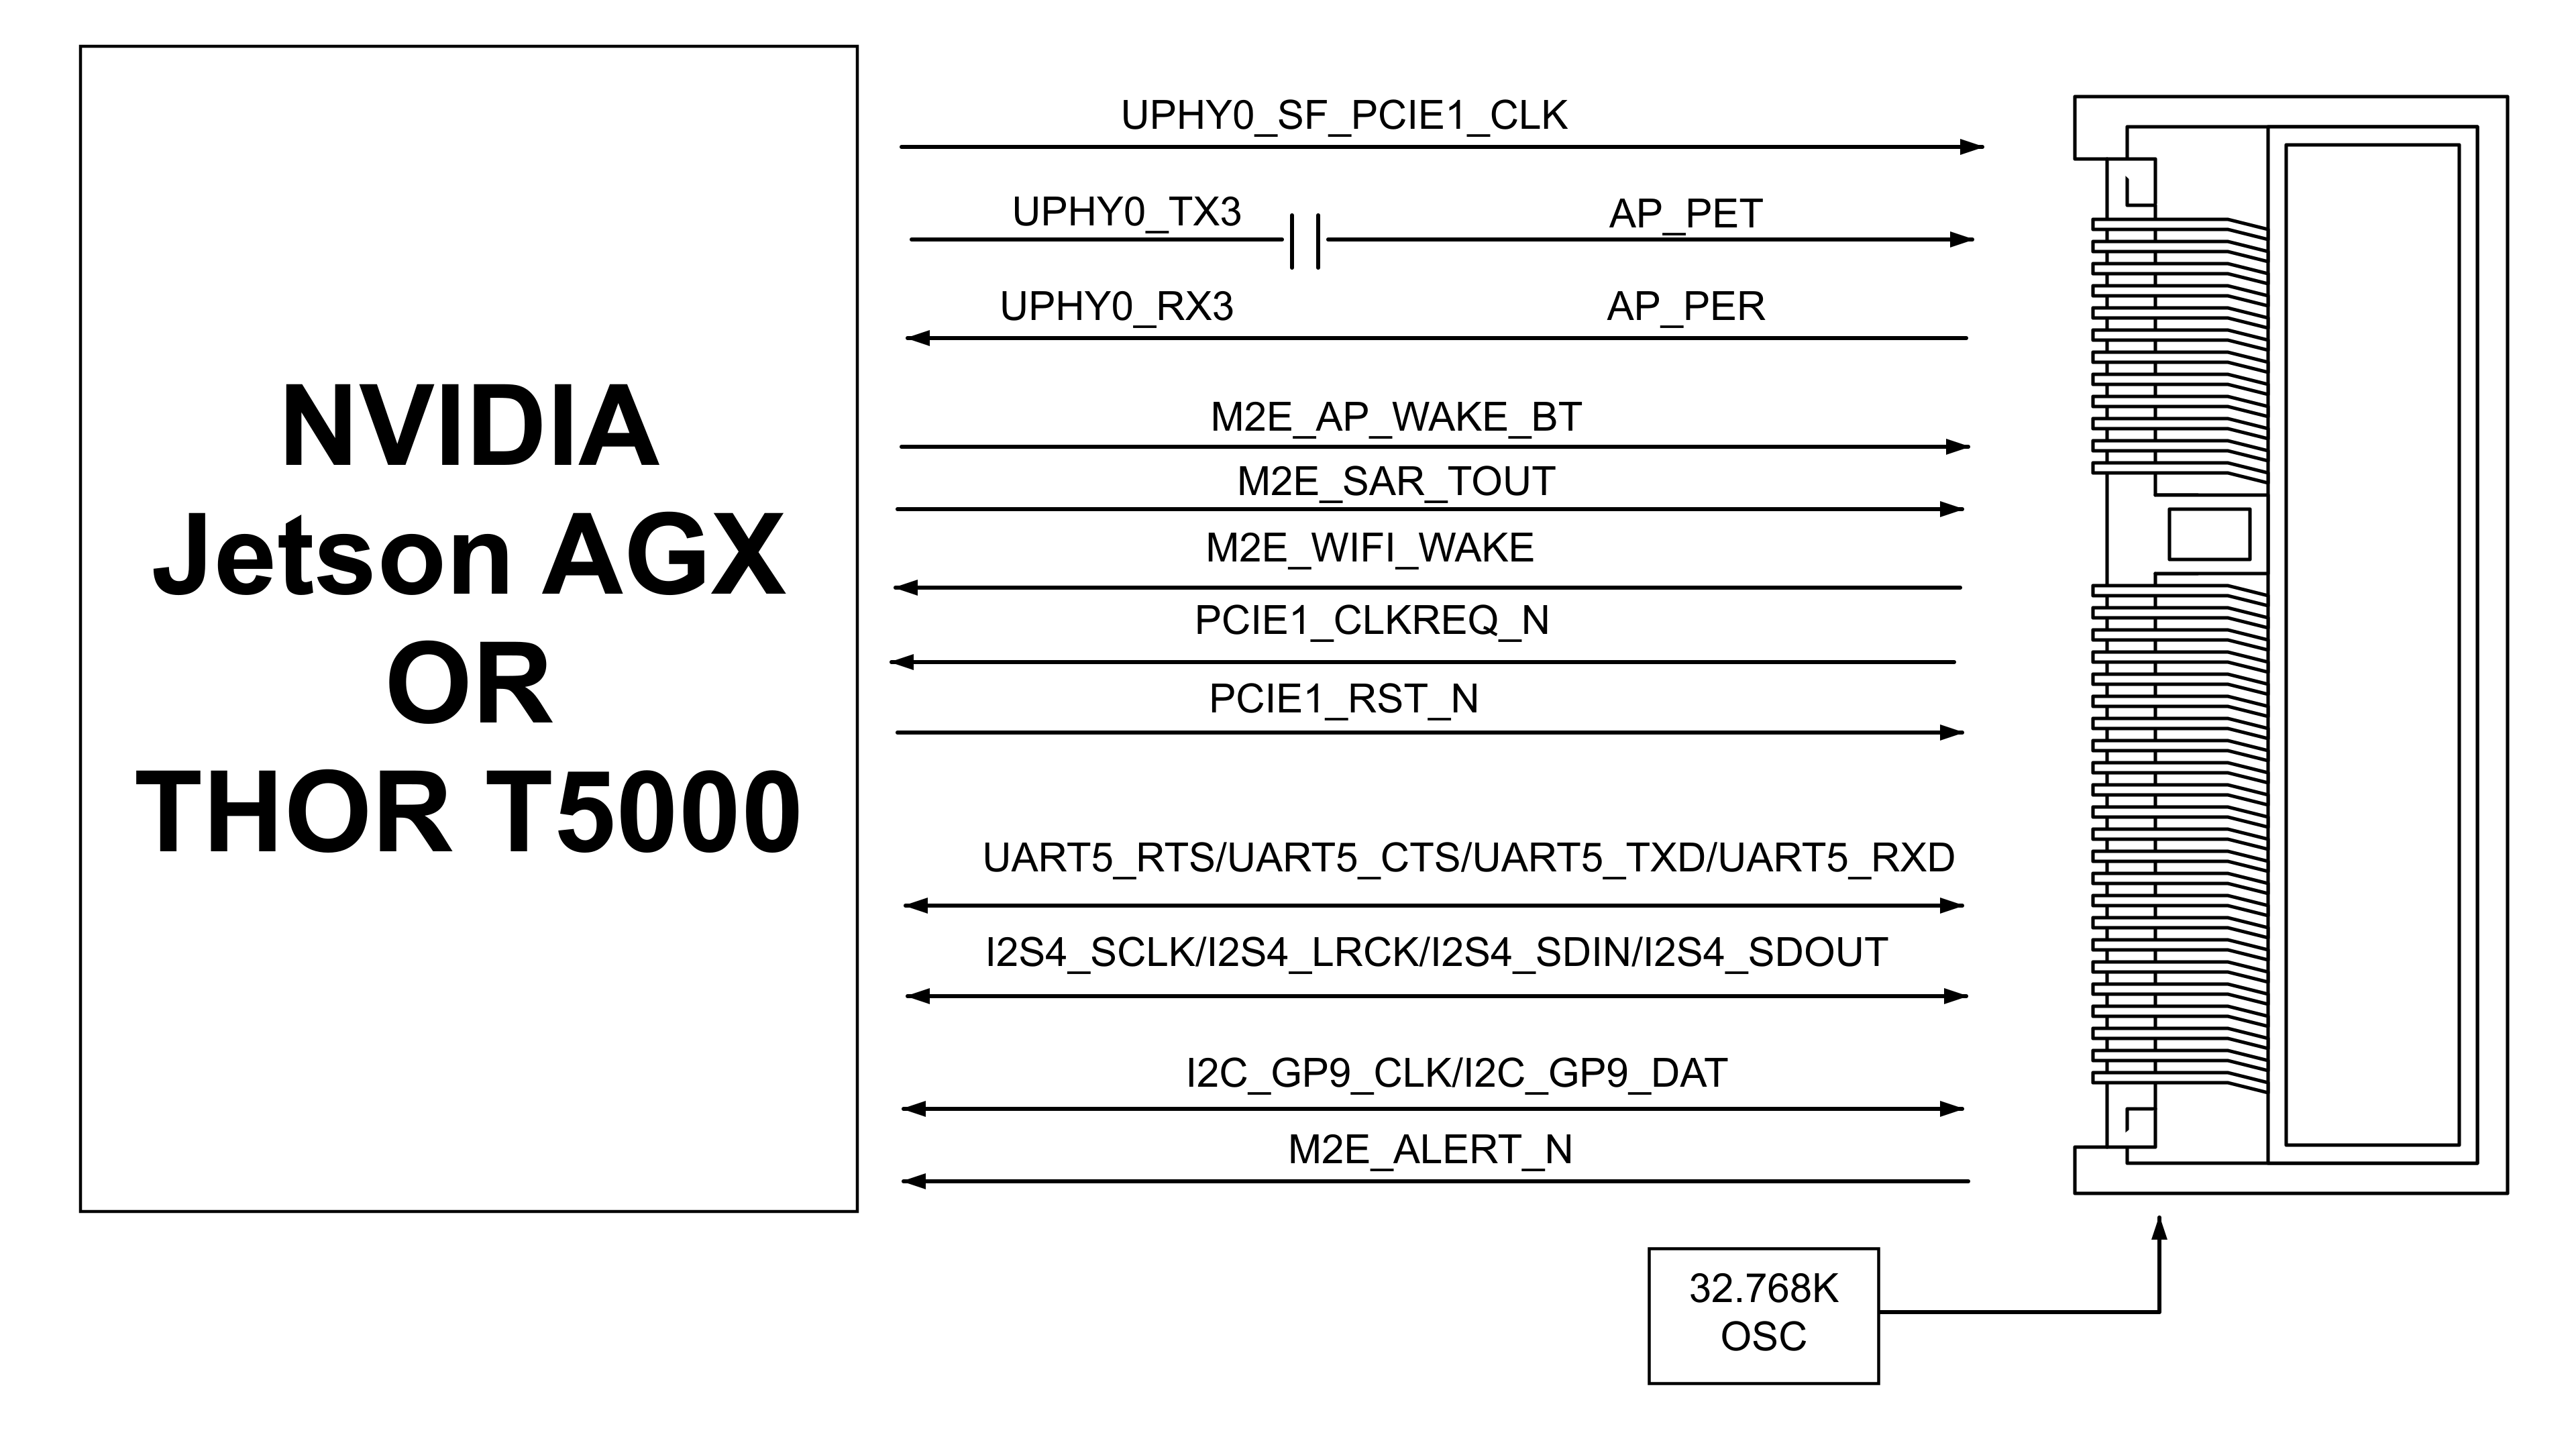
Figure 3.3.1 - M.2 Connection Diagram
M.2 WIFI/BT interface pin assignment:
| Pin # | Signal Name | Pin Name | Description | Direction |
| B32 | AP_PERN0 | UPHY_RX21_N | UPHY block 0, Receive Lane 3 | Input |
| B33 | AP_PERP0 | UPHY_RX21_P | Input | |
| G34 | AP_PETN0 | UPHY_TX21_N | UPHY block 0, Transmit Lane 3 | Output |
| G35 | AP_PETP0 | UPHY_TX21_P | Output | |
| D48 | UPHY0_SF_PCIE1_CLK_N | PEX_CLK6_N | PCIe Output Reference Clock for controller #1. | Output |
| D49 | UPHY0_SF_PCIE1_CLK_P | PEX_CLK6_P | Output | |
| B37 | PCIE1_CLKREQ_N | PEX_C7_CLKREQ_N | PCIe Clock Request for controller #1. | Input |
| A57 | M2E_AP_WAKE_BT | UART2_CTS | BT and AP wake up signal | Input |
| G58 | M2E_SAR_TOUT | UART2_RTS | Reserve | Output |
| G55 | M2E_WIFI_WAKE | GPIO23 | WIFI Wake signal | Input |
| J58 | UART5_TXD | UART5_TX | UART 5 Transmit | Output |
| H58 | UART5_RXD | UART5_RX | UART 5 Receive | Input |
| K58 | UART5_RTS | UART5_RTS | UART 5 Request to Send | Output |
| H57 | UART5_CTS | UART5_CTS | UART 5 Clear to Send | Input |
| C59 | I2S4_SCLK | I2S3_SCLK | I2S Serial Clock | Output |
| C60 | I2S4_FS | I2S3_FS | I2S Left/Right Clock | Output |
| J59 | I2S4_DIN | I2S3_DIN | I2S Data Input | Input |
| K59 | I2S4_DOUT | I2S3_DOUT | I2S Data Output | Output |
Table 3.3.1 - M.2 WIFI/BT Interface Pin Assignment
3.4 DP Display Interface
The Jetson Orin AGX/THOR module supports DP video output. The development board provides 1 DisplayPort output interface connected to the Jetson Orin AGX/THOR module for video display. The interface supports VESA DisplayPort v1.2 and eDP v1.4 output standards.
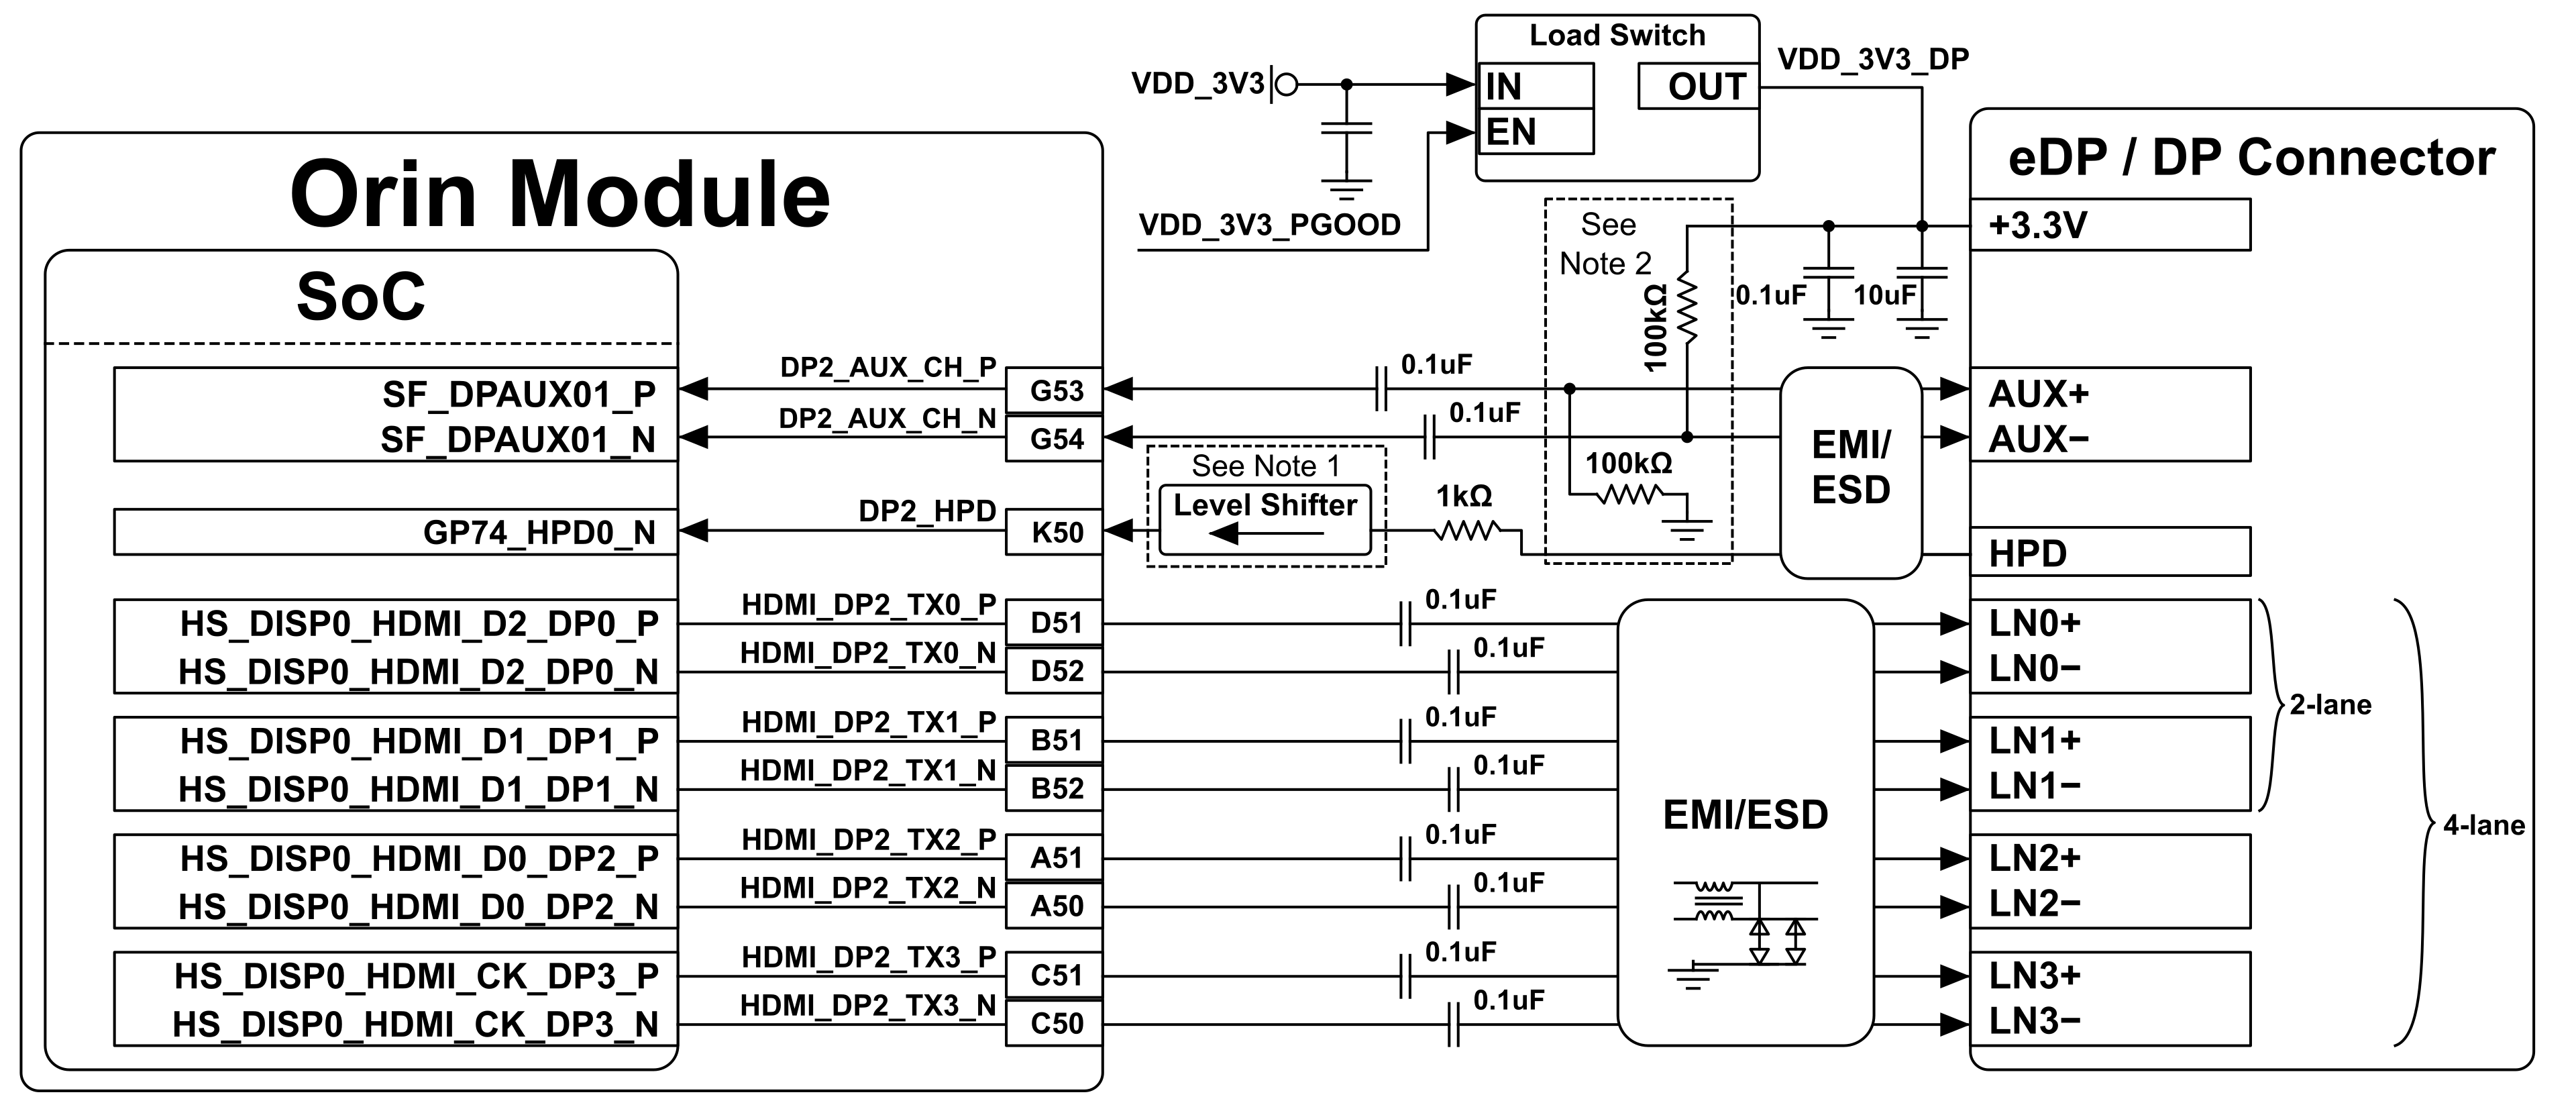
The DisplayPort interface pin assignment is as follows:
| Pin # | Signal Name | Pin Name | Description | Direction |
| D52 | HDMI_DP2_TX0_N | HS_DISP0_HDMI_D2_DP0_N | DisplayPort 2 Lane 0- | Output |
| D51 | HDMI_DP2_TX0_P | HS_DISP0_HDMI_D2_DP0_P | DisplayPort 2 Lane 0+ | Output |
| B52 | HDMI_DP2_TX1_N | HS_DISP0_HDMI_D1_DP1_N | DisplayPort 2 Lane 1– | Output |
| B51 | HDMI_DP2_TX1_P | HS_DISP0_HDMI_D1_DP1_P | DisplayPort 2 Lane 1+ | Output |
| A50 | HDMI_DP2_TX2_N | HS_DISP0_HDMI_D0_DP2_N | DisplayPort 2 Lane 2– | Output |
| A51 | HDMI_DP2_TX2_P | HS_DISP0_HDMI_D0_DP2_P | DisplayPort 2 Lane 2+ | Output |
| C50 | HDMI_DP2_TX3_N | HS_DISP0_HDMI_CK_DP3_N | DisplayPort 2 Lane 3– | Output |
| C51 | HDMI_DP2_TX3_P | HS_DISP0_HDMI_CK_DP3_P | DisplayPort 2 Lane 3+ | Output |
| K50 | DP2_HPD | GP74_HPD0_N | Display Port/HDMI 2 Hot Plug Detect | Bidir |
| J50 | HDMI_CEC | GP05_HDMI_CEC | HDMI CEC | Bidir |
| G53 | DP2_AUX_CH_P | SF_DPAUX01_P | Display Port 2 Aux+ or HDMI DDC SCL | Bidir |
| G54 | DP2_AUX_CH_N | SF_DPAUX01_N | Display Port 2 Aux– or HDMI DDC SDA | Bidir |
Table 3.4.1 - DisplayPort Interface Pin Assignment
3.5 USB3.2 Interface
The 2 USB3.2 interfaces (USB0 and USB1) of the NVIDIA Orin AGX/THOR module are connected to USB3.2 Type-C ports. The USB interfaces support HOST, SLAVE, and OTG modes, with a data transfer speed of up to 10 Gb/s. The USB3.2 connection diagram is shown in Figure 3.5.1:
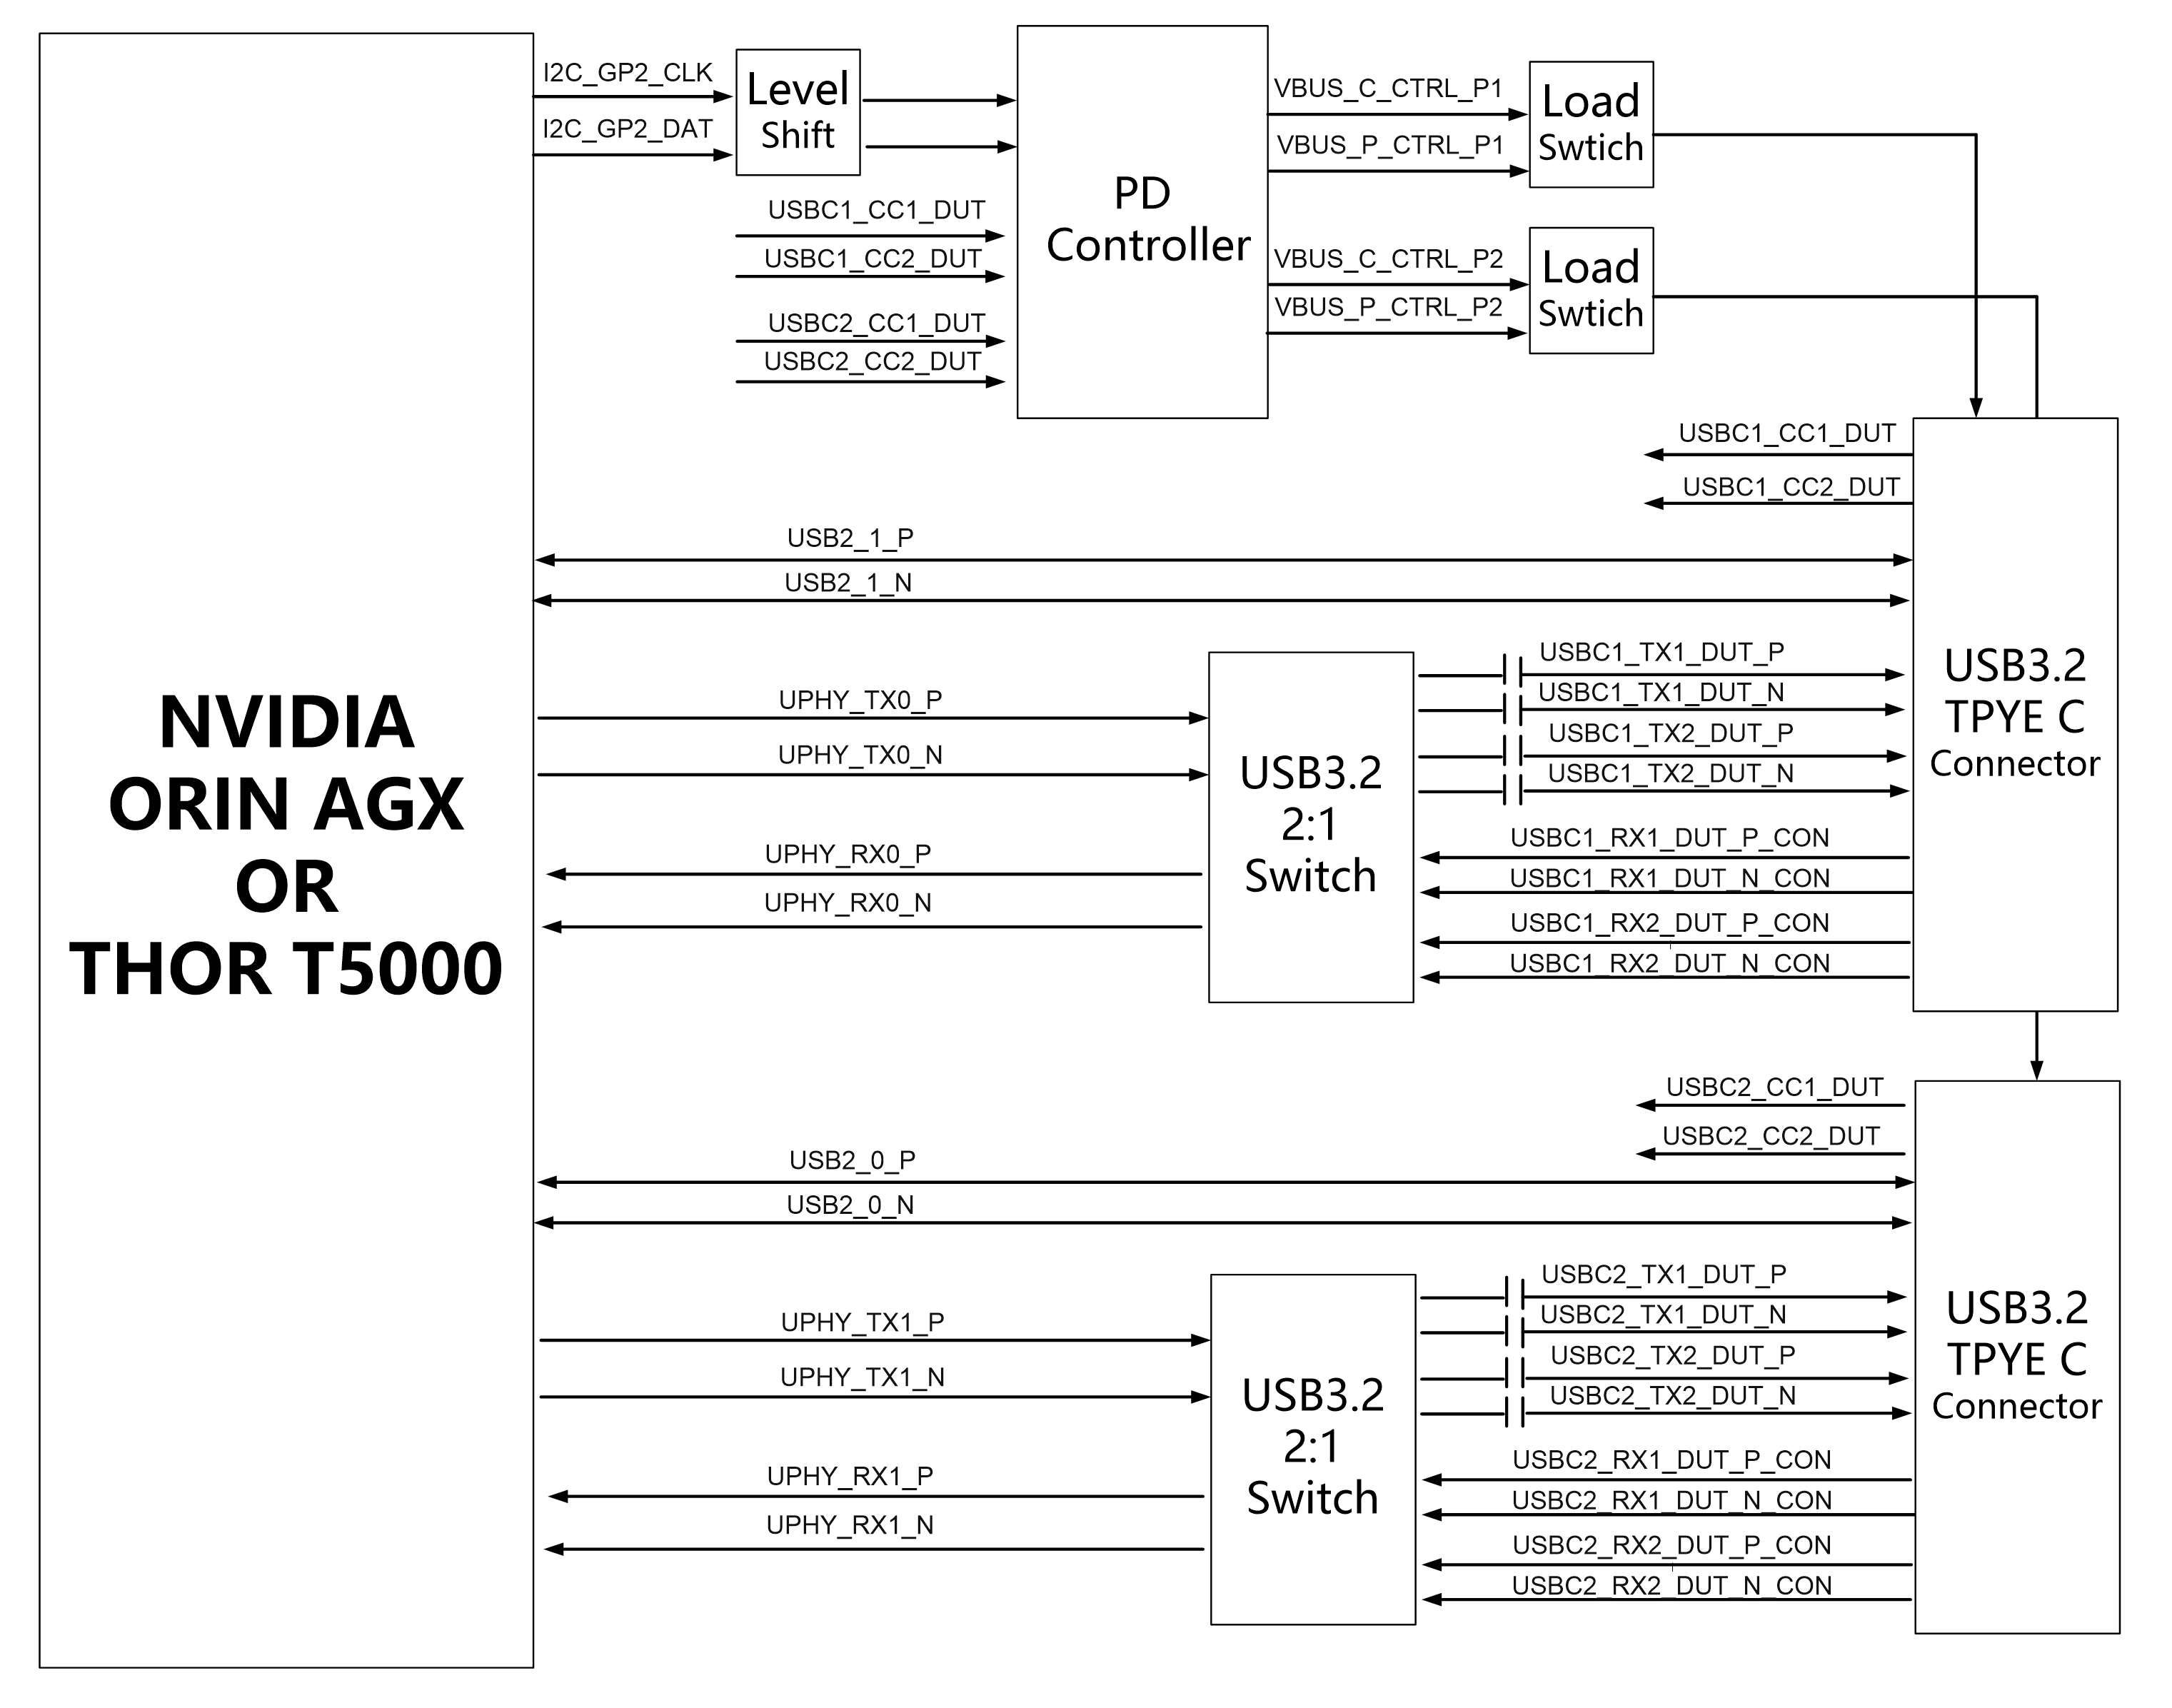
Figure 3.5.1 - USB3.2 Interface Diagram
USB3.2 interface pin assignment:
| Pin # | Signal Name | Pin Name | Description | Direction |
| A23 | UPHY_RX0_N | HS_UPHY0_L0_RX_N | UPHY block 0, Receive Lane 0 | Input |
| A22 | UPHY_RX0_P | HS_UPHY0_L0_RX_P | Input | |
| J23 | UPHY_TX0_N | HS_UPHY0_L0_TX_N | UPHY block 0, Transmit Lane 0 | Output |
| J22 | UPHY_TX0_P | HS_UPHY0_L0_TX_P | Output | |
| F13 | USB0_N | HS_USB0_P0_N | USB 2.0 Port 0 Data | Bidir |
| F12 | USB0_P | HS_USB0_P0_P | Bidir | |
| C22 | UPHY_RX1_N | HS_UPHY0_L1_RX_N | UPHY block 0, Receive Lane 1 | Input |
| C23 | UPHY_RX1_P | HS_UPHY0_L1_RX_P | Input | |
| G22 | UPHY_TX1_N | HS_UPHY0_L1_TX_N | UPHY block 0, Transmit Lane 1 | Output |
| G23 | UPHY_TX1_P | HS_UPHY0_L1_TX_P | Output | |
| C10 | USB1_N | HS_USB2_P1_N | USB 2.0, Port 1 Data | Bidir |
| C11 | USB1_P | HS_USB2_P1_P | Bidir | |
| J61 | I2C_GP2_CLK | I2C2_CLK | General I2C 2 clock | Bidir |
| K61 | I2C_GP2_DAT | I2C2_DAT | General I2C 2 Data | Bidir |
| E56 | I2C_INT_CCG4 | SPI3_CS1_N | General I2C interrupt | Input |
Table 3.5.1 - USB3.2 Pin Configuration
3.6 10GbE Ethernet Interface (AGX Only)
When using the AGX ORIN module, the expansion board provides 1 10GbE Ethernet port. The Multi-Gigabit Ethernet (MGBE) of the AGX ORIN module is connected to a Marvell 10Gbps Ethernet PHY chip. The AQR113C is a quad-channel 10GBASE-T Ethernet PHY chip that supports 10 Gbps Ethernet transmission over twisted-pair cables (Cat6a/Cat7), and is backward compatible with 5 Gbps, 2.5 Gbps, 1 Gbps, and 100 Mbps. The MDI signals output by the AQR113C are directly connected to the RJ45 connector. Figure 3.6.1 shows the Ethernet connection diagram:
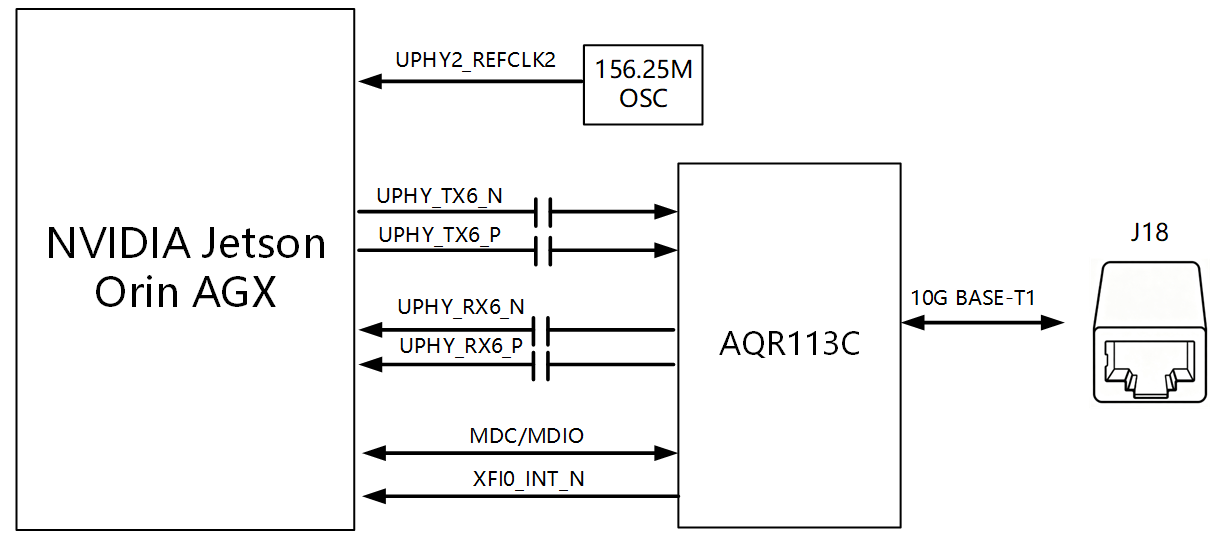
Figure 3.6.1 - Ethernet Connection Diagram
The NVIDIA Jetson Orin AGX 10GbE Ethernet pin assignment is as follows:
| Pin # | Signal Name | Pin Name | Description | Direction |
| K16 | UPHY_TX6_N | HS_UPHY2_L4_TX_N | UPHY block 2, Transmit Lane 4 | Output |
| K17 | UPHY_TX6_P | HS_UPHY2_L4_TX_P | Output | |
| B17 | UPHY_RX6_N | HS_UPHY2_L4_RX_N | UPHY block 2, Receive Lane 4 | Input |
| B16 | UPHY_RX6_P | HS_UPHY2_L4_RX_P | Input | |
| H51 | GPIO26_XFI0_MDC | GPIO26 | MGBE C0 Management Clock | Bidir |
| K49 | GPIO25_XFI0_MDIO | GPIO25 | MGBE C0 Management Data | Bidir |
| C57 | XFI0_INT_N | SPI3_CS0_N | MGBE C0 interrupt signal | Input |
| F29 | UPHY_REFCLK2_N | HS_UPHY2_REFCLK2_N | This is the REFCLK for MGBE. | Input |
| F28 | UPHY_REFCLK2_P | HS_UPHY2_REFCLK2_P | Input |
Table 3.6.1 - NVIDIA Jetson Orin AGX 10GbE Ethernet Pin Assignment
3.7 5G Ethernet Interface (THOR Only)
When using the THOR T5000 module, the expansion board provides 1 5Gbps Ethernet port. The THOR T5000 module achieves 5G Gigabit communication through a PCIe network controller (NIC). The 5G Ethernet chip is the Realtek RTL8126. The RTL8126 is a quad-channel 10GBASE-T Ethernet PHY chip that supports 10 Gbps Ethernet over twisted-pair cables (Cat6a/Cat7), and is backward compatible with 5 Gbps, 2.5 Gbps, 1 Gbps, and 100 Mbps. The MDI signals output by the RTL8126 are directly connected to the RJ45 connector. Figure 3.7.1 shows the Ethernet connection diagram:
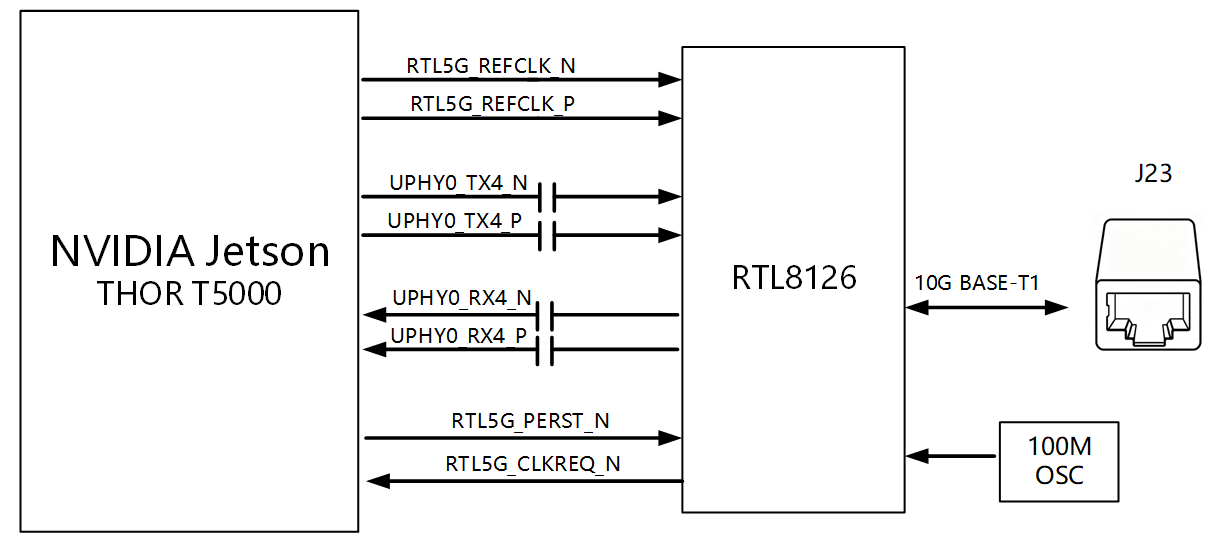
Figure 3.7.1 - Ethernet Connection Diagram
The NVIDIA Jetson THOR T5000 5G Ethernet pin assignment is as follows:
| Pin # | Signal Name | Pin Name | Description | Direction |
| E15 | RTL5G_REFCLK_P | UPHY_REFCLK5_P | PCIe output Reference Clock for controller #2 | Output |
| E14 | RTL5G_REFCLK_N | UPHY_REFCLK5_N | Output | |
| B21 | UPHY_RX2_P | UPHY_RX2_P | Differential Receive Data Pair | Input |
| B20 | UPHY_RX2_N | UPHY_RX2_N | Input | |
| K21 | UPHY_TX2_P | UPHY_TX2_P | Differential Transmit Data Pair | Output |
| K20 | UPHY_TX2_N | UPHY_TX2_N | Output | |
| D10 | RTL5G_PERST_N | PEX_C2_RST_N | PCIe Reset for controller #2 | Output |
| E11 | RTL5G_CLKREQ_N | PEX_C2_CLKREQ_N | PCIe Clock Request for controller #2 | Input |
Table 3.7.1 - NVIDIA Jetson THOR T5000 5G Ethernet Pin Assignment
3.8 TF Card (AGX Only)
The HEA47 board has a TF card slot on the ORIN AGX system side. The AGX SDMMC controller connects directly to the TF card through the SDIO interface. The schematic of the AGX module and the TF card connector is shown in the following figure.
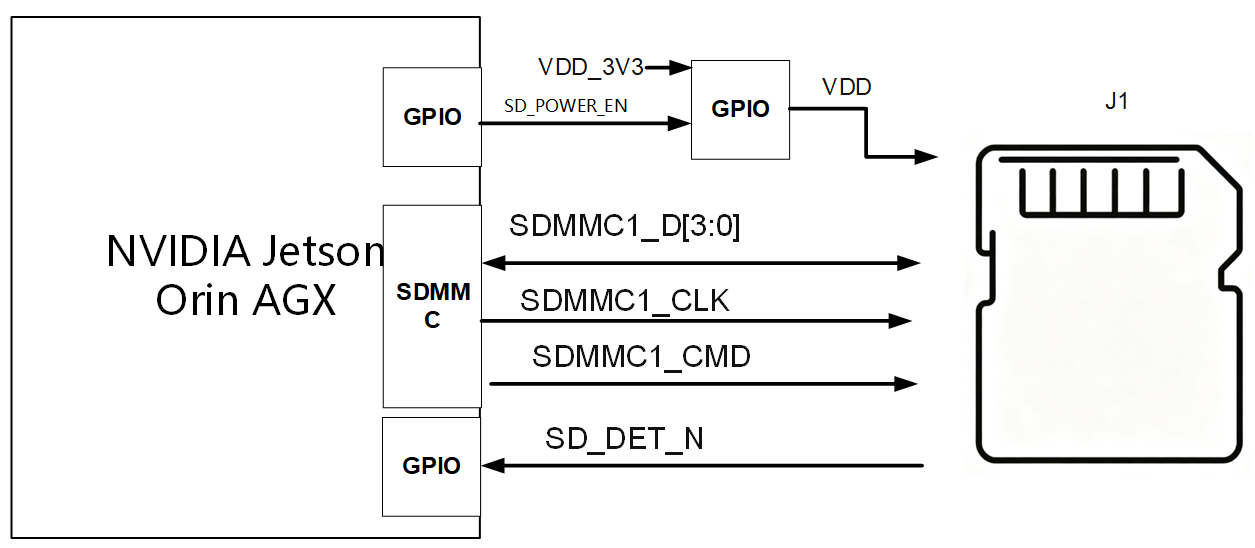
Figure 3.8.1 - TF Card Connection Diagram
The NVIDIA Jetson Orin AGX TF card pin assignment is as follows:
| Pin # | Signal Name | Pin Name | Description | Direction |
| B6 | SDMMC1_CLK | SDCARD_CLK | SD Card (or SDIO) Clock | Output |
| A5 | SDMMC1_CMD | SDCARD_CMD | SD Card (or SDIO) Command | Bidir |
| E8 | SDMMC1_D0 | SDCARD_D0 | SD Card (or SDIO) Data 0 | Bidir |
| F8 | SDMMC1_D1 | SDCARD_D1 | SD Card (or SDIO) Data 1 | Bidir |
| A4 | SDMMC1_D2 | SDCARD_D2 | SD Card (or SDIO) Data 2 | Bidir |
| D6 | SDMMC1_D3 | SDCARD_D3 | SD Card (or SDIO) Data 3 | Bidir |
| L6 | SD_DET_N | GPIO02 | GPIO #2 pr SD Card Card Detect | Bidir |
| A7 | SD_POWER_EN | GPIO29 | GPIO #29, I2S, or SD Card Write Protect | Bidir |
Table 3.8.1 - NVIDIA Jetson Orin AGX TF Card Pin Assignment
3.9 PCIe x8 Interface
The ORIN AGX/THOR system and the FPGA RFSOC are connected via PCIe Gen3 x8 for PCIe data communication. By default, the NVIDIA AGX/THOR acts as the RC master and the RFSOC acts as the EP slave. Figure 3.9.1 shows the PCIe hardware connection diagram between the AGX/THOR module and the RFSOC.
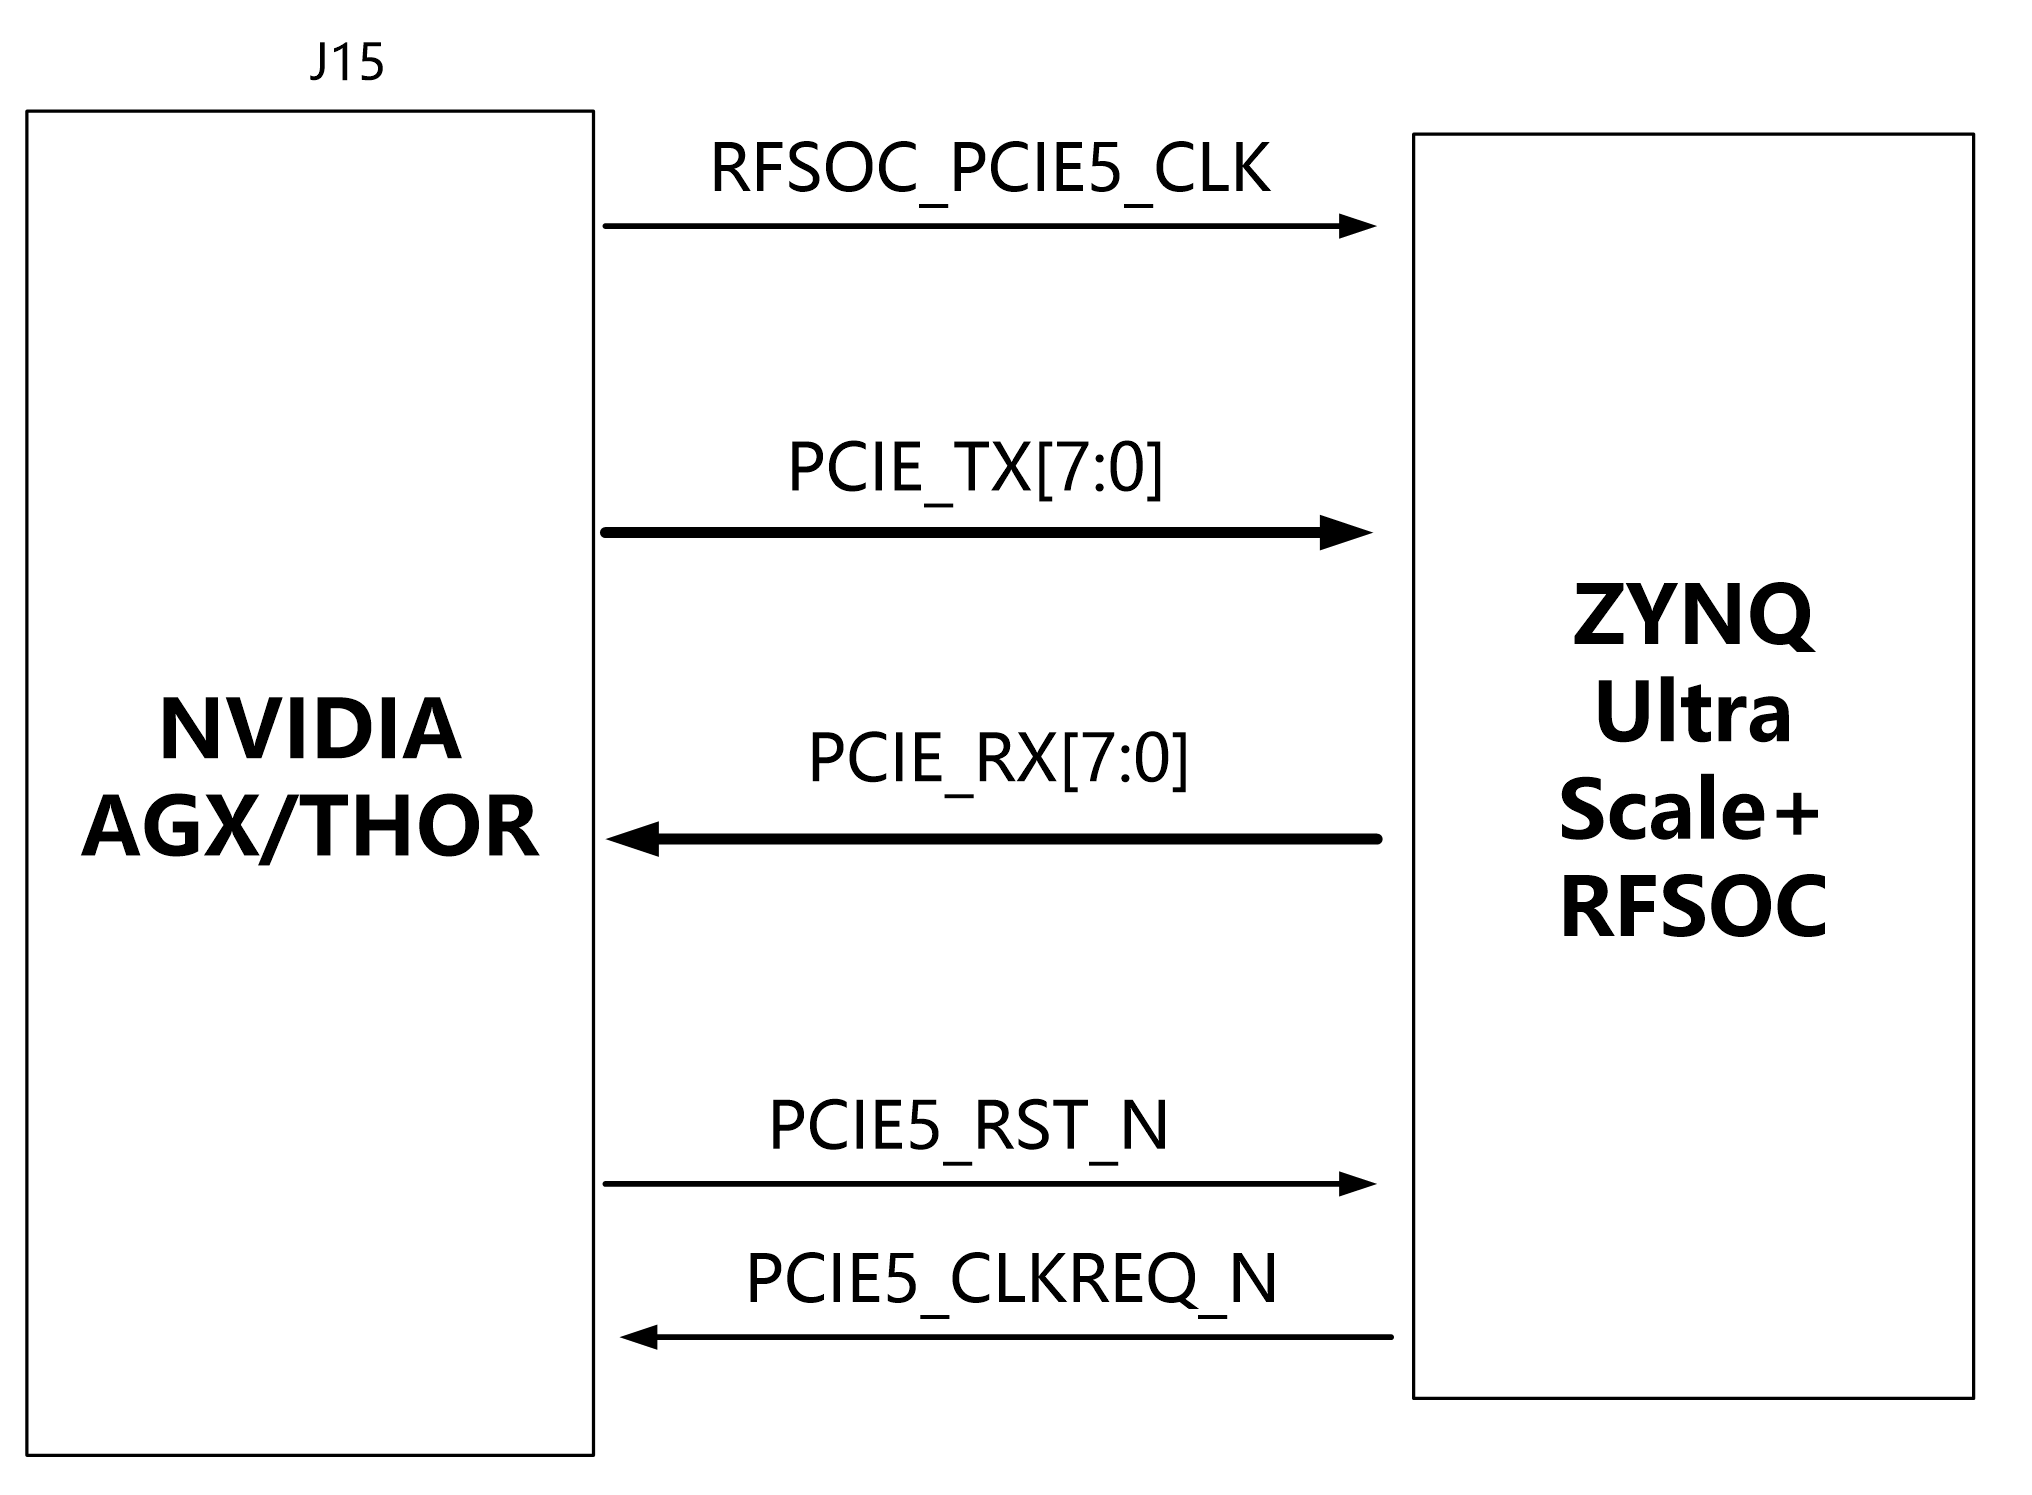
Figure 3.9.1 - PCIe Gen3 x8 Connection Diagram
The NVIDIA Jetson Orin AGX/THOR PCIe x8 pin assignment is as follows:
| Pin # | Signal Name | Pin Name | Description | Direction |
| D25 | PCIE_RX0_N | UPHY_RX12_N | UPHY block 1, Receive Lane 0 | Input |
| D24 | PCIE_RX0_P | UPHY_RX12_P | Input | |
| B24 | PCIE_RX1_N | UPHY_RX13_N | UPHY block 1, Receive Lane 1 | Input |
| B25 | PCIE_RX1_P | UPHY_RX13_P | Input | |
| C26 | PCIE_RX2_N | UPHY_RX14_N | UPHY block 1, Receive Lane 2 | Input |
| C27 | PCIE_RX2_P | UPHY_RX14_P | Input | |
| A27 | PCIE_RX3_N | UPHY_RX15_N | UPHY block 1, Receive Lane 3 | Input |
| A26 | PCIE_RX3_P | UPHY_RX15_P | Input | |
| D29 | PCIE_RX4_N | UPHY_RX16_N | UPHY block 1, Receive Lane 4 | Input |
| D28 | PCIE_RX4_P | UPHY_RX16_P | Input | |
| B28 | PCIE_RX5_N | UPHY_RX17_N | UPHY block 1, Receive Lane 5 | Input |
| B29 | PCIE_RX5_P | UPHY_RX17_P | Input | |
| C30 | PCIE_RX6_N | UPHY_RX18_N | UPHY block 1, Receive Lane 6 | Input |
| C31 | PCIE_RX6_P | UPHY_RX18_P | Input | |
| A31 | PCIE_RX7_N | UPHY_RX19_N | UPHY block 1, Receive Lane 7 | Input |
| A30 | PCIE_RX7_P | UPHY_RX19_P | Input | |
| H25 | PCIE_TX0_N | UPHY_TX12_N | UPHY block 1, Transmit Lane 0 | Output |
| H24 | PCIE_TX0_P | UPHY_TX12_P | Output | |
| K24 | PCIE_TX1_N | UPHY_TX13_N | UPHY block 1, Transmit Lane 1 | Output |
| K25 | PCIE_TX1_P | UPHY_TX13_P | Output | |
| G26 | PCIE_TX2_N | UPHY_TX14_N | UPHY block 1, Transmit Lane 2 | Output |
| G27 | PCIE_TX2_P | UPHY_TX14_P | Output | |
| J27 | PCIE_TX3_N | UPHY_TX15_N | UPHY block 1, Transmit Lane 3 | Output |
| J26 | PCIE_TX3_P | UPHY_TX15_P | Output | |
| H29 | PCIE_TX4_N | UPHY_TX16_N | UPHY block 1, Transmit Lane 4 | Output |
| H28 | PCIE_TX4_P | UPHY_TX16_P | Output | |
| K28 | PCIE_TX5_N | UPHY_TX17_N | UPHY block 1, Transmit Lane 5 | Output |
| K29 | PCIE_TX5_P | UPHY_TX17_P | Output | |
| G30 | PCIE_TX6_N | UPHY_TX18_N | UPHY block 1, Transmit Lane 6 | Output |
| G31 | PCIE_TX6_P | UPHY_TX18_P | Output | |
| J31 | PCIE_TX7_N | UPHY_TX19_N | UPHY block 1, Transmit Lane 7 | Output |
| J30 | PCIE_TX7_P | UPHY_TX19_P | Output | |
| C8 | PCIE5_CLKREQ_N | PEX_C5_CLKREQ_N | PCIe Clock Request for controller #5 | Input |
| H10 | PCIE5_RST_N | PEX_C5_RST_N | PCIe Reset for controller #5 | Output |
Table 3.9.1 - NVIDIA AGX/THOR PCIe x8 Pin Assignment
3.10 EEPROM
The HEA47 board has an EEPROM chip on the ORIN AGX/THOR system side, used to store board ID information or configuration data. The chip is a 24AA04 I/SN with a capacity of 4 Kbit, connected to the NVIDIA Jetson AGX/THOR module via the I2C bus. The pin assignment for EEPROM communication with the AGX/THOR module is as follows:
| Pin # | Signal Name | Pin Name | Description | Direction |
| K5 | I2C1_CLK | GP126_I2C1_CLK | I2C1_CLK | Output |
| L8 | I2C1_DAT | GP127_I2C1_DAT | I2C1_DAT | Bidir |
Table 3.10.1 - EEPROM Communication Pin Assignment with the NVIDIA AGX/THOR Module
3.11 40-Pin Connector
The HEA47 board has a 40-pin connector on the ORIN AGX/THOR system side, used to expand the GPIO or peripheral interfaces of the AGX/THOR. The 40-pin connector expands 2 I2C buses, 2 SPI buses, 1 UART, 2 CAN buses, 1 I2S, 2 PWM signals, and several GPIOs. All signals are connected to the AGX/THOR module through bidirectional level-shift chips, and the default I/O level on the connector is 3.3V. The pin assignment for communication between the 40-pin connector and the AGX/THOR module is as follows:
| 40-Pin # | Signal Name | Description | 40-Pin # | Signal Name | Description |
| 1 | VDD_3V3 | +3.3V Power | 2 | VDD_5V | +5V Power |
| 3 | I2C_GP8_DAT_LVS | I2C GP8 Data | 4 | VDD_5V | +5V Power |
| 5 | I2C_GP8_CLK_LVS | I2C GP8 Clock | 6 | GND | Ground |
| 7 | MCLK05_LVS | MCLK05 | 8 | UART1_TX_LVS | UART1 TXD transmit |
| 9 | GND | Ground | 10 | UART1_RX_LVS | UART1 RXD receive |
| 11 | UART1_RTS_LVS | UART1 RTS | 12 | I2S2_SCLK_LVS | I2S2 SCLK clock |
| 13 | PWM1_40PIN_LVS | PWM1 control signal | 14 | GND | Ground |
| 15 | PWM2_40PIN_LVS | PWM2 control signal | 16 | GPIO8_DMIC3_DAT_40PIN | GPIO8 |
| 17 | VDD_3V3 | +3.3V Power | 18 | PWM3_40PIN_LVS | PWM3 control signal |
| 19 | SPI_MOSI_LVS | SPI MOSI | 20 | GND | Ground |
| 21 | SPI_MISO_LVS | SPI MISO | 22 | GPIO_40PIN_LVS | GPIO signal |
| 23 | SPI_SCK_LVS | SPI SCK clock signal | 24 | SPI_CS0_LVS | SPI CS0 chip select |
| 25 | GND | Ground | 26 | SPI_CS1_LVS | SPI CS1 chip select |
| 27 | I2C_GP2_DAT_LVS | I2C GP2 Data | 28 | I2C_GP2_CLK_LVS | I2C GP2 Clock |
| 29 | CAN0_DIN | CAN0 Data Input | 30 | GND | Ground |
| 31 | CAN0_DOUT | CAN0 Data Output | 32 | GPIO9_DMIC3_CLK_40PIN | GPIO9 |
| 33 | CAN1_DOUT | CAN1 Data Output | 34 | GND | Ground |
| 35 | I2S2_FS_LVS | I2S2 FS frame sync | 36 | UART1_CTS_LVS | UART1 CTS |
| 37 | CAN1_DIN | CAN1 Data Input | 38 | I2S2_DIN_LVS | I2S2 Data Input |
| 39 | GND | Ground | 40 | I2S2_DOUT_LVS | I2S2 Data output |
Table 3.11.1 - 40-pin Pin Assignment
Chapter 4: Power Supply
The HEA47 development board is powered by +12V (25A). The 12V supply directly powers the RFSOC SoM through a MOSFET switch, and the switch signal is controlled by VIN_POW_ON output from the MCU. The 12V and 5V supplies for the AGX/THOR module are also controlled by VIN_POW_ON.
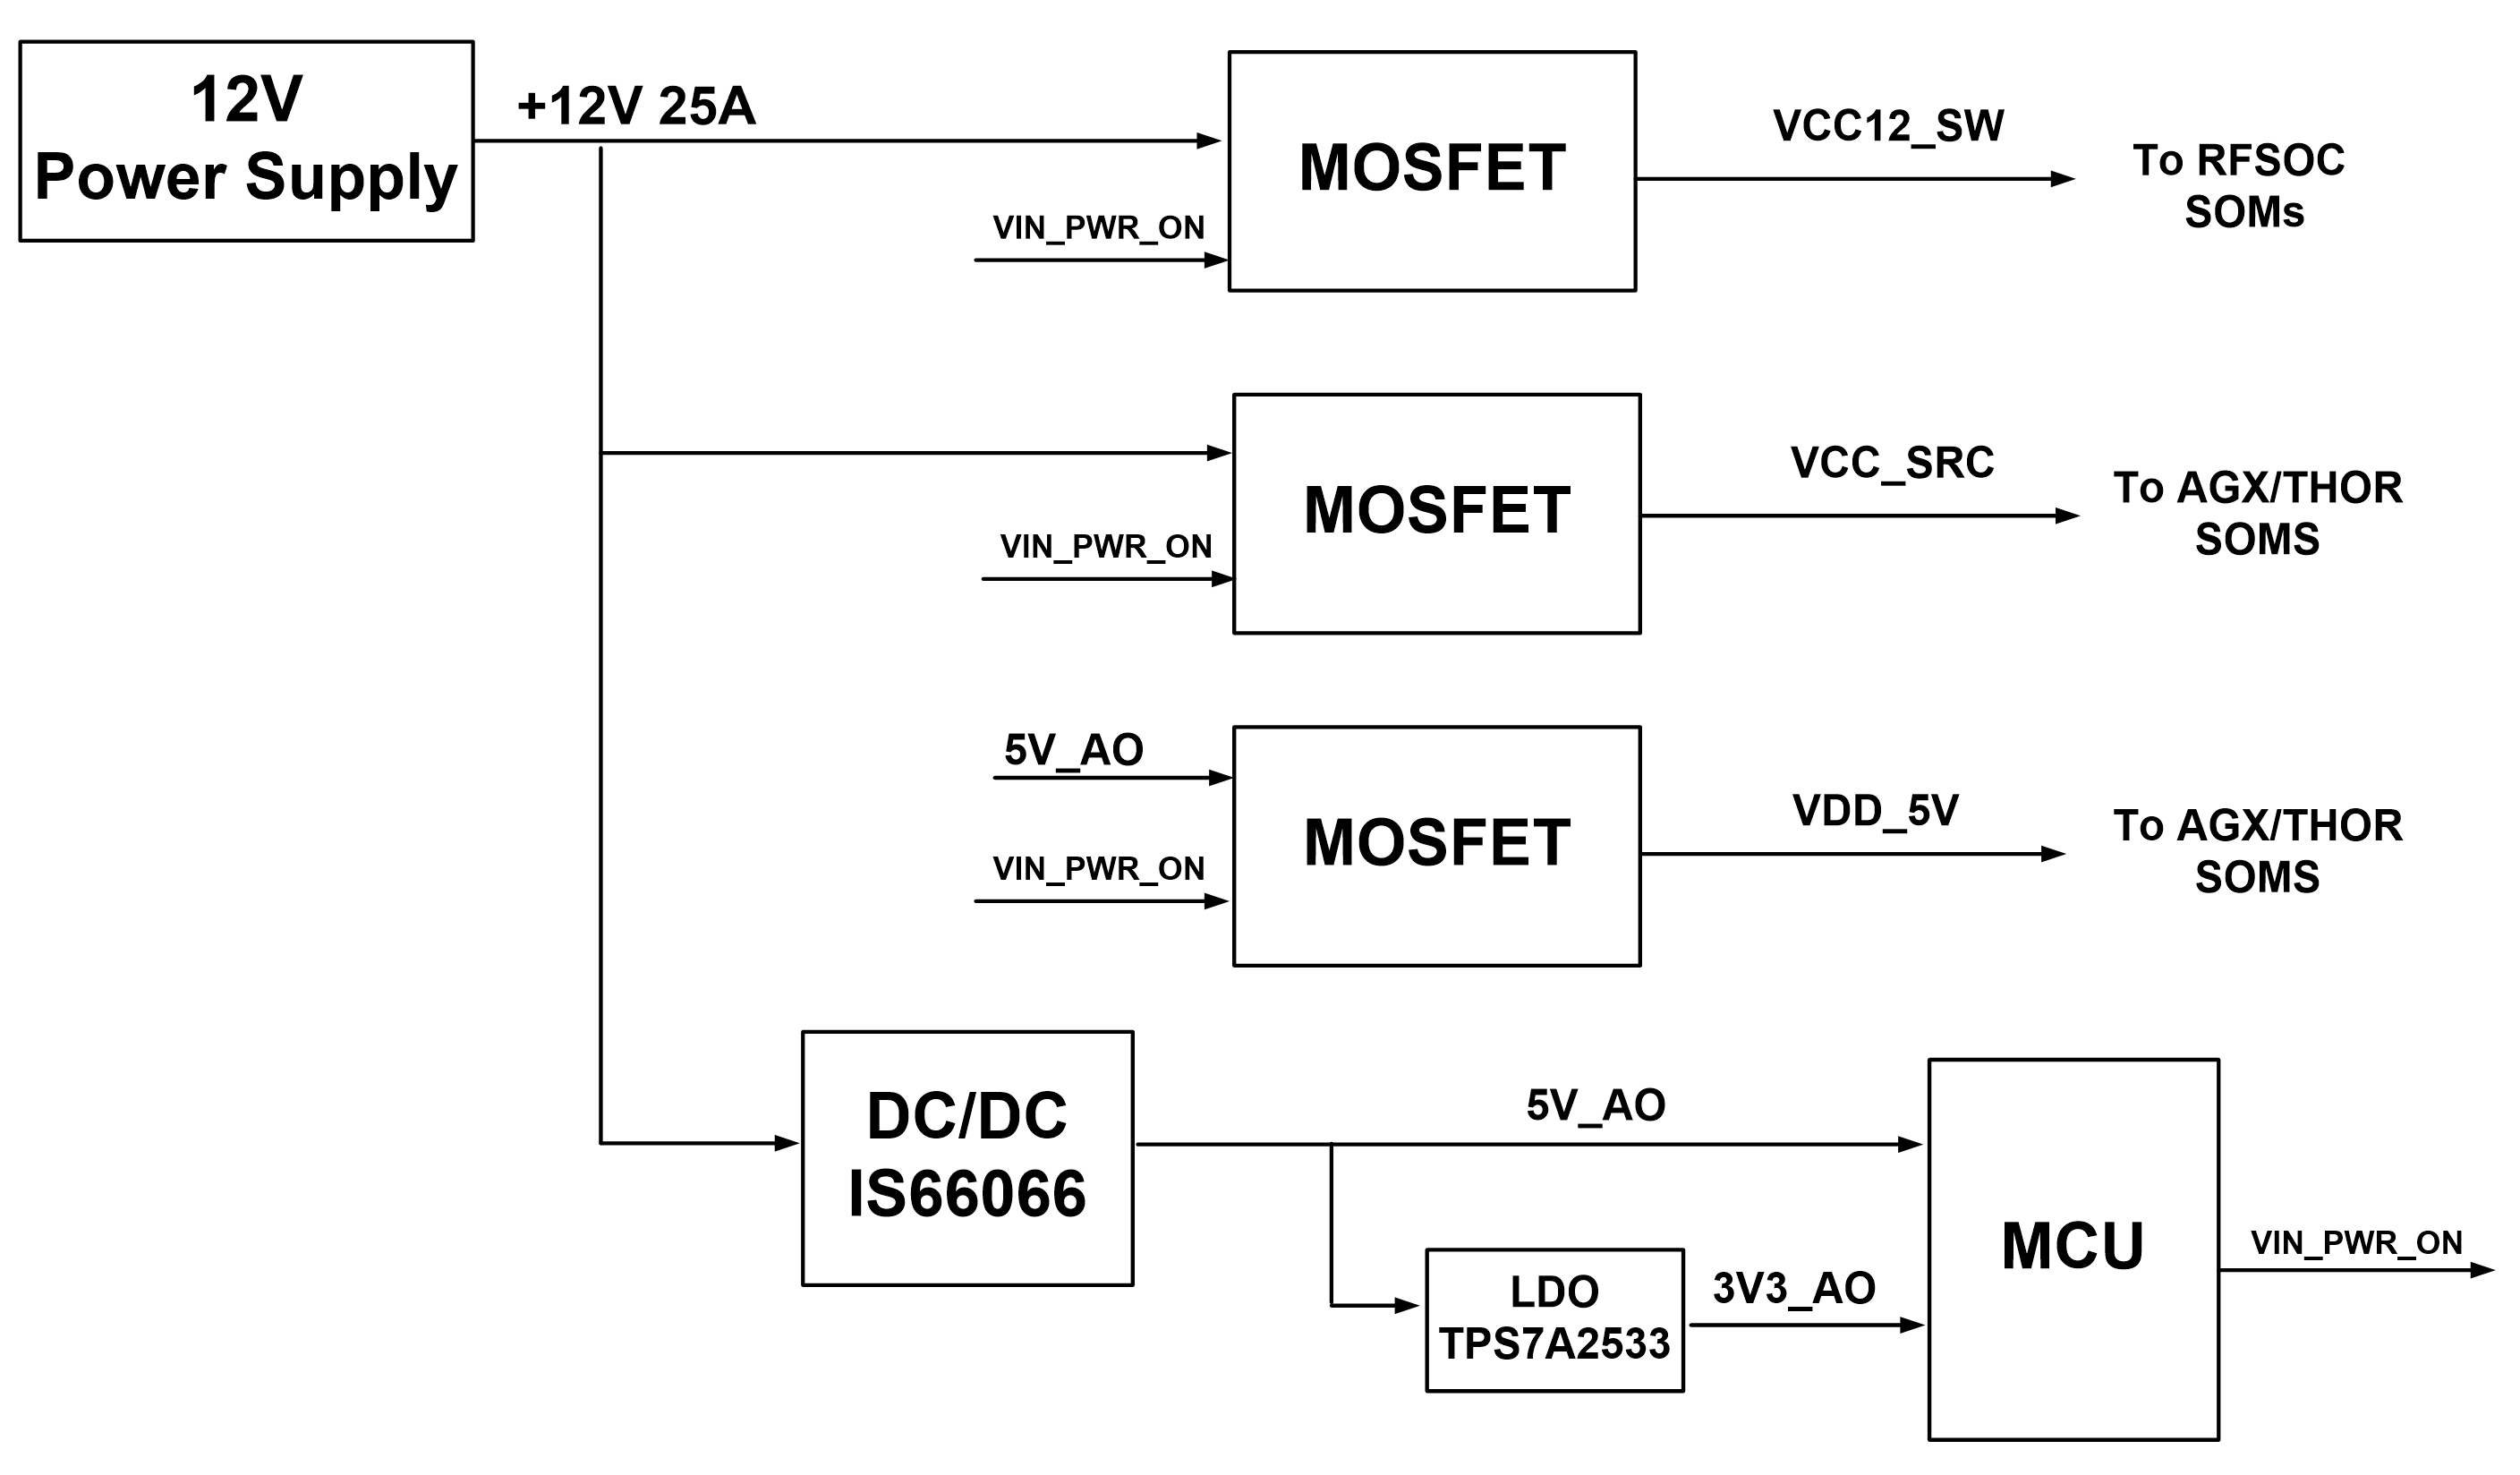
Figure 4.1.1 - 12V and 5V Power Supply Design Diagram
The MCU chip on the HEA47 carrier board controls the power-up sequence of the entire board. This design is consistent with the AGX/THOR demo board. The MCU circuit design is as follows:
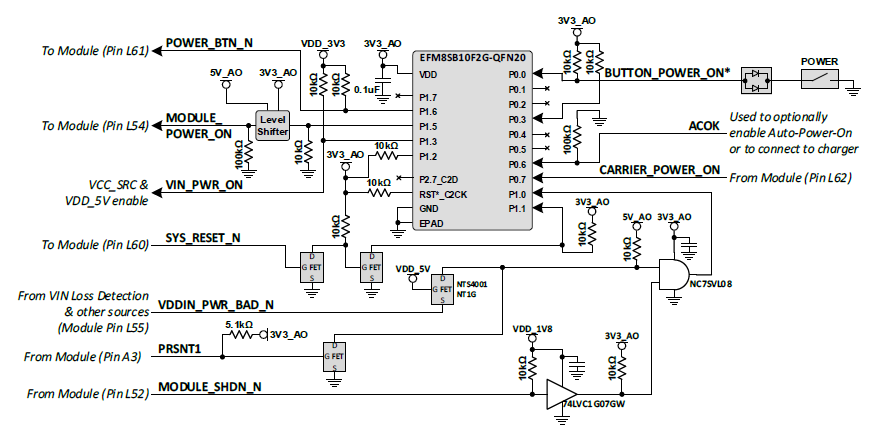
Figure 4.1.2 - MCU Control Block Diagram
- Power-UpWhen the POWER button is pressed, the MCU drives VIN_PWR_ON high to start supplying power to the AGX/THOR module. Then the MODULE_POWER_ON signal goes high to notify the AGX/THOR module to boot. After the AGX/THOR module completes booting, it drives the CARRIER_POWER_ON signal high. The CARRIER_POWER_ON signal enables the on-board 3.3V, 1.8V, and other power rails, and the peripherals begin to power up.
- Power-Down
When the POWER button is pressed for more than 10 seconds, the MCU drives MODULE_POWER_ON low, and the AGX/THOR module begins to power down. At the same time, the AGX/THOR module drives CARRIER_POWER_ON low, cutting power to the peripheral circuits. Then the MCU drives VIN_PWR_ON low.
The detailed power-up and power-down sequence of the HEA47 is as follows:
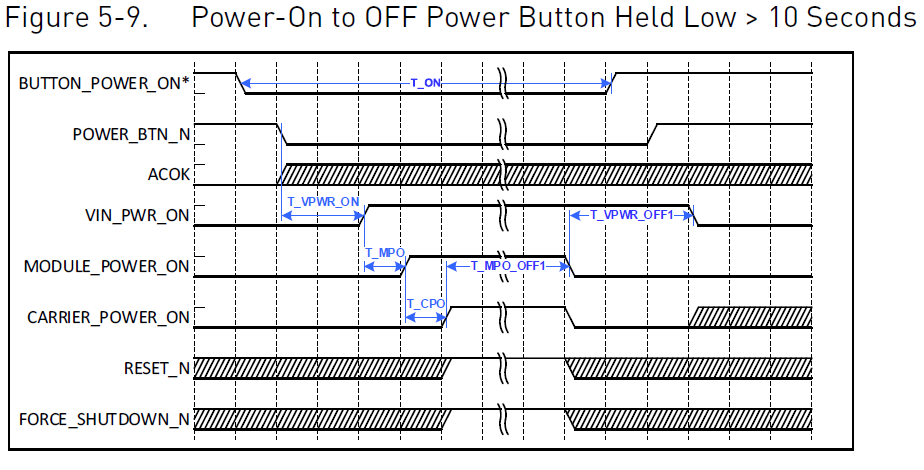
Figure 4.1.3 - Power-Up and Power-Down Sequence Diagram
Chapter 5: Power Button
The HEA47 development board has 1 power switch button, which is a self-resetting button with an LED. The button signal BUTTOM_POWER_ON_N is connected to pin P0.0 of the MCU. The user can use this switch to control the power-up and power-down of the board.
To power up, press the power switch once. To power down, press and hold the power switch (for more than 10 seconds). If the AGX/THOR module is not installed and the user needs to debug the RFSOC functionality standalone, a jumper cap must be installed on J22 to pull MCU pin P0.3 low, so that the MCU powers up the board independently. If the AGX/THOR module is present, the jumper cap J22 should not be installed.
Chapter 6: Mechanical Dimensions
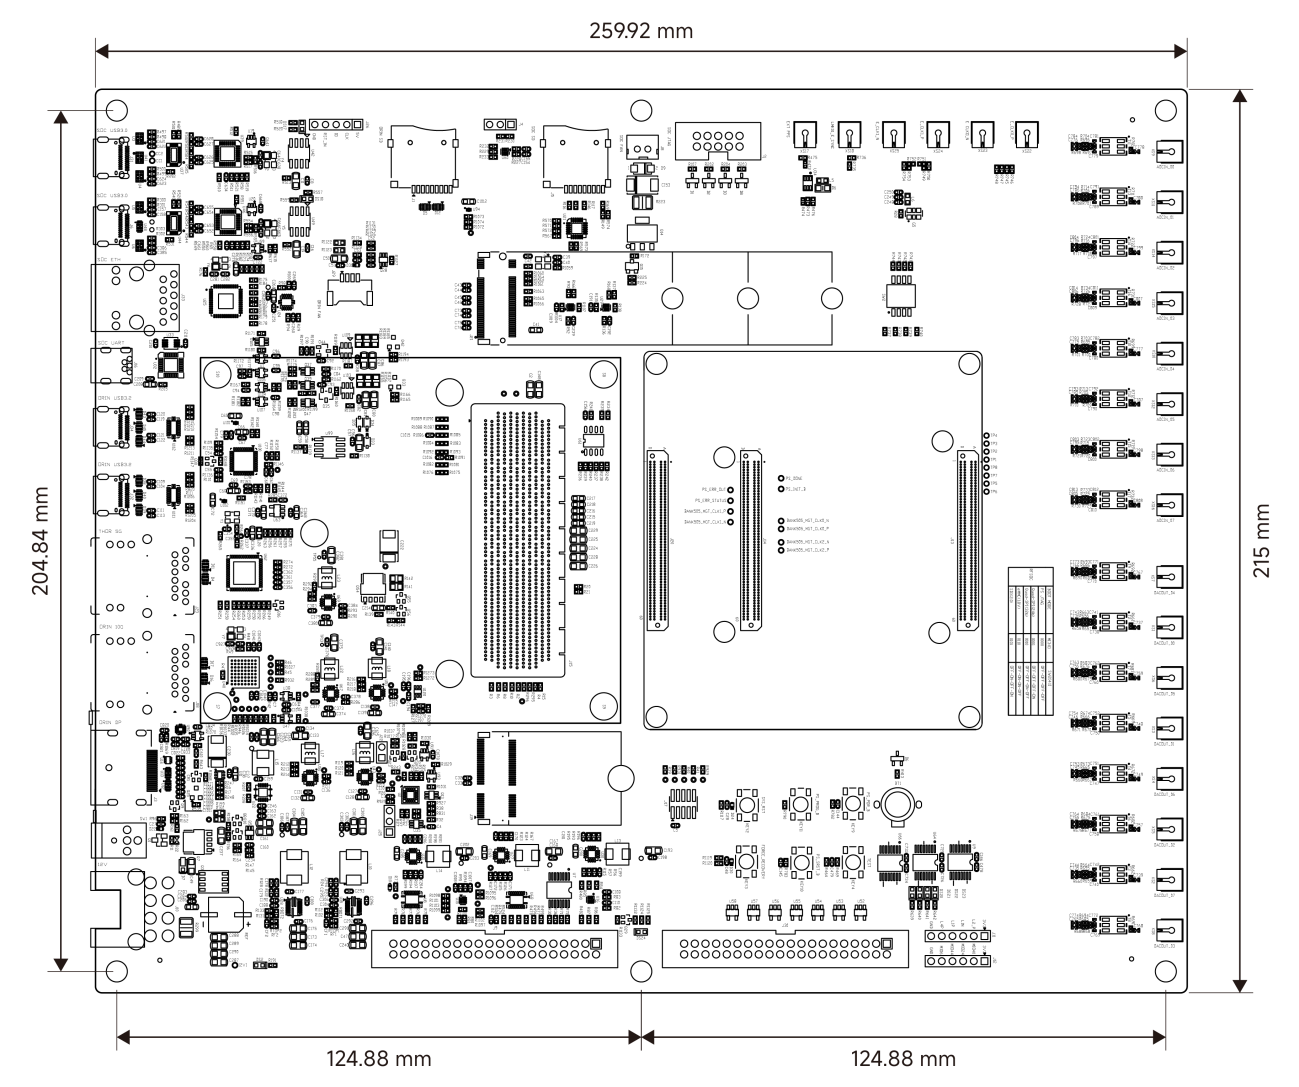
Figure 6.1.1 - Top View
Appendix: List of Abbreviations
| Abbreviation | Full English Name | Description |
| PS | Processor System | The processing subsystem in an SoC, typically including CPU cores, memory controllers, and peripheral interfaces for running software and operating systems. |
| PL | Programmable Logic | User-configurable FPGA logic resources used to implement custom digital circuits, interface controllers, and hardware acceleration functions. |
| SOC | System on Chip | An integrated circuit that combines processors, memory controllers, peripheral interfaces, and other system functions on a single chip. |
| DDR3 | Double Data Rate 3 SDRAM | A third-generation synchronous dynamic memory technology that transfers data on both edges of the clock signal and is commonly used as system memory. |
| eMMC | Embedded Multi Media Card | An embedded non-volatile storage device that integrates NAND Flash memory and a storage controller in a single package. |
| QSPI | Quad Serial Peripheral Interface | A high-speed serial interface that uses four data lines and is commonly used to connect NOR Flash devices for boot or configuration storage. |
| GTP | Gigabit Transceiver | A high-speed serial transceiver integrated in an FPGA for transmitting and receiving data at multi-gigabit rates. |
| UART | Universal Asynchronous Receiver/Transmitter | An asynchronous serial communication interface that transmits and receives data through TX and RX signal lines. |
| HDMI | High-Definition Multimedia Interface | A digital multimedia interface used to transmit high-definition video and audio signals between source and display devices. |
| PCIe | Peripheral Component Interconnect Express | A high-speed serial expansion bus standard used for communication between processors and devices such as FPGAs, GPUs, and SSDs. |
| USB | Universal Serial Bus | A standard serial interface used for data communication, peripheral connection, and power delivery between electronic devices. |
| JTAG | Joint Test Action Group | A standardized interface used for device testing, boundary scan, FPGA programming, and processor or system debugging. |
| SFP | Small Form-factor Pluggable | A compact, hot-pluggable transceiver interface used for optical or electrical network communication. |
| MIO | Multiplexed I/O | Multiplexed processor I/O pins in an SoC that can be configured for functions such as UART, I2C, SPI, or GPIO. |
| GPHY | Gigabit Ethernet PHY | A Gigabit Ethernet physical-layer transceiver that converts digital Ethernet data into electrical signals for transmission over a physical network medium. |
| I2C | Inter-Integrated Circuit | A two-wire serial communication bus using SDA and SCL lines, commonly used to connect sensors, EEPROMs, and peripheral devices. |
| RGMII | Reduced Gigabit Media Independent Interface | A reduced-pin-count interface between an Ethernet MAC and PHY that supports 10, 100, and 1000 Mbps Ethernet communication. |
| RMII | Reduced Media Independent Interface | A reduced-pin-count interface between an Ethernet MAC and PHY, mainly used for 10 and 100 Mbps Ethernet communication. |
| LED | Light Emitting Diode | A semiconductor device that emits light when electrically driven and is commonly used for power, status, and fault indication. |
| LVDS | Low-Voltage Differential Signaling | A high-speed differential signaling standard that provides low power consumption, low noise, and strong resistance to electromagnetic interference. |
Contact information
Alinx Electronic Limited
Company Website: www.en.alinx.com
Service Hotline: +86 21 67676997
Technical Support:technical@alinx.com